【flutter】制作明信片
头像区域
CircleAvatar
CircleAvatar 用户头像组件 radius属性设置头像大小, backgroundImage设置用户头像。
在这里设置的图像为静态图像AssetImage,从本地imags文件夹中加载。
引入静态图像资源
设置静态图像需要在yaml文件中配置图像的路径。
首先在工程中创建一个images文件夹,把需要的图片资源放进去。这里资源名称为shanhu.jpeg。
之后再yaml文件中配置图片的路径。可以把图片或者整个文件夹配置进去。
flutter:
  uses-material-design: true

  assets:
    - images/
    - images/shanhu.jpeg
void main() {
runApp(MyApp());
}
class MyApp extends StatelessWidget {
// This widget is the root of your application.
Widget build(BuildContext context) {
return MaterialApp(
home: Scaffold(
backgroundColor: Colors.teal,
body: SafeArea(
child: Column(
children: [
const CircleAvatar(
radius: 50,
backgroundImage: AssetImage('images/shanhu.jpeg'),
),
const Text(
'珊瑚宫星海',
style: TextStyle(
color: Colors.white,
fontSize: 40,
fontWeight: FontWeight.bold,
),
)
],
)),
),
);
}
}
字体设置
下载字体
下载一个自己喜欢的字体,放在工程目录的fonts文件夹中,字体文件一般的格式为 文件名.ttf。
配置yaml文件
在yaml文件中写入以下配置, 其中family替换为自己的字体名,asset替换为自己的字体文件名
flutter:
  fonts:
    - family: AaJianHaoTi
      fonts:
        - asset: fonts/AaJianHaoTi.ttf
语法检查关闭
flutter中有一些对于const的语法检查,会有大段的波浪线,可以在analysis_options.yaml文件中设置关闭,根据编辑器提示的语法检查名称,
将这一项设置为false即可关闭。
linter:
  rules:
    prefer_const_literals_to_create_immutables : false
文字区域
引入自带图标
图标库网址:https://fluttericon.cn/ 在这里寻找自己需要的图标,使用Icons类引入自带的图标。
void main() {
runApp(MyApp());
}
class MyApp extends StatelessWidget {
// This widget is the root of your application.
Widget build(BuildContext context) {
return MaterialApp(
home: Scaffold(
backgroundColor: Colors.teal,
body: SafeArea(
child: Column(
children: [
const CircleAvatar(
radius: 50,
backgroundImage: AssetImage('images/shanhu.jpeg'),
),
const Text(
'珊瑚宫星海',
style: TextStyle(
fontFamily: 'AaJianHaoTi',
color: Colors.white,
fontSize: 40,
fontWeight: FontWeight.bold,
),
),
const Text(
'Flutter Developer',
style: TextStyle(
fontFamily: 'AaJianHaoTi',
color: Color(0xFFB2DFDB),
fontSize: 20,
letterSpacing: 2.5,
fontWeight: FontWeight.bold,
),
),
Container(
color: Colors.white,
margin: EdgeInsets.symmetric(vertical: 10, horizontal: 25),
padding: EdgeInsets.all(10),
child: Row(
children: [
const Icon(
Icons.phone_android,
color: Colors.teal,
),
const SizedBox(
width: 10,
),
const Text(
'+86 130111112222',
style: TextStyle(
color: Colors.teal,
fontFamily: 'AaJianHaoTi',
fontSize: 20,
),
),
],
),
),
Container(
color: Colors.white,
margin: EdgeInsets.symmetric(vertical: 10, horizontal: 25),
padding: EdgeInsets.all(10),
child: Row(
children: [
const Icon(
Icons.email,
color: Colors.teal,
),
const SizedBox(
width: 10,
),
const Text(
'123456789@qq.com',
style: TextStyle(
fontSize: 20,
fontFamily: 'AaJianHaoTi',
color: Colors.teal,
),
)
],
),
)
],
)),
),
);
}
}
使用card组件替换Container
card是flutter预构建的组件,可以更方便的制作一个卡片效果。
card中没有padding属性,会自动设置内边距。
card中有一个孩子ListTile用来代替row组件。
ListTitle 中 leading 设置这一行开头的小图标, title 设置图标之后的文本。
void main() {
runApp(MyApp());
}
class MyApp extends StatelessWidget {
// This widget is the root of your application.
Widget build(BuildContext context) {
return MaterialApp(
home: Scaffold(
backgroundColor: Colors.teal,
body: SafeArea(
child: Column(
children: [
const CircleAvatar(
radius: 50,
backgroundImage: AssetImage('images/shanhu.jpeg'),
),
const Text(
'珊瑚宫星海',
style: TextStyle(
fontFamily: 'AaJianHaoTi',
color: Colors.white,
fontSize: 40,
fontWeight: FontWeight.bold,
),
),
const Text(
'Flutter Developer',
style: TextStyle(
fontFamily: 'AaJianHaoTi',
color: Color(0xFFB2DFDB),
fontSize: 20,
letterSpacing: 2.5,
fontWeight: FontWeight.bold,
),
),
const Card(
margin: EdgeInsets.symmetric(vertical: 10, horizontal: 25),
child: ListTile(
leading: Icon(
Icons.phone_android,
color: Colors.teal,
),
title: Text(
'+86 130111112222',
style: TextStyle(
color: Colors.teal,
fontFamily: 'AaJianHaoTi',
fontSize: 20,
),
),
),
),
const Card(
margin: EdgeInsets.symmetric(vertical: 10, horizontal: 25),
child: ListTile(
leading: Icon(
Icons.email,
color: Colors.teal,
),
title: Text(
'123456789@qq.com',
style: TextStyle(
fontSize: 20,
fontFamily: 'AaJianHaoTi',
color: Colors.teal,
),
),
),
),
],
)),
),
);
}
}
设置主轴居中和水平线
主轴居中需要在column 组件上设置,属性名称为mainAxisAlignment。
水平线需要在SizedBox中设置一个child:Divider 指定水平线的颜色即可。
void main() {
runApp(MyApp());
}
class MyApp extends StatelessWidget {
// This widget is the root of your application.
Widget build(BuildContext context) {
return MaterialApp(
home: Scaffold(
backgroundColor: Colors.teal,
body: SafeArea(
child: Column(
mainAxisAlignment: MainAxisAlignment.center,
children: [
const CircleAvatar(
radius: 50,
backgroundImage: AssetImage('images/shanhu.jpeg'),
),
const Text(
'珊瑚宫星海',
style: TextStyle(
fontFamily: 'AaJianHaoTi',
color: Colors.white,
fontSize: 40,
fontWeight: FontWeight.bold,
),
),
const Text(
'Flutter Developer',
style: TextStyle(
fontFamily: 'AaJianHaoTi',
color: Color(0xFFB2DFDB),
fontSize: 20,
letterSpacing: 2.5,
fontWeight: FontWeight.bold,
),
),
const SizedBox(
height: 20,
width: 150,
child: Divider(
color: Color(0xFFB2DFDB), //Colors.teal.shade100
),
),
const Card(
margin: EdgeInsets.symmetric(vertical: 10, horizontal: 25),
child: ListTile(
leading: Icon(
Icons.phone_android,
color: Colors.teal,
),
title: Text(
'+86 130111112222',
style: TextStyle(
color: Colors.teal,
fontFamily: 'AaJianHaoTi',
fontSize: 20,
),
),
),
),
const Card(
margin: EdgeInsets.symmetric(vertical: 10, horizontal: 25),
child: ListTile(
leading: Icon(
Icons.email,
color: Colors.teal,
),
title: Text(
'123456789@qq.com',
style: TextStyle(
fontSize: 20,
fontFamily: 'AaJianHaoTi',
color: Colors.teal,
),
),
),
),
],
)),
),
);
}
}
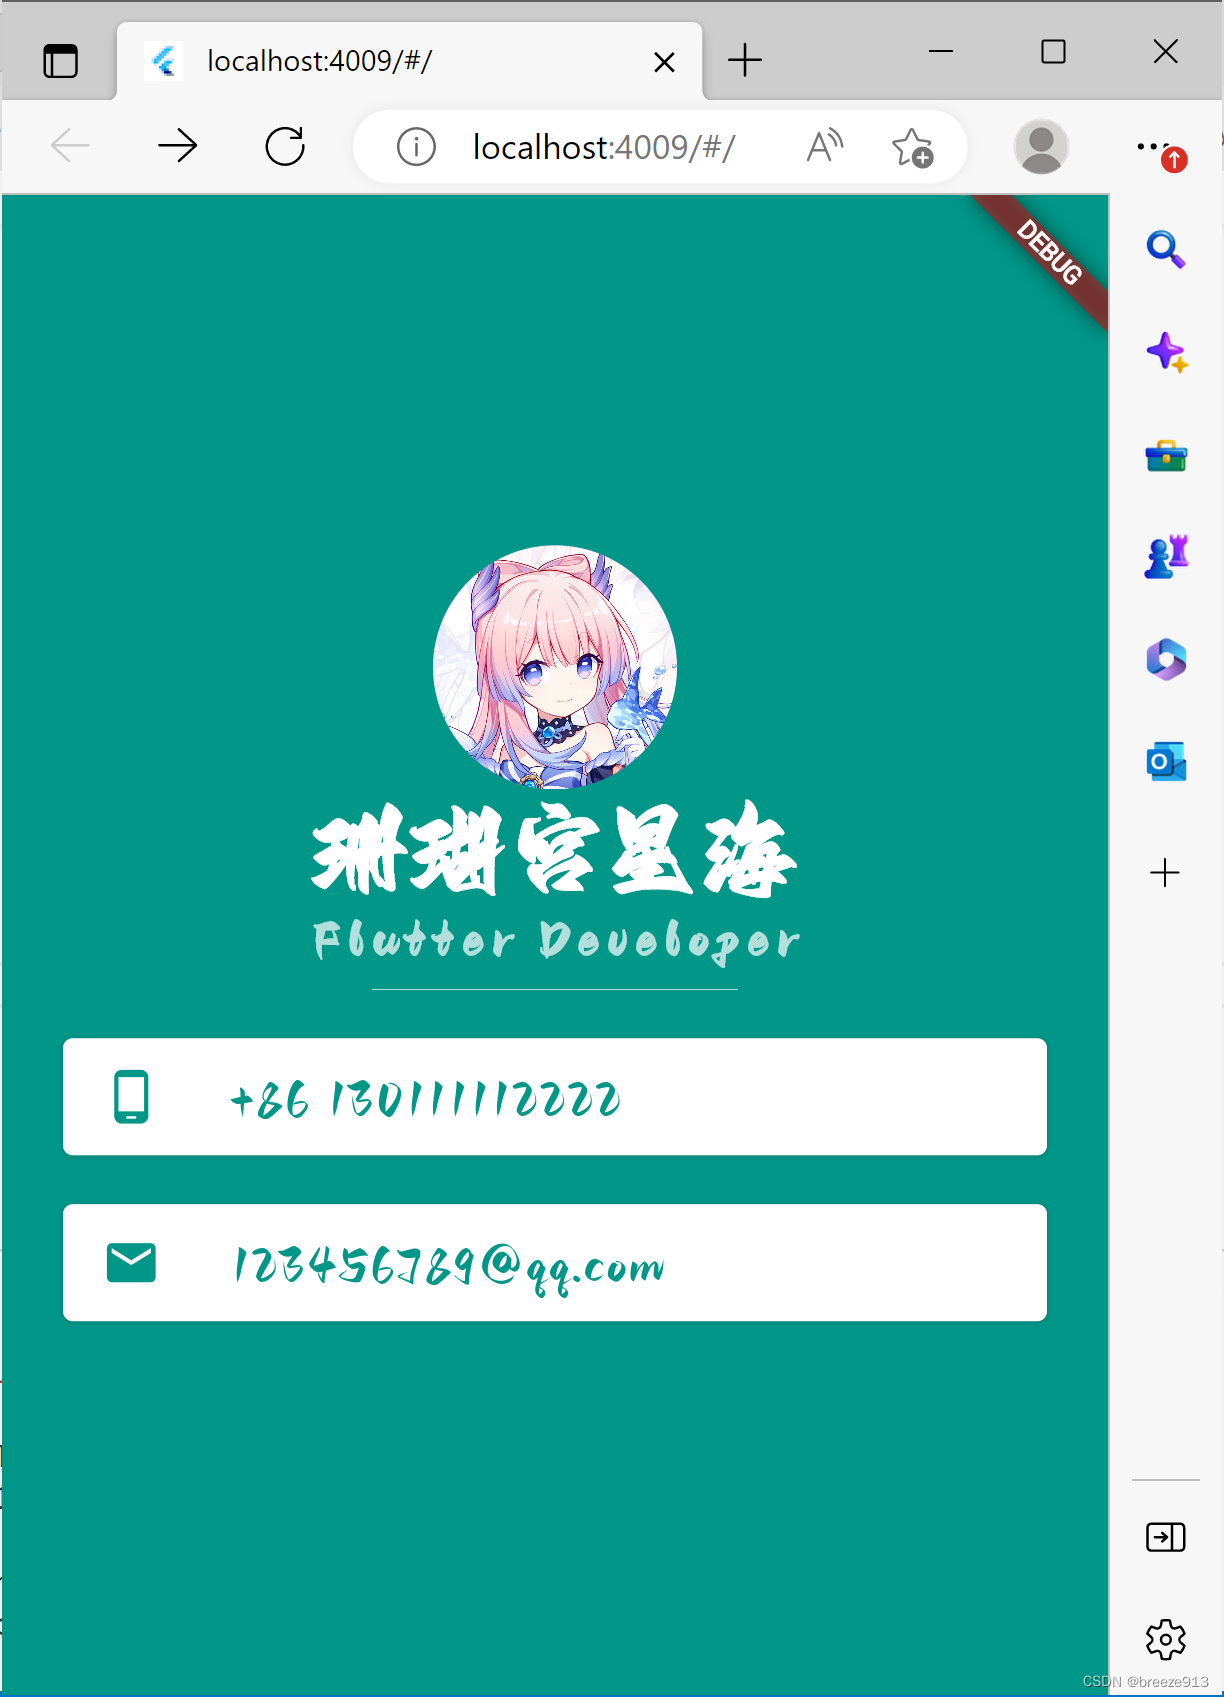
最终效果

开源鸿蒙跨平台开发社区汇聚开发者与厂商,共建“一次开发,多端部署”的开源生态,致力于降低跨端开发门槛,推动万物智联创新。
更多推荐
 0
0 0
0- 0


 已为社区贡献2条内容

所有评论(0)