Flutter for OpenHarmony 实战:MD3 主题搭建 + 多页面基础结构实现
·
欢迎加入开源鸿蒙跨平台社区:https://openharmonycrossplatform.csdn.net
一、环境准备
确保你的 Flutter 环境已配置完成(建议 Flutter 3.10+,MD3 支持更完善):
- 检查 Flutter 版本:
flutter --version - 创建新项目(可选):
flutter create md3_multi_page_demo - 打开项目,删除
lib/main.dart中默认的示例代码,从头编写。
二、步骤 1:配置 Material Design 3 主题
MD3 是 Google 最新的设计规范,核心是动态色彩、更强的层级感和交互反馈,第一步先全局配置 MD3 主题。
1.1 基础入口代码搭建
修改lib/main.dart,先写最外层的MaterialApp,并启用 MD3:
import 'package:flutter/material.dart';

void main() {
  runApp(const MyApp());
}

class MyApp extends StatelessWidget {
  const MyApp({super.key});

  @override
  Widget build(BuildContext context) {
    return MaterialApp(
      title: 'MD3多页面Demo',
      debugShowCheckedModeBanner: false, // 隐藏调试横幅
      // 核心:配置MD3主题
      theme: ThemeData(
        useMaterial3: true, // 启用Material Design 3
        // 1. 配置颜色方案(MD3核心)
        colorScheme: ColorScheme.fromSeed(
          seedColor: Colors.blueAccent, // 种子色(生成整套配色)
          brightness: Brightness.light, // 亮色模式
          // 可选:自定义关键颜色(覆盖种子色生成的默认值)
          primary: Colors.blueAccent,
          secondary: Colors.purpleAccent,
          surface: Colors.white,
        ),
        // 2. 配置文本样式(MD3默认字体适配)
        textTheme: const TextTheme(
          displayLarge: TextStyle(fontSize: 32, fontWeight: FontWeight.bold),
          titleMedium: TextStyle(fontSize: 18, fontWeight: FontWeight.w600),
          bodyMedium: TextStyle(fontSize: 14, color: Colors.black87),
        ),
        // 3. 配置组件默认样式(可选,按需自定义)
        appBarTheme: const AppBarTheme(
          centerTitle: true,
          elevation: 0, // MD3推荐扁平化AppBar
          scrolledUnderElevation: 4, // 滚动时的阴影
        ),
        bottomNavigationBarTheme: const BottomNavigationBarThemeData(
          type: BottomNavigationBarType.fixed,
          elevation: 8,
          selectedItemColor: Colors.blueAccent, // 选中颜色
          unselectedItemColor: Colors.grey, // 未选中颜色
        ),
      ),
      home: const MainPage(), // 底部导航的主页面
    );
  }
}
1.2 关键说明
useMaterial3: true:必须开启,否则所有 MD3 样式不生效;ColorScheme.fromSeed:MD3 的核心配色方式,通过一个 “种子色” 自动生成整套协调的配色(包括 primary、secondary、surface 等),也可手动覆盖;- 组件主题(AppBar/BottomNavigationBar):MD3 推荐低阴影、扁平化设计,需适配调整。
三、步骤 2:实现多页面底部导航结构
核心思路:用BottomNavigationBar做底部导航栏,IndexedStack管理多个页面的显示(保持页面状态,切换不重建)。
2.1 定义主页面(MainPage)
在main.dart中继续编写MainPage(有状态组件,管理导航选中状态):
// 底部导航主页面
class MainPage extends StatefulWidget {
const MainPage({super.key});
@override
State<MainPage> createState() => _MainPageState();
}
class _MainPageState extends State<MainPage> {
// 1. 管理当前选中的页面索引
int _currentIndex = 0;
// 2. 定义三个页面的列表(后续实现每个页面)
final List<Widget> _pages = const [
HomePage(),
SearchPage(),
MinePage(),
];
// 3. 定义底部导航的图标和文字
final List<BottomNavigationBarItem> _navItems = const [
BottomNavigationBarItem(
icon: Icon(Icons.home_outlined), // 未选中图标
activeIcon: Icon(Icons.home), // 选中图标(MD3推荐填充图标)
label: '首页',
),
BottomNavigationBarItem(
icon: Icon(Icons.search_outlined),
activeIcon: Icon(Icons.search),
label: '搜索',
),
BottomNavigationBarItem(
icon: Icon(Icons.person_outlined),
activeIcon: Icon(Icons.person),
label: '我的',
),
];
@override
Widget build(BuildContext context) {
return Scaffold(
// 4. 用IndexedStack显示当前页面(保持状态)
body: IndexedStack(
index: _currentIndex,
children: _pages,
),
// 5. 底部导航栏
bottomNavigationBar: BottomNavigationBar(
items: _navItems,
currentIndex: _currentIndex,
// 6. 切换导航时更新索引
onTap: (index) {
setState(() {
_currentIndex = index;
});
},
),
);
}
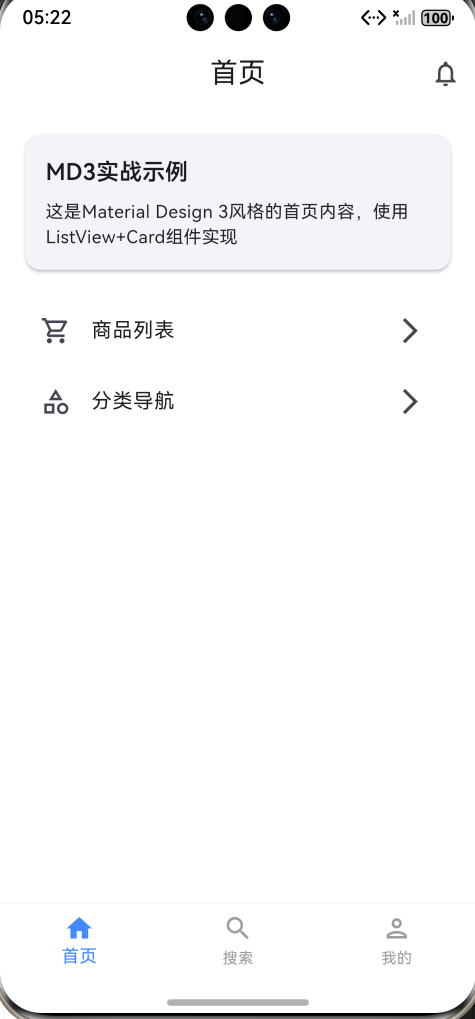
}2.2 实现首页(HomePage)
编写首页的基础结构(Scaffold + AppBar + 示例内容):
// 首页
class HomePage extends StatelessWidget {
  const HomePage({super.key});

  @override
  Widget build(BuildContext context) {
    return Scaffold(
      appBar: AppBar(
        title: const Text('首页'),
        // MD3风格的AppBar右侧操作按钮
        actions: [
          IconButton(
            icon: const Icon(Icons.notifications_outlined),
            onPressed: () {},
          ),
        ],
      ),
      body: ListView(
        padding: const EdgeInsets.all(16),
        children: [
          // MD3风格的卡片
          Card(
            elevation: 2,
            shape: RoundedRectangleBorder(
              borderRadius: BorderRadius.circular(12), // MD3推荐圆角
            ),
            child: Padding(
              padding: const EdgeInsets.all(16),
              child: Column(
                crossAxisAlignment: CrossAxisAlignment.start,
                children: [
                  Text(
                    'MD3实战示例',
                    style: Theme.of(context).textTheme.titleMedium,
                  ),
                  const SizedBox(height: 8),
                  Text(
                    '这是Material Design 3风格的首页内容,使用ListView+Card组件实现',
                    style: Theme.of(context).textTheme.bodyMedium,
                  ),
                ],
              ),
            ),
          ),
          const SizedBox(height: 16),
          // 示例列表
          ListTile(
            leading: const Icon(Icons.shopping_cart_outlined),
            title: const Text('商品列表'),
            trailing: const Icon(Icons.arrow_forward_ios),
            onTap: () {},
          ),
          ListTile(
            leading: const Icon(Icons.category_outlined),
            title: const Text('分类导航'),
            trailing: const Icon(Icons.arrow_forward_ios),
            onTap: () {},
          ),
        ],
      ),
    );
  }
}
2.3 实现搜索页(SearchPage)
编写搜索页(搜索框 + 示例结果区域):
// 搜索页
class SearchPage extends StatelessWidget {
  const SearchPage({super.key});

  @override
  Widget build(BuildContext context) {
    return Scaffold(
      appBar: AppBar(
        title: // MD3风格的搜索框
        TextField(
          decoration: InputDecoration(
            hintText: '请输入搜索内容',
            border: InputBorder.none,
            prefixIcon: const Icon(Icons.search, color: Colors.grey),
            suffixIcon: IconButton(
              icon: const Icon(Icons.clear, color: Colors.grey),
              onPressed: () {},
            ),
          ),
          style: Theme.of(context).textTheme.bodyMedium,
        ),
      ),
      body: const Padding(
        padding: EdgeInsets.all(16),
        child: Column(
          children: [
            // 热搜推荐
            Align(
              alignment: Alignment.centerLeft,
              child: Text(
                '热搜推荐',
                style: TextStyle(fontSize: 16, fontWeight: FontWeight.w600),
              ),
            ),
            SizedBox(height: 12),
            // 热搜标签
            Wrap(
              spacing: 8,
              runSpacing: 8,
              children: [
                Chip(label: Text('Flutter MD3')),
                Chip(label: Text('多页面开发')),
                Chip(label: Text('底部导航')),
                Chip(label: Text('Material Design')),
              ],
            ),
            // 占位的搜索结果区域
            Expanded(
              child: Center(
                child: Text('请输入关键词搜索'),
              ),
            ),
          ],
        ),
      ),
    );
  }
}
2.4 实现我的页面(MinePage)
编写 “我的” 页面(用户信息卡片 + 功能列表):
// 我的页面
class MinePage extends StatelessWidget {
  const MinePage({super.key});

  @override
  Widget build(BuildContext context) {
    return Scaffold(
      appBar: AppBar(
        title: const Text('我的'),
      ),
      body: ListView(
        children: [
          // 用户信息卡片(MD3风格)
          Container(
            color: Theme.of(context).colorScheme.primaryContainer, // MD3的主容器色
            padding: const EdgeInsets.symmetric(vertical: 24, horizontal: 16),
            child: const Row(
              children: [
                // 头像
                CircleAvatar(
                  radius: 40,
                  backgroundImage: NetworkImage(
                    'https://picsum.photos/200/200', // 示例头像
                  ),
                ),
                SizedBox(width: 16),
                // 用户信息
                Column(
                  crossAxisAlignment: CrossAxisAlignment.start,
                  children: [
                    Text(
                      'Flutter开发者',
                      style: TextStyle(fontSize: 18, fontWeight: FontWeight.bold),
                    ),
                    SizedBox(height: 4),
                    Text(
                      '点击编辑个人资料',
                      style: TextStyle(fontSize: 14, color: Colors.grey),
                    ),
                  ],
                ),
              ],
            ),
          ),
          const SizedBox(height: 16),
          // 功能列表
          ListTile(
            leading: const Icon(Icons.settings_outlined),
            title: const Text('设置'),
            trailing: const Icon(Icons.arrow_forward_ios),
            onTap: () {},
          ),
          ListTile(
            leading: const Icon(Icons.help_outline),
            title: const Text('帮助与反馈'),
            trailing: const Icon(Icons.arrow_forward_ios),
            onTap: () {},
          ),
          ListTile(
            leading: const Icon(Icons.logout_outlined),
            title: const Text('退出登录'),
            trailing: const Icon(Icons.arrow_forward_ios),
            textColor: Colors.red,
            onTap: () {},
          ),
        ],
      ),
    );
  }
}
四、步骤 3:运行验证
- 连接模拟器 / 真机,执行
flutter run; - 验证核心功能:
- 主题样式:AppBar、Card、BottomNavigationBar 是否为 MD3 风格(扁平化、圆角、柔和阴影);
- 页面切换:点击底部导航栏的 “首页 / 搜索 / 我的”,能正常切换页面,且页面状态不丢失(IndexedStack 特性);
- 组件交互:搜索框、列表项、按钮等可正常点击,视觉反馈符合 MD3 规范。

开源鸿蒙跨平台开发社区汇聚开发者与厂商,共建“一次开发,多端部署”的开源生态,致力于降低跨端开发门槛,推动万物智联创新。
更多推荐
 5
5 0
0- 0


 已为社区贡献3条内容

所有评论(0)