Kotlin安卓称王?Java如何调用Kotlin的高级特性?_android kt context class
    KotlinDemo demo = new KotlinDemo();

    demo.setValueCallback("str", new Function0<Unit>() {
        @Override
        public Unit invoke() {

            ToastUtils.INSTANCE.makeText(mActivity, "我被回调了!!");

            return null;
        }
    });

    demo.setValueCallback2(new Function0<Unit>() {
        @Override
        public Unit invoke() {

            YYLogUtils.w("这里没有返回值,我回调到我就行了");

            return null;
        }
    }, new Function1<Integer, Integer>() {
        @Override
        public Integer invoke(Integer integer) {

            YYLogUtils.w("这里有返回值,回调到这里,我还需要处理运算,我的上级才能收到我处理的值");

            return integer + 10;
        }
    });

}
打印的结果:

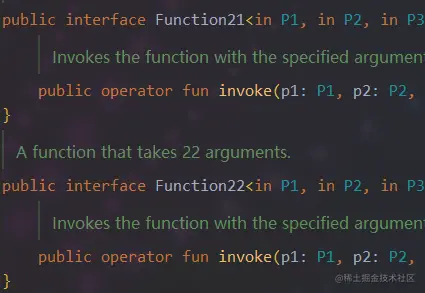
高阶函数的Java调用可以说是后续的基础,关于 Function 的接口,从Function1 到 Function22 Kotlin给我们定义了20多个接口对象,只是用于区分有多少个参数,本质都是一样的。
不会真有人定义这么多参数吧,我最多用到三个参数 😅 😅
##### 五、Java调用KT的SAM方式
其实Sam是基于Kotlin的简化方式,对应Java调用Kotlin来说其实是一样的,它只适应于Kotlin。
比如:
interface MyCustomCallback {
fun onCallback()
}
---
fun interface MyCustomCallback {
fun onCallback()
}
---
fun setSamMethod(callback: MyCustomCallback) {

    callback.onCallback()
}
在Java中是一样的调用
public void demo5(View view) {

    KotlinDemo demo = new KotlinDemo();

    demo.setSamMethod(new MyCustomCallback() {
        @Override
        public void onCallback() {
            YYLogUtils.w("回调到了");
        }
    });
}
只是在Kotlin语言中new的方式不同罢了:
fun setValueCallback2(block: MyCustomCallback.() -> Unit) {

    block(object : MyCustomCallback {
        override fun onCallback() {
            YYLogUtils.w("对方调用了,然后我来继续执行")
        }
    })

}
---
fun setValueCallback2(block: MyCustomCallback.() -> Unit) {

    block(MyCustomCallback { YYLogUtils.w("对方调用了,然后我来继续执行") })

}
其实是和高阶函数的调用比较类似,只是一个是我们自己定义的接口,一个是高阶函数Java转换的Function接口,使用起来是一样的。


##### 六、Java调用KT高阶扩展函数


什么叫高阶扩展函数,其实就高阶函数,只是把原本回调的对象类型放在了前面以扩展的方式表达。**以扩展的方式定义高阶函数**,我把它叫做高阶扩展函数,但其本质还是高阶函数。


举一个很简单的例子
fun String.setValueCallback11(block: Industry.(Int) -> Unit) {
block(Industry(0, this, “123”, “456”), 10)
}
fun String.setValueCallback12(block: (Industry, Int) -> Unit) {
block(Industry(0, this, “123”, “456”), 10)
}
前者是高阶扩展函数,后者是高阶函数,使用的方式是一样的,只是高阶函数回调的时候一个需要用it或者指定变量接收,而高阶扩展函数只需要this接收,并且高阶扩展函数默认在回调的第一个参数上。


例如:
"test".setValueCallback11 { int ->
    YYLogUtils.w("收到回调:industry:" + this.toString() + " int:" + int)
}

"test".setValueCallback12 { industry, int ->
    YYLogUtils.w("收到回调:industry:" + industry.toString() + " int:" + int)
}
一个直接用this,另一种需要用it或者自定义名称来接收。用起来都是一样的,只是使用高阶扩展函数的话,会有一些简写方式更加方便,(如果不懂的话可能会更懵吧)


**如何定义高阶扩展函数**


这种方式有几种定义方式,以函数的类型定义为扩展函数定义和非扩展函数定义。参数又分基本类型,自定义类型,与接口类型。


下面都会讲到,先从简单的常用的讲起。


**基本数据类型:**
//这种比较常见
fun String.setValueCallback(block: String.() -> Unit) {

    block(this.length.toString())
}
---
demo.setValueCallback("test", new Function1<String, Unit>() {
    @Override
    public Unit invoke(String s) {
        YYLogUtils.w("看看我收到的什么:" + s);
        return null;
    }
});
使用扩展方法再加上高阶扩展函数的参数,我们就可以直接使用this。就可以直接拿到数据设置回调。
这样的方式主要用于**直接回调给对方**
打印结果:

**自定义对象类型:**
如果我们修改高阶扩展函数的对象,你看这样就不协调了,String的扩展方法,确实回调的Industry对象
fun String.setValueCallback(block: Industry.() -> Unit) {
    //直接回调给对方
    block(this.length.toString())
}
如果还是使用String的参数,上面的用法就会报错,我们应该回调Industry的对象。
fun String.setValueCallback(block: Industry.() -> Unit) {
    //直接回调给对方
    block(Industry(0, this, "123", "456"))
}
我们把String的扩展this当做Industry的构造参数的一个属性,这样才能回调一个Industry对象给Java
看Log打印,回调的就是Industry

**接口类型:**
除了用对象做高阶扩展函数,我们还能以接口的形式做高阶扩展函数。
//还能设置不相关的对象扩展
fun setValueCallback2(block: MyCustomCallback.() -> Unit) {
    block(object : MyCustomCallback {
        override fun onCallback() {

        }
    })

}
使用接口类型做我参数的扩展,这里我们需要new一个对象给调用者。就导致这种方法是 **回调给对方调用再通过对方回调给自己**


在Java的代码中我们可以直接调用接口的方法,让对方去执行
public void demo3(View view) {
    KotlinDemo demo = new KotlinDemo();

    demo.setValueCallback2(new Function1<MyCustomCallback, Unit>() {
        @Override
        public Unit invoke(MyCustomCallback myCustomCallback) {

            //调用
            myCustomCallback.onCallback();

            return null;
        }
    });
}
打印的Log如下:

不管是用Java代码去调用,还是用Ktolin代码调用,本质是一样的。
需要注意方法的参数,是否是基本类型的高阶扩展函数,还是对象类型的高阶扩展函数,还是接口类型的高阶扩展函数。这会导致是回调的方式不同。
而方法本身是否是扩展函数,则相对没有那么重要,主要是看方便我们能否使用this,如果需要this对象就用扩展函数,如果不需要那我们可以不用。
**关于高阶扩展函数的补充**
其实前文也说了,本质还是高阶扩展函数,只是区分是否用this接收而已,所以高阶扩展函数也是针对Kotlin来说的,对Java语言来说,还是以高阶函数的方式来处理。
举例说明:
fun String.setValueCallback1(block: String.(Int) -> Unit) {
block(this, 10)
}
Java代码中使用这一种高阶扩展函数:
KotlinDemoKt.setValueCallback1("test", new Function2<String, Integer, Unit>() {
     @Override
    public Unit invoke(String s, Integer integer) {
        YYLogUtils.w("收到回调:s:" + s + "integer:" + integer);
        return null;
    }
});
可以看到Java语言可不管你扩不扩展,对它来说就是两个参数,我也不能用this什么的,我只能用转换过的Function。可以看到Kotlin虽然定义的是Int,但是Java接收到的是 Function2 是两个参数的回调,顺序是第一个是String第二个是Int。


前文讲到的基本类型,对象类型,接口类型,这里做一个全部的Demo
fun String.setValueCallback0(block: (Int) -> Unit) {
block(10)
}
fun String.setValueCallback1(block: String.(Int) -> Unit) {
block(this, 10)
}
fun String.setValueCallback11(block: Industry.(Int) -> Unit) {
block(Industry(0, this, “123”, “456”), 10)
}
fun String.setValueCallback12(block: (Industry, Int) -> Unit) {
block(Industry(0, this, “123”, “456”), 10)
}
fun String.setValueCallback13(block: MyCustomCallback.(String) -> Unit) {
block(MyCustomCallback { YYLogUtils.w("对方调用了,然后我来继续执行") }, this + "加点后缀")
}
为了方便理解,回调的时候我故意没有省略this,一般大家写代码都会省略this。


如果是Kotlin代码调用,很简单
    "test".setValueCallback1 { int ->
        YYLogUtils.w("收到回调:str:" + this + " int:" + int)
    }

    "test".setValueCallback11 { int ->
        YYLogUtils.w("收到回调:industry:" + this.toString() + " int:" + int)
    }

    "test".setValueCallback12 { industry, int ->
        YYLogUtils.w("收到回调:industry:" + industry.toString() + " int:" + int)
    }

    "test".setValueCallback13 { str ->
        YYLogUtils.w("收到回调:callback:" + this + " str:" + str)
        this.onCallback()
    }
打印如下:

如果是Java代码调用:
public void demo2(View view) {

    KotlinDemo demo = new KotlinDemo();

    KotlinDemoKt.setValueCallback1("test", new Function2<String, Integer, Unit>() {
        @Override
        public Unit invoke(String s, Integer integer) {
            YYLogUtils.w("收到回调:s:" + s + "integer:" + integer);
            return null;
        }
    });

    KotlinDemoKt.setValueCallback11("test", new Function2<Industry, Integer, Unit>() {
        @Override
        public Unit invoke(Industry industry, Integer integer) {
            YYLogUtils.w("收到回调:industry:" + this.toString() + " integer:" + integer);
            return null;

        }
    });

    KotlinDemoKt.setValueCallback12("test", new Function2<Industry, Integer, Unit>() {
        @Override
        public Unit invoke(Industry industry, Integer integer) {
            YYLogUtils.w("收到回调:industry:" + this.toString() + " integer:" + integer);
            return null;

        }
    });

    KotlinDemoKt.setValueCallback13("test", new Function2<MyCustomCallback, String, Unit>() {
        @Override
        public Unit invoke(MyCustomCallback myCustomCallback, String s) {

            YYLogUtils.w("收到回调:callback:" + myCustomCallback.toString() + " str:" + s);
            myCustomCallback.onCallback();

            return null;
        }
    });
可以看到这种方式对Java是没有效果的,和高阶函数的使用是一模一样的。
打印Log如下:

结论:这种以高阶函数定义的扩展函数,对Java的调用来说没效果,只是Kotin语言的一些简化。
##### 七、Java调用KT的DSL方式
按照顺序一步一步的来,我们会了Java调用扩展函数和高阶扩展函数,那么在此基础上我们就能完成Kotlin的DSL调用了。
我们都知道DSL的简化规则是基于高阶扩展函数间接实现的(也可以直接高阶函数实现,不过使用的时候就需要用it去点出方法,不够优雅,所以一般大家都用高阶扩展函数的方式去实现)。
那么我们学了Java调用高阶扩展函数之后,再回头看看DSL的调用有什么不同。
之前的文章已经讲过DSL定义的几种方式,这里不多BB,直接快速过一次代码:
fun TestNet.setOnSuccessCallbackDsl(init: SuccessCallbackImpl.() -> Unit) {
val listener = SuccessCallbackImpl()
init(listener)
this.setOnSuccessCallback(listener)
}
var mCallback: SuccessCallback? = null
fun setOnSuccessCallback(callback: SuccessCallback) {
this.mCallback = callback
}
interface SuccessCallback { //多个参数不能使用fun修饰了
fun onSuccess(str: String): String
fun doSth()
}
class SuccessCallbackImpl : TestNet.SuccessCallback {
private var onSuccess: ((String) -> String)? = null

private var doSth: (() -> Unit)? = null

fun onSuccess(method: (String) -> String) {
    onSuccess = method
}

fun doSth(method: () -> Unit) {
    doSth = method
}

override fun onSuccess(str: String): String {
    return onSuccess?.invoke(str).toString()
}

override fun doSth() {
    doSth?.invoke()
}
}
我们定义一个测试方法用于回调数据
fun requestDSLCallback() {

    MainScope().launch {

        val result = withContext(Dispatchers.IO) {
            delay(500)

            return@withContext Random().nextInt(10)
        }

        val res = mCallback?.onSuccess("DSL测试-->成功")

        YYLogUtils.w("result:$res")

        mCallback?.doSth()

    }
}
Kotlin代码使用DSL,相信大家都已经轻车熟路了。
val testNet = TestNet()
testNet.setOnSuccessCallbackDsl {
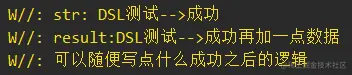
onSuccess { str ->
YYLogUtils.w("str: $str")
str + "再加一点数据"
}
doSth {
YYLogUtils.w("可以随便写点什么成功之后的逻辑")
}
}
testNet.requestDSLCallback()
打印Log:
重点是Java中如何调用DSL的这种方式呢?我们学了Java调用扩展方法和Java调用高阶扩展函数,那么组合在一起就是这样:
TestNet testNet = new TestNet();
TestNetKt.setOnSuccessCallbackDsl(testNet, new Function1<SuccessCallbackImpl, Unit>() {
@Override
public Unit invoke(SuccessCallbackImpl successCallback) {
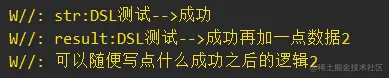
successCallback.onSuccess(new Function1<String, String>() {
@Override
public String invoke(String s) {
YYLogUtils.w("str:" + s);
return s + "再加一点数据2";
}
});
successCallback.doSth(new Function0<Unit>() {
@Override
public Unit invoke() {
YYLogUtils.w("可以随便写点什么成功之后的逻辑2");
return null;
}
});
return null;
}
});
testNet.requestDSLCallback();
我们需要在回调的方法中使用接口对象,手动的实现回调方法,回调的具体方法则是扩展函数的Java转换函数 Function 接口。
如此即可实现Kotlin的DSL调用,打印Log如下:
看起来相对麻烦,但是仔细一瞅,其实还是Java调用高阶函数的那一套,只是Kotlin语言使用高阶扩展函数,看起来比较简洁而已。
##### 八、Java调用KT协程
其实我们在Java代码中是无法使用协程或者说不方便使用协程的,但是我们介绍完上面的几种方案之后,我们可以间接的实现协程。
例如我们使用一个Kotlin工具类,作为一个中间层,然后通过回调的方式可以启动协程,切换协程的操作。虽然相对麻烦但是毕竟能用了!
我们再Kotlin代码中定义协程
//协程
fun setValueCallback3(block: CoroutineScope.() -> Unit) {

    GlobalScope.launch(Dispatchers.IO) {

        block(this)
    }

}
如果是在Kotlin代码中不用说,肯定是很简单的
KotlinDemo().setValueCallback3 {

    YYLogUtils.w("在协程中执行?"+Thread.currentThread().name)
}
运行:

但是在Java代码中我们如何运行呢?Kotlin代码中使用高阶函数默认就是 {} 即可,而在Java代码中帮我们转换为了 Function 的接口,相当于和上面的高阶扩展函数一样的用法。
public void demo4(View view) {
    KotlinDemo demo = new KotlinDemo();

    demo.setValueCallback3(new Function1<CoroutineScope, Unit>() {
        @Override
        public Unit invoke(CoroutineScope coroutineScope) {

            YYLogUtils.w("在协程中执行?" + Thread.currentThread().getName());

            return null;
        }
    });
}
运行:

如果想指明 suspend标记,也可以的
fun setValueCallback4(block: suspend CoroutineScope.() -> Unit) {

    GlobalScope.launch(Dispatchers.IO) {

        block.invoke(this)
    }

}
使用的方式是一样的:
demo.setValueCallback4(new Function2<CoroutineScope, Continuation<? super Unit>, Object>() {
     @Override
    public Object invoke(CoroutineScope coroutineScope, Continuation<? super Unit> continuation) {

        YYLogUtils.w("在协程中执行suspend?" + Thread.currentThread().getName());

        return null;
     }
});
讲到这里给大家说明一个小细节,需要注意的是Kotlin代码中回调的写法
//协程
fun setValueCallback3(block: CoroutineScope.() -> Unit) {

    GlobalScope.launch(Dispatchers.IO) {

        block(this)
    }

}
前文讲过高阶扩展函数的一些简写,注意这里的回调调用其实有很多写法,但是都是一些简写,标准回调是:


>
> block(this)
>
>
>


有些简写使用


>
> block()
>
>
>


>
> block
>
>
>


其实都没毛病,只是简写而已,但是但是,这么用 Kotlin 语言去调用没毛病,但是在Java语言中就不会回调了。


所以如果你看到别人的代码一些高阶扩展函数的回调使用的是默认的block(this)回调,可能也不是别人不会一些简写,可能别人是想适配Java的调用呢?


其实也更推荐大家使用标准的回调 block(this) 或 block.invoke(this)。这样函数的调用与内部的参数更标准化,更加的简单明了,适配性也更好。


下面我们继续更复杂一点的启动协程与切换协程 (PS:我真的不想再写了,真的有哪个冤种会在Java里面写协程的吗…)


简单的说说把,我们使用一个中间层,Kotlin工具类中定义一些协程的使用,然后通过高阶函数回调,或者高阶扩展函数回调。
fun callLaunch(block: suspend CoroutineScope.() -> Unit) {

    GlobalScope.launch(Dispatchers.Main) {

        block.invoke(this)

    }

}

suspend fun callWithContext(block: () -> String): String {

    return withContext(Dispatchers.IO) {

        block()
    }

}
使用的时候:
demo.callLaunch(new Function2<CoroutineScope, Continuation<? super Unit>, Object>() {
        @Override
        public Object invoke(CoroutineScope coroutineScope, Continuation<? super Unit> continuation) {

            YYLogUtils.w("启动了协程===>做点什么好呢" + Thread.currentThread().getName());

            demo.callWithContext(new Function0<String>() {
                @Override
                public String invoke() {

                    YYLogUtils.w("切换线程看看" + Thread.currentThread().getName());

                    return null;
                }
            }, new Continuation<String>() {
                @NonNull
                @Override
                public CoroutineContext getContext() {
                    return coroutineScope.getCoroutineContext();
                }

                @Override
                public void resumeWith(@NonNull Object o) {
                }
            });

            return null;
        }
});
打印结果:

总的来说在Java中使用协程真的是折磨,就算使用回调间接的调用也是折磨,并且居然还要自己手动管理协程上下文。究极折磨!
#### 总结
总的来说Java调用Kotlin的场景,协程不太好用,扩展函数中内联泛型不能使用,其他的一些方式我们都能通过Java来调用Kotlin代码。
所以说不会Kotlin一样可以使用Kotlin的一些特性,虽然用 Java 调用 Kotlin 很麻烦并且一点都不优雅,但毕竟能用了,要什么自行车。
话说到这里了,我还是比较推荐大家学习Kotlin,使用Kotlin搭建项目,毕竟我们往后面看一点,Compose 必然会成为趋势…
#### Android 学习手册
**Kotlin 篇:[`https://qr18.cn/CdjtAF`]( )**
**Android Framework底层原理篇:[`https://qr18.cn/AQpN4J`]( )**
**Android 性能优化篇:[`https://qr18.cn/FVlo89`]( )**
**Android 车载篇:[`https://qr18.cn/F05ZCM`]( )**
**Flutter 篇:[`https://qr18.cn/DIvKma`]( )**
**Android 音视频篇:[`https://qr18.cn/Ei3VPD`]( )**
**Jetpack全家桶篇(内含Compose):[`https://qr18.cn/A0gajp`]( )**
**Gradle 篇:[`https://qr18.cn/DzrmMB`]( )**
**OkHttp 源码解析笔记:[`https://qr18.cn/Cw0pBD`]( )**
**Android 八大知识体:[`https://qr18.cn/CyxarU`]( )**
**Android 核心笔记:[`https://qr21.cn/CaZQLo`]( )**
**Android 面试题锦:[`https://qr18.cn/CKV8OZ`]( )**

开源鸿蒙跨平台开发社区汇聚开发者与厂商,共建“一次开发,多端部署”的开源生态,致力于降低跨端开发门槛,推动万物智联创新。
更多推荐

 4
4 0
0- 0


 已为社区贡献1条内容

所有评论(0)