Kotlin Multiplatform 网络请求 Ktor
网络请求这方面 Kotlin Multiplatform 和 Android 这边还是有些不一样的,在使用的时候也踩了很多坑,本篇文章就记录一下 Kotlin Multiplatform 中 Ktor 的用法和注意事项。需要注意的是,如果使用了 serialization 作为 ktor 的反序列化工具,那每一个 data class 都需要打上序列化的注解,因为打了序列化注解,所以 data c
Ktor 是多平台网络请求的统一解决方案,它可以用一套近乎相同的 Kotlin 代码在 Android、iOS、桌面应用等不同平台上进行网络通信。
从 Android 原生 View 开发转向 Compose Multiplatform 开发也有一段时间了。网络请求这方面 Kotlin Multiplatform 和 Android 这边还是有些不一样的,在使用的时候也踩了很多坑,本篇文章就记录一下 Kotlin Multiplatform 中 Ktor 的用法和注意事项
依赖(在项目 build.gradle.kts 的 sourceSets 中添加):
sourceSets {
    androidMain.dependencies { // android
        implementation(libs.ktor.client.android)
    }
    commonMain.dependencies {
        implementation(libs.ktor.client.core)
        implementation(libs.ktor.client.content.negotiation)
        implementation(libs.ktor.serialization.kotlinx.json)
        implementation(libs.ktor.client.logging)
    }
    iosMain.dependencies { // ios
        implementation(libs.ktor.client.darwin)
    }
}
libs.versions.toml:
[versions]
ktor = "3.3.1"

[libraries]
ktor-client-android = { module = "io.ktor:ktor-client-android", version.ref = "ktor" }
ktor-client-cio = { module = "io.ktor:ktor-client-cio", version.ref = "ktor" }
ktor-client-content-negotiation = { module = "io.ktor:ktor-client-content-negotiation", version.ref = "ktor" }
ktor-client-core = { module = "io.ktor:ktor-client-core", version.ref = "ktor" }
ktor-client-darwin = { module = "io.ktor:ktor-client-darwin", version.ref = "ktor" }
ktor-client-logging = { module = "io.ktor:ktor-client-logging", version.ref = "ktor" }
ktor-serialization-kotlinx-json = { module = "io.ktor:ktor-serialization-kotlinx-json", version.ref = "ktor" }
用法:
import io.ktor.client.HttpClient

fun main() {
    val httpClient = HttpClient()

    CoroutineScope(Dispatchers.IO).launch {
        val httpResponse = httpClient.get("https://xxxxxx") {}  // get请求
        val httpResponse = httpClient.post("https://xxxxxx") {} // post请求

        val responseCode = httpResponse.status.value // 响应码
        val responseBody = httpResponse.body()       // 响应体
    }
}
所有的网络请求只依赖 httpClient 这一个对象,直接调用这个对象的 get 方法或 post 方法就能完成 GET 请求和 POST 请求,得益于协程,调用后会直接返回网络请求结果的对象,然后根据业务需要去取值即可。
注:请求时需要配置的请求参数在后面的函数中配置即可
val postResponse = httpClient.post("https://xxxxxx") {
// 追加请求头
headers.append("key", value)
// 在域名后追加参数
parameter("key", value)
// Json类型
contentType(ContentType.Application.Json)
setBody(body) // 请求体
// 表单提交
setBody(
MultiPartFormDataContent(formData {
append("key", value)
})
)
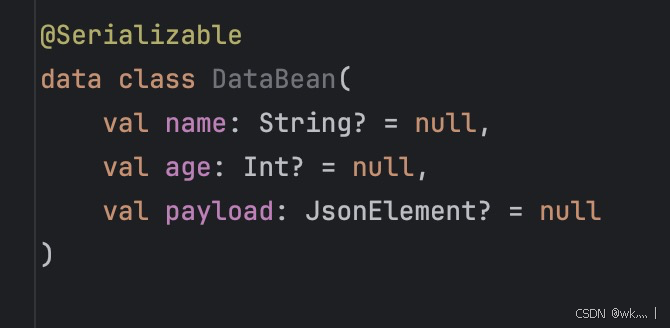
}需要注意的是,如果使用了 serialization 作为 ktor 的反序列化工具,那每一个 data class 都需要打上序列化的注解,否则运行时会报错:
RESPONSE https://xxxxxxx failed with exception: kotlinx.serialization.SerializationException: Serializer for class 'DataBean' is not found. Please ensure that class is marked as '@Serializable' and that the serialization compiler plugin is applied.
因为打了序列化注解,所以 data class 里的字段类型是不能有 Any 的,所有的 Any 都要用 JsonElement 代替,否则编译时会报错:
 ->
-> 
在实际的开发过程当中,网络请求会携带很配置,而且很多都是公共的,所以可以在 httpClient 中统一配置:
fun getHttpClient(): HttpClient {
    return HttpClient {
        defaultRequest {
            headers { // 默认请求头
                append("key1", value1)
                append("key2", value2)
            }
        }
        install(ContentNegotiation) { // 响应体反序列化配置
            json(Json {
                prettyPrint = true
                ignoreUnknownKeys = true  // 忽略未知字段
                coerceInputValues = true  // 强制转换输入值(null -> 默认值)
                isLenient = true          // 宽松模式
            })
        }
    }
}
在 Android 传统的 Retrofit 网络请求当中,要配置接口、创建对象、调用接口回调,这样来完成网络请求。而 Ktor 强制使用 Kotlin 协程,直接创建对象和调用方法就完成了网络请求,更加直观,代码量更少,理解成本和维护成本也会更小。

开源鸿蒙跨平台开发社区汇聚开发者与厂商,共建“一次开发,多端部署”的开源生态,致力于降低跨端开发门槛,推动万物智联创新。
更多推荐

 4
4 0
0- 0


 已为社区贡献7条内容

所有评论(0)