QT之QSignalMapper
QT之QSignalMapper文章目录实现案例1效果图实现代码实现案例2简述效果图上代码结尾之所以转载是因为对于特定需求使用QSignalMapper来说很方便,本想自己写一篇但是网上已有比较好文章,具体如下。发现下边实现方法与我的实现方法有不同,那我把自己的效果图和代码也附上吧。实现案例1效果图实现代码The QSignalMapper class bundles signals from i
QT之QSignalMapper
之所以转载是因为对于特定需求使用QSignalMapper来说很方便,本想自己写一篇但是网上已有比较好文章,具体如下。
发现下边实现方法与我的实现方法有不同,那我把自己的效果图和代码也附上吧。
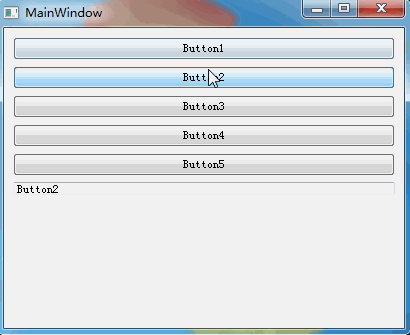
实现案例1
效果图
实现代码
The QSignalMapper class bundles signals from identifiable senders.
–qt assistant
多个信号调用相同slots,通过QSignalMapper可以分辨sender,代码如下:
void MainWindow::initControl()
{
    QVBoxLayout *pLayout = new QVBoxLayout(this);
    QString str = "Button1 Button2 Button3 Button4 Button5";
    QStringList strList = str.split(" ");
    QSignalMapper *pMapper = new QSignalMapper(this);
    int nRowCnt = 0;
    foreach(QString itor, strList)
    {
        QPushButton *pBtn = new QPushButton(this);
        pBtn->setText(itor);
        connect(pBtn, SIGNAL(clicked()), pMapper, SLOT(map()));
        pMapper->setMapping(pBtn, pBtn->text());
        pLayout->addWidget(pBtn, nRowCnt++, 0);
    }
    QLineEdit *pEdit = new QLineEdit(this);
    pEdit->setFixedHeight(CON_HEGIHT);
    connect(pMapper, SIGNAL(mapped(QString)), pEdit, SLOT(setText(QString)));
    pLayout->addWidget(pEdit, nRowCnt, 0);
    pLayout->addStretch();
    this->centralWidget()->setLayout(pLayout);
}
实现案例2
简述
QSignalMapper我们可以理解为转发器,此话怎讲呢?比如,按钮点击的响应槽,绑定到QSignalMapper上,QSignalMapper收到按钮的点击后,又通知到另外的控件上做处理。有的朋友会问了,为什么要这么麻烦,需要转一手,不能去掉中间的QSignalMapper,而直接调用吗。答案当然是可以的,为什么需要QSignalMapper这个转发器呢,我们先来看下效果,然后再看看代码,相信大家会喜欢上QSignalMapper这个转发器的。
效果图
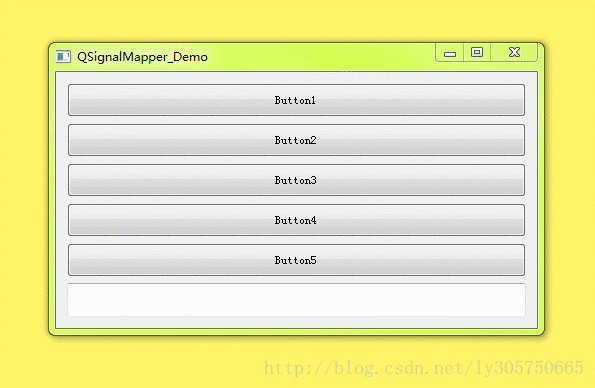
上代码
void QSignalMapper_Demo::initControl()
{
    QVBoxLayout *pLayout = new QVBoxLayout(this);

    QString str = "Button1 Button2 Button3 Button4 Button5";
    QStringList strList = str.split(" ");
    QSignalMapper *pMapper = new QSignalMapper(this);

    int nRowCnt = 0;
    foreach(QString itor, strList)
    {
        QPushButton *pBtn = new QPushButton(this);
        pBtn->setFixedHeight(CON_HEGIHT);
        pBtn->setText(itor);

        connect(pBtn, SIGNAL(clicked()), pMapper, SLOT(map()));
        pMapper->setMapping(pBtn, pBtn->text());

        pLayout->addWidget(pBtn, nRowCnt++, 0);
    }

    QLineEdit *pEdit = new QLineEdit(this);
    pEdit->setFixedHeight(CON_HEGIHT);
    connect(pMapper, SIGNAL(mapped(QString)), pEdit, SLOT(setText(QString)));
    pLayout->addWidget(pEdit, nRowCnt, 0);
    pLayout->addStretch();
}
眼光利索的朋友看到了我代码中,代码不规范,说你代码怎么就new,怎么没deltete,你这样不会内存泄漏吗,这里告诉大家是不会的哦,相关知识可以看我之前写的QT之内存泄漏管理。
回到本节,看完QSignalMapper的用法,我们回过头再看看,不用QSignalMapper,又该如何实现上面的效果呢,编辑框中我们可以看到,是哪个按钮被按下了。
//去掉QSignalMapper
void QSignalMapper_Demo::initControl()
{
    QVBoxLayout *pLayout = new QVBoxLayout(this);

    QString str = "Button1 Button2 Button3 Button4 Button5";
    QStringList strList = str.split(" ");

    int nRowCnt = 0;
    foreach(QString itor, strList)
    {
        QPushButton *pBtn = new QPushButton(this);
        pBtn->setFixedHeight(CON_HEGIHT);
        pBtn->setText(itor);
        //这里,响应的是同一个槽,按钮被点击后,我们却不能知道是哪个按钮被按下。
        connect(pBtn, SIGNAL(clicked()), this, SLOT(onclicked()()));
        //有的朋友说,可以每个按钮绑定不同的槽做区分呀,这样做可以是可以,但是你觉得使用QSignalMapper是不是要更简洁些呢?
        pLayout->addWidget(pBtn, nRowCnt++, 0);
    }

    QLineEdit *pEdit = new QLineEdit(this);
    pEdit->setFixedHeight(CON_HEGIHT);
    pLayout->addWidget(pEdit, nRowCnt, 0);
    pLayout->addStretch();
}
结尾
看完代码,相信大家都知道了QSignalMapper的美!有的朋友又问了,我什么时候该用QSignalMapper呢?通过上面的例子很简单呀,我们需要处理同一个事情时,而简化多个不同的槽却做着相同的事,我们的QSignalMapper就派上用场啦!

开源鸿蒙跨平台开发社区汇聚开发者与厂商,共建“一次开发,多端部署”的开源生态,致力于降低跨端开发门槛,推动万物智联创新。
更多推荐


 0
0 0
0- 0


 已为社区贡献7条内容

所有评论(0)