在React Native中实现无限滚动列表
While implementing pagination in mobile devices, one has to take a different approach since space is minimal unlike the web, due to this factor, infinite scrolling has always been the go to solution,
While implementing pagination in mobile devices, one has to take a different approach since space is minimal unlike the web, due to this factor, infinite scrolling has always been the go to solution, giving your users a smooth and desirable experience.
在移动设备中实现分页时,由于与Web不同,空间极小,因此必须采取不同的方法,由于这一因素,无限滚动一直是解决问题的方法,可为您的用户提供流畅而理想的体验。
In this tutorial, we will be building an infinite scroll list using the FlatList component in React Native, we will be consuming Punk API which is a free beers catalogue API.
在本教程中,我们将使用React Native中的FlatList组件构建一个无限滚动列表,我们将使用Punk API ,这是一个免费的啤酒目录API。
示范影片 ( Demo Video )
Here's a small demo video of what the end result will look like:
这是一个小示范视频,显示最终结果:

配置 ( Setting Up )
We will be using create-react-native-app to bootstrap our React Native app, run the folowing command to install it globally:
我们将使用create-react-native-app引导我们的React Native应用程序,运行以下命令将其全局安装:
npm install -g create-react-native-appNext we need to bootstrap the app in your preffered directory:
接下来,我们需要在您的首选目录中引导该应用程序:
react-native init react_native_infinite_scroll_tutorialI'll be using an android emulator for this tutorial but the code works for both IOS and Android platforms. In case you don't have an android emulator setup follow the instructions provided in the android documentation here.
在本教程中,我将使用一个android模拟器,但是该代码可在IOS和Android平台上使用。 如果您没有android模拟器设置,请按照android文档中提供的说明进行操作 在这里 。
Make sure your emulator is up and running then navigate to your project directory and run the following command:
确保模拟器已启动并正在运行,然后导航至项目目录并运行以下命令:
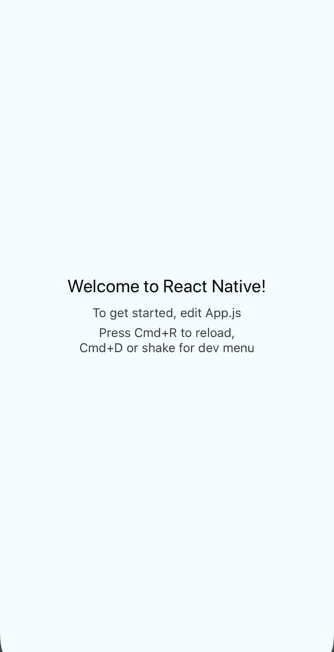
react-native run-androidThis should download all required dependecies and install the app on your emulator and then launch it automatically, You should have a screen with the default text showing as follows:
这应该下载所有必需的依赖项并在模拟器上安装该应用程序,然后自动启动它。您应该具有一个屏幕,其默认文本如下所示:
Now that we have our sample app up and running, we will now install the required dependecies for the project, we will be using the Axios for making requests to the server and Glamorous Native for styling our components, run the following command to install them:
现在,我们已经启动并运行了示例应用程序,现在我们将为项目安装所需的依赖项,我们将使用Axios向服务器发出请求,并使用Glamorous Native样式化组件,运行以下命令进行安装:
npm install -S axios glamorous-native目录结构 ( Directory Structure )
Directory structure is always crucial in an application, since this is a simple demo app, we'll keep this as minimal as possible:
目录结构在应用程序中始终至关重要,因为这是一个简单的演示应用程序,所以我们将其保持在最低限度:
src
├── App.js
├── components
│   ├── BeerPreviewCard
│   │   ├── BeerPreviewCard.js
│   │   └── index.js
│   ├── ContainedImage
│   │   └── index.js
│   └── Title
│       └── index.js
├── config
│   └── theme.js
└── utils
    └── lib
        └── axiosService.js
Axios配置 ( Axios Config )
In order to make our axios usage easy, we will create a singleton instance of the axios service that we can import across our components:
为了简化axios的使用,我们将创建axios服务的单例实例,可以将其跨组件导入:
import axios from 'axios';

const axiosService = axios.create({
  baseURL: 'https://api.punkapi.com/v2/',
  timeout: 10000,
  headers: {
    'Content-Type': 'application/json'
  }
});

// singleton instance
export default axiosService;
卡样式 ( Card Styling )
Next we will create cards to display our beer data and add some designs to it.
接下来,我们将创建卡片来显示我们的啤酒数据并向其中添加一些设计。
theme.js (theme.js)
This file contains the app color pallete which we will use across the app.
该文件包含我们将在整个应用程序中使用的应用程序颜色调色板。
export const colors = {
  french_blue: '#3f51b5',
  deep_sky_blue: '#007aff',
  white: '#ffffff',
  black: '#000000',
  veryLightPink: '#f2f2f2'
};
Title.js (Title.js)
This file contains the card text component that we will use to display the beer name in the card.
该文件包含卡片文本部分,我们将使用该文本部分来显示卡片中的啤酒名称。
import glamorous from 'glamorous-native';
import { colors } from '../../config/theme';

const Title = glamorous.text((props, theme) => ({
  fontFamily: 'robotoRegular',
  fontSize: 16,
  color: props.color || colors.black,
  lineHeight: 24,
  textAlign: props.align || 'left',
  alignSelf: props.alignSelf || 'center'
}));

export default Title;
ContainedImage.js (ContainedImage.js)
This file contains our image component which will have a resizeMode of contained in order to have the image fit within it's containing component.
该文件包含我们的图像组件,该组件的resizeMode为resizeMode ,以便使图像适合其包含组件。
import React from 'react';
import glamorous from 'glamorous-native';

const CardImageContainer = glamorous.view((props, theme) => ({
  flex: 1,
  alignItems: 'stretch'
}));

const StyledImage = glamorous.image((props, theme) => ({
  position: 'absolute',
  top: 0,
  left: 0,
  bottom: 0,
  right: 0
}));

const ContainedImage = props => {
  return (
    <CardImageContainer>
      <StyledImage resizeMode="contain" {...props} />
    </CardImageContainer>
  );
};

export default ContainedImage;
BeerPreviewCard.js (BeerPreviewCard.js)
This file contains the main card container, this is where we combine the title component and the image component to form a card that displays the beer name and image.
该文件包含主卡片容器,在这里我们将标题部分和图像部分组合在一起,形成显示啤酒名称和图像的卡片。
import React from 'react';
import glamorous from 'glamorous-native';

// app theme colors
import { colors } from '../../config/theme';

// components
import Title from '../Title';
import ContainedImage from '../ContainedImage';

const CardContainer = glamorous.view((props, theme) => ({
  height: 160,
  width: '85%',
  left: '7.5%',
  justifyContent: 'space-around'
}));

const CardImageContainer = glamorous.view((props, theme) => ({
  flex: 1,
  alignItems: 'stretch'
}));

const BeerNameContainer = glamorous.view((props, theme) => ({
  height: '30%',
  backgroundColor: colors.deep_sky_blue,
  justifyContent: 'center'
}));

const BeerPreviewCard = ({ name, imageUrl }) => {
  return (
    <CardContainer>
      <CardImageContainer>
        <ContainedImage source={{ uri: imageUrl }} />
      </CardImageContainer>
      <BeerNameContainer>
        <Title align="center" color={colors.white}>
          {name}
        </Title>
      </BeerNameContainer>
    </CardContainer>
  );
};

export default BeerPreviewCard;
拿啤酒 (Fetching Beers)
The logic for fetching beers will be in App.js which is the main component of the app, we need to consume the API by making a GET request to fetch a list paginated beers:
提取啤酒的逻辑将在App.js中,这是应用程序的主要组件,我们需要通过发出GET请求来获取分批啤酒列表来消耗API:
import React, { Component } from 'react';

// axios service
import axiosService from './utils/lib/axiosService';

export default class AllBeersScreen extends Component {
  state = {
    data: [],
    page: 1,
    loading: true,
    error: null
  };

  componentDidMount() {
    this._fetchAllBeers();
  }

  _fetchAllBeers = () => {
    const { page } = this.state;
    const URL = `/beers?page=${page}&per_page=10`;

    axiosService
      .request({
        url: URL,
        method: 'GET'
      })
      .then(response => {
        this.setState((prevState, nextProps) => ({
          data:
            page === 1
              ? Array.from(response.data)
              : [...this.state.data, ...response.data],
          loading: false
        }));
      })
      .catch(error => {
        this.setState({ error, loading: false });
      });
  };

 render() {
    return (
        // map through beers and display card
    );
}
FlatList组件 ( FlatList Component )
So what is a FlatList component? I'll quote the React Native docs which describes it as a performant interface for rendering simple, flat lists, supporting the most handy features this include:
那么什么是FlatList组件? 我将引用React Native文档 ,该文档将其描述为一种性能界面,用于呈现简单的平面列表,并支持以下最方便的功能:
- Fully cross-platform. 完全跨平台。
- Optional horizontal mode. 可选的水平模式。
- Configurable viewability callbacks. 可配置的可见性回调。
- Header support. 标头支持。
- Footer support. 页脚支持。
- Separator support. 分隔符支持。
- Pull to Refresh. 拉刷新。
- Scroll loading. 滚动加载。
- ScrollToIndex support ScrollToIndex支持
We will be using a few features from the above list for our app namely footer, pull to refresh and scroll loading.
我们将为应用程序使用上述列表中的一些功能,即页脚,拉动刷新和滚动加载。
基本用法: (Basic Usage:)
To use the FlatList component, you have to pass two main props which are RenderItem and data we can now pass the data we fetched earlier on to the FlatList component and use the BeerPreviewCard component to render a basic FlatListas follows:
要使用FlatList组件,您必须传递两个主要的道具RenderItem和data我们现在可以将先前获取的数据传递给FlatList组件,并使用BeerPreviewCard组件来呈现基本的FlatList ,如下所示:
export default class AllBeersScreen extends Component {
// fetch beer request and update state from earlier on
render() {
return (
<FlatList
contentContainerStyle={{
flex: 1,
flexDirection: 'column',
height: '100%',
width: '100%'
}}
data={this.state.data}
keyExtractor={item => item.id.toString()}
renderItem={({ item }) => (
<View
style={{
marginTop: 25,
width: '50%'
}}
>
<BeerPreviewCard name={item.name} imageUrl={item.image_url} />
</View>
)}
/>
);
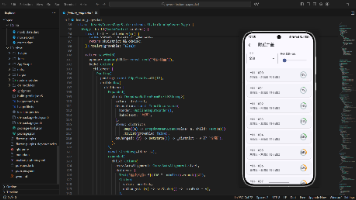
}Reload your app and you should a view similar to this:
重新加载您的应用,您应该看到类似以下的视图:

滚动加载 (Scroll Loading)
The main feature of infinite scrolling is loading content on demand as the user scrolls through the app, to achieve this, the FlatList component requires two props namely onEndReached and onEndReachedThreshold.
无限滚动的主要功能是在用户滚动应用程序时按需加载内容,要实现此目的, FlatList组件需要两个道具,即onEndReached和onEndReachedThreshold 。
onEndReached is the callback called when the users scroll position is close to the onEndReachedThreshold of the rendered content, onEndReachedThreshold is basically a number which indicates the user's scroll position in relation to how far it is from the end of the visible content, when the user reaches the specified position, the onEndReached callback is triggered.
onEndReached是当用户滚动位置接近渲染内容的onEndReachedThreshold时调用的回调, onEndReachedThreshold是一个数字,指示用户滚动位置与用户到达可视内容末端的距离有关在指定位置,将触发onEndReached回调。
A value of 0.5 will trigger onEndReached when the end of the content is within half the visible length of the list, which is what we need for this use case.
当内容的结尾在列表的可见长度的一半onEndReached时,值为0.5将触发onEndReached ,这是我们在此用例中需要的。
export default class AllBeersScreen extends Component {
  state = {
    data: [],
    page: 1,
    loading: true,
    loadingMore: false,
    error: null
  };

 // fetch beer request and update state from earlier on

  _handleLoadMore = () => {
    this.setState(
      (prevState, nextProps) => ({
        page: prevState.page + 1,
        loadingMore: true
      }),
      () => {
        this._fetchAllBeers();
      }
    );
  };

 render() {
    return (
         <FlatList
          contentContainerStyle={{
            flex: 1,
            flexDirection: 'column',
            height: '100%',
            width: '100%'
          }}
          data={this.state.data}
          renderItem={({ item }) => (
            <View
              style={{
                marginTop: 25,
                width: '50%'
              }}
            >
              <BeerPreviewCard name={item.name} imageUrl={item.image_url} />
            </View>
          )}
          onEndReached={this._handleLoadMore}
          onEndReachedThreshold={0.5}
          initialNumToRender={10}
        />
    );
  }
}
If you go back to the app and scroll down, you'll notice the beer list been automatically loaded as you scroll down (see demo at start of tutorial).
如果返回该应用程序并向下滚动,您会注意到向下滚动时会自动加载啤酒清单(请参阅本教程开始时的演示)。
页脚 (Footer)
The footer is basically the bottom part of our FlatList component, when the user scrolls down we want to show a loader when the content is been fetched, we can achieve this using the ListFooterComponent prop where we will pass a function that returns an ActivityIndicator component wrapped in a View component:
页脚基本上是FlatList组件的底部,当用户向下滚动时,我们想在提取内容时显示一个加载器,我们可以使用ListFooterComponent实现此ListFooterComponent ,我们将传递一个函数,该函数返回一个被包装的ActivityIndicator组件在视图组件中:
_renderFooter = () => {
if (!this.state.loadingMore) return null;
return (
<View
style={{
position: 'relative',
width: width,
height: height,
paddingVertical: 20,
borderTopWidth: 1,
marginTop: 10,
marginBottom: 10,
borderColor: colors.veryLightPink
}}
>
<ActivityIndicator animating size="large" />
</View>
);
};
render() {
return (
<FlatList
// other props
ListFooterComponent={this._renderFooter}
/>
);
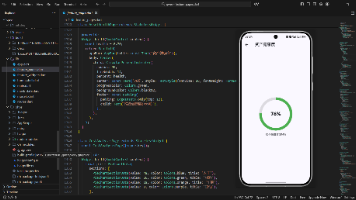
}Now when scrolling a loader will show on the screen while the content is loading (see demo at start of tutorial)
现在,当滚动内容时,将在屏幕上显示一个加载器(请参阅本教程开始时的演示)
拉动刷新 (Pull To Refresh)
Pull to refresh functionality is widely used in almost every modern application that uses network activity to fetch data, to achieve this in the FlatList, we need to pass the onRefresh prop which triggers a callback when the user carries a pull down gesture at the top of the screen:
几乎在使用网络活动来获取数据的每个现代应用程序中,拉刷新功能已广泛使用,要在FlatList实现此FlatList ,我们需要传递FlatList ,该onRefresh会在用户顶部的下拉手势时触发回调。屏幕:
_handleRefresh = () => {
    this.setState(
      {
        page: 1,
        refreshing: true
      },
      () => {
        this._fetchAllBeers();
      }
    );
  };

 render() {
    return (
         <FlatList
          // other props
          onRefresh={this._handleRefresh}
          refreshing={this.state.refreshing}
        />
    );
  }
Now when you try pulling down from the top part of the screen a loader will appear from the top and the content will be refetched.
现在,当您尝试从屏幕顶部下拉时,加载程序将从顶部出现,并且内容将被重新提取。
额外道具说明: (Extra Props Explained:)
initialNumToRender - This is the number of items we want to render when the app loads the data.
initialNumToRender这是我们在应用加载数据时要呈现的项目数。
keyExtractor - Used to extract a unique key for a given item at the specified index.
keyExtractor用于在给定索引处提取给定项目的唯一键。
结论: ( Conclusion: )
Infinite scrolling grants your users a smooth experience while using you app and is an easy way for your to deliver presentable and well ordered content for your users.
无限滚动可为您的用户在使用您的应用程序时提供流畅的体验,并且是您为用户提供可呈现且井井有条的内容的简便方法。
You can access the code here
您可以在此处访问代码
翻译自: https://scotch.io/tutorials/implementing-an-infinite-scroll-list-in-react-native

开源鸿蒙跨平台开发社区汇聚开发者与厂商,共建“一次开发,多端部署”的开源生态,致力于降低跨端开发门槛,推动万物智联创新。
更多推荐

 0
0 0
0- 0


 已为社区贡献16条内容

所有评论(0)