

How you can build test cases from zero and why testing is important.
如何从零开始构建测试用例,以及为什么测试很重要。
Testing an app is very important. We all have heard stories about how great products caused a terrible loss for some undetected errors. To minimize that type of risk, testing software is a very common (and really good) practice. From unit testing to integration testing, there are a lot of methods to check if our app or system is working as expected. But even with that, every software always has undetected defects: Errors and bugs only discovered by the final user. We don’t want the user to get a bad experience with our product so… Can we try to minimize the number of errors? Or in other words: Can we detect the most number of bugs before we release our system?
测试应用程序非常重要。 我们都听说过有关优质产品如何导致一些未发现的错误的巨大损失的故事 。 为了最大程度地减少这种风险,测试软件是一种非常普遍的做法(也是非常好的做法)。 从单元测试到集成测试,有很多方法可以检查我们的应用程序或系统是否按预期运行。 但是即使这样,每个软件也始终存在无法检测到的缺陷:错误和错误只有最终用户才能发现。 我们不希望用户对我们的产品有不好的体验,所以……我们可以尝试减少错误数量吗? 或者换句话说:在发布系统之前,我们能否检测到最多的错误?
One way to do that is by working with testers. They will run our app once and again to discover hidden bugs, mimicking the expected (and the unexpected) user’s behavior. This is a really great method, and with more testers more chance to get bugs discovered. But we don’t have always the necessary resources to work with them: It’s necessary to find alternative methods to try to mimic the user’s behavior.
一种方法是与测试人员合作 。 他们将一次又一次地运行我们的应用程序,以发现隐藏的错误,从而模仿预期(和意外)用户的行为。 这是一种非常好的方法,并且有更多的测试人员有更多的机会发现错误。 但是我们并不总是拥有与之合作的必要资源:有必要找到替代方法来尝试模仿用户的行为。
自动化测试 (Automated Testing)
When developing Flutter apps we can create a lot of automated tests: Unit tests to verify the correct response of our functions or methods, integration tests to check the behavior of some parts of our system when working together and widget tests to verify that the widget’s UI looks and interacts as expected. But we can’t really see (at least in the last one) how the app is working, how the widgets are rendered or how they are responding to user interaction. As the Flutter team say in the Flutter Test page:
在开发Flutter应用程序时,我们可以创建许多自动化测试:单元测试以验证我们的功能或方法的正确响应;集成测试以在共同工作时检查系统某些部分的行为;小部件测试以验证小部件的UI看起来并按照预期进行交互。 但是我们真的看不到(至少在最后一个中)应用程序的工作方式,小部件的呈现方式或它们如何响应用户交互。 正如Flutter小组在Flutter测试页面上所说:
A widget test’s environment is replaced with an implementation much simpler than a full-blown UI system.
与全面的UI系统相比,小部件测试的环境已被实现简单得多的实现所取代。
To overcome this problem and test automatically our apps while watching how every widget or interface is reacting, we can get the help of some open source packages. So today, I am going to introduce one of them: The automated_testing_framework package.
为了克服这个问题并在观察每个小部件或界面的React时自动测试我们的应用程序,我们可以获得一些开源软件包的帮助。 因此,今天,我将介绍其中之一: automatic_testing_framework软件包。
构建可测试的应用 (Building a testable app)
导入必要的组件: (Importing the necessary components :)
This time we are going to test the most simple Flutter app: The CounterApp. To do so we create a new Flutter project:
这次,我们将测试最简单的Flutter应用: CounterApp 。 为此,我们创建一个新的Flutter项目:
flutter create new_appAfter that, we need to import the Dart package into the pubspec.yaml to create the tests:
之后,我们需要将Dart包导入pubspec.yaml以创建测试:
automated_testing_framework: ^1.0.3To build the core for the test package, let’s rewrite the MyApp widget as a StatefulWidget . The code should look like below.
为了构建测试包的核心,让我们将MyApp小部件重写为StatefulWidget 。 该代码应如下所示。
Let’s start the set up for the tests. First of all, we need to instantiate a TestController from the automated_testing_framework . It requires two arguments: A NavigatorKey navigatorKeyand a Future<void> Function onReset . The former should be the same key attached to a MaterialApp to allow the navigation within the framework and the latter is a function to reset the application to an initial state. So, inside the MyAppState we write:
让我们开始测试设置。 首先,我们需要一个实例化TestController从automated_testing_framework 。 它需要两个参数: NavigatorKey navigatorKey和Future<void> Function onReset 。 前者应该是附加到MaterialApp的相同键,以允许在框架内进行导航,而后者是将应用程序重置为初始状态的功能。 因此,在MyAppState内部,我们编写:
final GlobalKey<NavigatorState> _navigatorKey = GlobalKey<NavigatorState>();
TestController _testController;


Future<void> _onReset() async {
  while (_navigatorKey.currentState?.canPop() == true) {
    _navigatorKey.currentState.pop();
  }
  _navigatorKey.currentState.pushReplacementNamed('/');
}


@override
void initState() {
  super.initState();
  _testController = TestController(
    navigatorKey: _navigatorKey,
    onReset: _onReset,
    testReader: AssetTestStore(
      testAssets: [
        'assets/simple.json',
      ],
    ).testReader,
  );
}
You may be wondering: What is the _onReset() function? What is the TestController doing? Why is there an ‘assets/simple.json’? Let’s go step by step.
您可能想知道: _onReset()函数是什么? TestController在做什么? 为什么会有“ assets / simple.json”? 让我们一步一步走。
Function onReset() : (Function onReset() :)
When the tests are complete, the framework will want to “reset” the app state to an initial state¹. So it’s our responsibility to tell the framework how to reset it. In this case, we just replaced the current route with the ‘/’ route (the default route). This way we can restart the entire app. As we will see soon, the framework shows us a summary of the tests: Which passed and which not. This summary is presented as a new page in the app, so it’s necessary to pop the routes our test has created, before restarting the state. (You can test what happens if you remove the while).
测试完成后,框架将希望将应用程序状态“重置”为初始状态¹。 因此,告诉框架如何重置是我们的责任。 在这种情况下,我们只是将当前路由替换为“ /”路由(默认路由)。 这样,我们可以重新启动整个应用程序。 我们将很快看到,该框架向我们显示了测试摘要:哪些通过了哪些,没有通过。 此摘要在应用程序中显示为新页面,因此有必要在重新启动状态之前pop测试创建的路由。 (如果删除while则可以测试会发生什么)。
TestController和JSON文件: (TestController and the JSON file :)
The TestController is the core of the package: it allows us to create, load, and execute the tests. For now, we only want to load and execute our tests. But… What tests? The framework allows us to load custom tests from JSON files (it also has more load methods), so we can create the tests as independent files and put inside the app as assets. How?
TestController是程序包的核心:它允许我们创建,加载和执行测试。 目前,我们只想加载并执行测试。 但是……什么测试? 该框架允许我们从JSON文件加载自定义测试(它还具有更多的加载方法),因此我们可以将测试创建为独立文件,然后将其作为资产放入应用程序中。 怎么样?
First, we create the assets folder inside the app root folder. After that we need to tell the pubspec.yaml to use that folder:
首先,我们在应用程序根文件夹内创建assets文件夹。 之后,我们需要告诉pubspec.yaml使用该文件夹:
flutter:uses-material-design: trueassets:- assets/Let’s think of a very simple test: Press the increment button and check if the text showing the _counter has changed. To do so, you need to create a simple.json file and copy in it this:
让我们考虑一个非常简单的测试:按下增量按钮,检查显示_counter的文本_counter已更改。 为此,您需要创建一个simple.json文件并在其中复制以下内容:
{
  "name": "Simple",
  "steps": [
    {
      "id": "tap",
      "image": null,
      "values": {
        "testableId": "fab"
      }
    },
    {
      "id": "assert_value",
      "image": null,
      "values": {
        "testableId": "text_value",
        "value": "1",
        "equals": "true"
      }
    }
  ]
}
The id of each step is the name of the action we want to do. In this case, the press action is called"id": "tap" but which widget are we going to press? For now, let’s say we are going to tap a button with testableId equals to "fab" . It’s the same case for the next step: To check if the text has changed it’s necessary to check if its value has changed. So we need to ensure the text value is equals to something. As we only pressed the increment button once, the value changed from “0” to “1". To do this verification, we can use the assert_value test step, and check if the widget with "testableId": “text_value” has a "value" equals to "1" . The testableId values are string ids we are going to create in the next steps. You have to remember only that they are a way to identify a specific widget.
每个步骤的id是我们要执行的操作的名称。 在这种情况下,按下动作称为"id": "tap"但是我们要按下哪个小部件? 现在,假设我们要点击testableId等于"fab"的按钮。 下一步是相同的情况:要检查文本是否已更改,有必要检查其值是否已更改。 因此,我们需要确保文本值等于某值。 因为只按了一次增量按钮,所以值从“ 0”更改为“ 1”。要进行验证,我们可以使用assert_value测试步骤,并检查带有"testableId": “text_value”的小部件是否具有"value"等于"1" testableId值是我们将在后续步骤中创建的字符串ID。您只需要记住它们是识别特定小部件的一种方式。
Now that the TestController is created, how do we use it?
现在已经创建了TestController ,我们如何使用它?
我们需要将我们的TestController提供给WidgetTree (We need to provide our TestController to the WidgetTree)
We need to enclose the entire app to be tested (in this case the MaterialApp) inside a TestRunner . That widget requires two parameters: the TestController and a child widget. This way the framework can access the controller (the TestRunneralso provides other properties to enable/disable tests, change the method to display the progress of the tests, etc). And also we have to add one property to MaterialApp :
我们需要将要测试的整个应用程序(在本例中为MaterialApp )封装在TestRunner 。 该小部件需要两个参数: TestController和一个child小部件。 这样,框架可以访问控制器( TestRunner还提供其他属性来启用/禁用测试,更改方法以显示测试进度等)。 而且我们还必须向MaterialApp添加一个属性:
-
navigatorKey: To pass the_navigatorKeywe created before.navigatorKey:要传递我们之前创建的_navigatorKey。
Our code now looks like this:
现在,我们的代码如下所示:
@override
Widget build(BuildContext context) {
  return TestRunner(
    controller: _testController,
    child: MaterialApp(
      navigatorKey: _navigatorKey,
      title: 'Automated Testing Demo',
      theme: ThemeData(
        primarySwatch: Colors.blue,
        visualDensity: VisualDensity.adaptivePlatformDensity,
      ),
      home: MyHomePage(title: 'Flutter Demo Home Page'),
    ),
  );
}
We already have the necessary setup to run some tests but… What are we going to verify? We need to tell the framework which are the widgets we are going to test (Do you remember the testableId?). To do so, the framework uses a Testable widget. This widget should wrap each widget we want to interact with: To make a press gesture, to read a value, to set a value, etc. In our example, we are going to test the counter, so we will interact with two widgets:
我们已经具有运行某些测试所必需的设置,但是……我们要验证什么? 我们需要告诉框架哪些是我们要测试的小部件(您还记得testableId吗?)。 为此,框架使用Testable小部件。 这个小部件应该包装我们要与之交互的每个小部件:要进行按下手势,读取值,设置值等。在我们的示例中,我们将测试计数器,因此我们将与两个小部件进行交互:
-
FloatingActionButtonto send theonPressevent (tap).FloatingActionButton发送onPress事件(tap)。 -
Textto assert the expected number value (assert_value).用于声明预期数字值(
assert_value)的Text。
Let’s assign to these widgets their testableId . How? Through the Testable widget:
让我们为其分配这些小部件的testableId 。 怎么样? 通过Testable小部件:
body: Center(
  child: Column(
    mainAxisAlignment: MainAxisAlignment.center,
    children: <Widget>[
      Text(
        'You have pushed the button this many times:',
      ),
      Testable(
        id: 'text_value',
        child: Text(
          '$_counter',
          style: Theme.of(context).textTheme.headline4,
        ),
      ),
    ],
  ),
),
floatingActionButton: Testable(
  id: 'fab',
  child: FloatingActionButton(
    onPressed: _incrementCounter,
    tooltip: 'Increment',
    child: Icon(Icons.add),
  ),
),
As you can tell, both the Text and the FloatingActionButton are enclosed in a Testable widget with an id .
如您所知, Text和FloatingActionButton都包含在具有id的Testable小部件中。
让我们开始测试! (Let’s start our tests!)
调用函数: (Calling the function :)
This is a very simple step. All we need to do is to somehow start the test process. This time, we are going to use the initState function of our _MyAppState to initialize the process. We are going to:
这是非常简单的步骤。 我们需要做的就是以某种方式启动测试过程。 这一次,我们将使用initState我们的功能_MyAppState初始化过程。 我们准备去:
- Load the test to the controller. 将测试加载到控制器。
- Execute the pending tests (in this case, the only test we have). 执行挂起的测试(在这种情况下,这是我们唯一的测试)。
To do so, we can create a simple function _runTests() to be called in the initState :
为此,我们可以创建一个简单的函数_runTests()在initState :
Future<void> _runTests() async {
  var tests = await _testController.loadTests(context);
  await _testController.runPendingTests(tests);
}
So we are done! The final code looks like this:
至此我们完成了! 最终代码如下所示:
import 'package:automated_testing_framework/automated_testing_framework.dart';
import 'package:flutter/material.dart';


void main() {
  runApp(MyApp());
}


class MyApp extends StatefulWidget {
  @override
  _MyAppState createState() => _MyAppState();
}


class _MyAppState extends State<MyApp> {
  final GlobalKey<NavigatorState> _navigatorKey = GlobalKey<NavigatorState>();
  TestController _testController;


  Future<void> _onReset() async {
    while (_navigatorKey.currentState?.canPop() == true) {
      _navigatorKey.currentState.pop();
    }
    _navigatorKey.currentState.pushReplacementNamed('/');
  }


  @override
  void initState() {
    super.initState();
    _testController = TestController(
      navigatorKey: _navigatorKey,
      onReset: _onReset,
      testReader: AssetTestStore(
        testAssets: [
          'assets/simple.json',
        ],
      ).testReader,
    );


    _runTests();
  }


  Future<void> _runTests() async {
    var tests = await _testController.loadTests(context);
    await _testController.runPendingTests(tests);
  }


  @override
  Widget build(BuildContext context) {
    return TestRunner(
      controller: _testController,
      child: MaterialApp(
        navigatorKey: _navigatorKey,
        title: 'Automated Testing Demo',
        theme: ThemeData(
          primarySwatch: Colors.blue,
          visualDensity: VisualDensity.adaptivePlatformDensity,
        ),
        home: MyHomePage(title: 'Flutter Demo Home Page'),
      ),
    );
  }
}


class MyHomePage extends StatefulWidget {
  MyHomePage({Key key, this.title}) : super(key: key);


  final String title;


  @override
  _MyHomePageState createState() => _MyHomePageState();
}


class _MyHomePageState extends State<MyHomePage> {
  int _counter = 0;


  void _incrementCounter() {
    setState(() {
      _counter++;
    });
  }


  @override
  Widget build(BuildContext context) {
    return Scaffold(
      appBar: AppBar(
        title: Text(widget.title),
      ),
      body: Center(
        child: Column(
          mainAxisAlignment: MainAxisAlignment.center,
          children: <Widget>[
            Text(
              'You have pushed the button this many times:',
            ),
            Testable(
              id: 'text_value',
              child: Text(
                '$_counter',
                style: Theme.of(context).textTheme.headline4,
              ),
            ),
          ],
        ),
      ),
      floatingActionButton: Testable(
        id: 'fab',
        child: FloatingActionButton(
          onPressed: _incrementCounter,
          tooltip: 'Increment',
          child: Icon(Icons.add),
        ),
      ),
    );
  }
}
运行测试: (Running the test :)
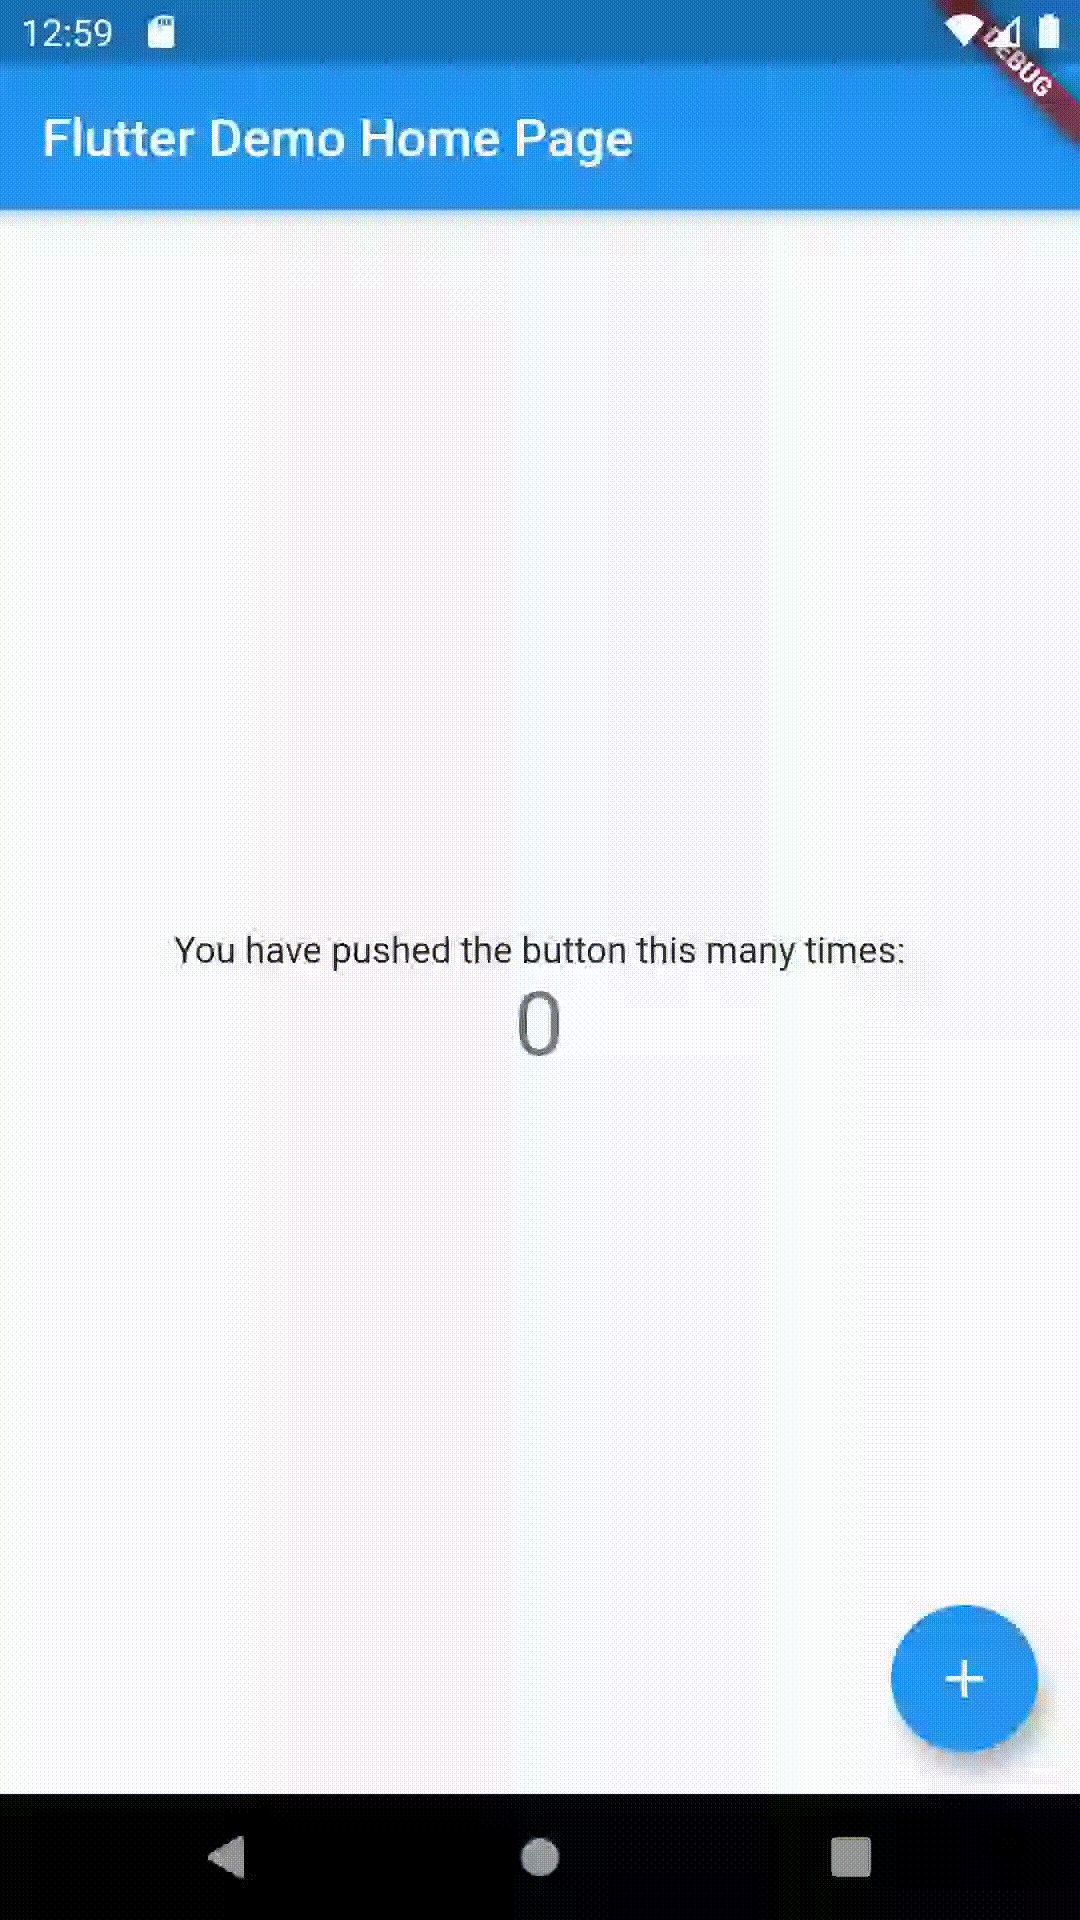
To run the test we have created, we just need to run the app in DEBUG mode and enjoy the results.
要运行我们创建的测试,我们只需要在DEBUG模式下运行该应用程序并享受结果即可。
All of the processes are automatized! Obviously this was a very simple test, but we can create more complex ones without coding in the app itself. We would only need to add new JSON files with all the tests.
所有过程都是自动化的! 显然,这是一个非常简单的测试,但是我们可以创建更复杂的测试,而无需在应用本身中进行编码。 我们只需要在所有测试中添加新的JSON文件即可。
This package also supports drag gestures, double tap, secondary tap, and more!
该软件包还支持拖动手势,双击,二次点击等等!
If we want to disable the tests when the app is built into RELEASE mode, the TestRunner supports a property called enabled which receives a boolean to enable or disable the test executions. This way we can be sure the tests only will run when we want to.
如果我们要在应用程序以RELEASE模式构建时禁用测试,则TestRunner支持一个名为enabled的属性,该属性接收一个布尔值以启用或禁用测试执行。 这样,我们可以确保测试仅在需要时运行。
结论 (Conclusion)
We learned how to automatize some user tests. This package is not intended to replace the Widget testing offered by the Flutter team but to run the app as if the final user were using it. This way we can ensure our code is prepared to be released. The example app code can be found here. This package has a lot of functionalities I didn’t explore here, so I will post a second part covering a few more features and capabilities of the automated_testing_framework . But if you can’t wait to discover more please visit its pub.dev page.
我们学习了如何自动化一些用户测试。 此软件包的目的不是取代Flutter团队提供的Widget测试,而是像最终用户正在使用该应用程序一样运行该应用程序。 这样我们可以确保我们的代码准备发布。 示例应用程序代码可以在此处找到。 这个包有很多功能我没有考察这里,所以我会后的第二部分涵盖了一些更多的功能和能力automated_testing_framework 。 但是,如果您迫不及待想要发现更多,请访问其pub.dev页面。
I hope this post has been useful to you. If you want to know how to render all types of widgets from JSON you might be interested to read a previous post I published.
希望这篇文章对您有所帮助。 如果你想知道如何使所有类型的JSON小工具,你可能会有兴趣看以前的帖子我发表。
[1] This would change from app to app, depending on the needs. Maybe you don’t want to reset to the very initial state but some other state.
[1]根据需要,这会因应用程序而异。 也许您不想重置为最初的状态,而是要重置为其他状态。
翻译自: https://medium.com/@limonadev/getting-started-with-automating-user-testing-in-flutter-3d1ec68d118


 已为社区贡献4条内容

所有评论(0)