

介绍 (Introduction)
This piece explores the development and management of TypeScript-based NPM packages for React Native. It will cover how to configure TypeScript linting and tsconfig for a package to ensure code integrity with useful VS Code extensions and settings to aid in TypeScript development.
本文探讨了用于React Native的基于TypeScript的NPM软件包的开发和管理。 它将介绍如何为软件包配置TypeScript linting和tsconfig ,以确保代码的完整性以及有用的VS Code扩展和设置,以帮助TypeScript开发。
An entire section will be dedicated to TypeScript specific development of a package, in addition to visiting a demo packages project that is available on GitHub. But there are other important aspects of developing NPM packages worth considering. Let’s firstly highlight some of those aspects so the reader gets a good intuition of what will be covered throughout this piece.
除了访问GitHub上的演示程序包项目外,整个部分还将专门针对TypeScript程序包开发。 但是,开发NPM软件包还有其他重要方面值得考虑。 首先,让我们重点介绍其中的一些方面,以便读者对本文的内容有一个很好的直觉。
软件包开发:独立与嵌入式 (Package development: standalone vs embedded)
Developing packages can either be done in a standalone project or within a project where those packages are installed and used. The latter approach makes sense if you build components for a particular project (a React Native app for example) and abstract those components into packages further down the line as they are needed for other projects.
开发软件包可以在独立项目中完成,也可以在安装和使用这些软件包的项目中完成。 如果您为特定项目(例如React Native应用程序)构建组件并将这些组件抽象到其他项目所需的软件包中,则后一种方法才有意义。
This ties into the concept of Agile Development where there may be no concrete roadmap to what components will be abstracted into packages.
这与敏捷开发的概念有关,在敏捷开发中,可能没有具体的路线图将哪些组件抽象到程序包中。
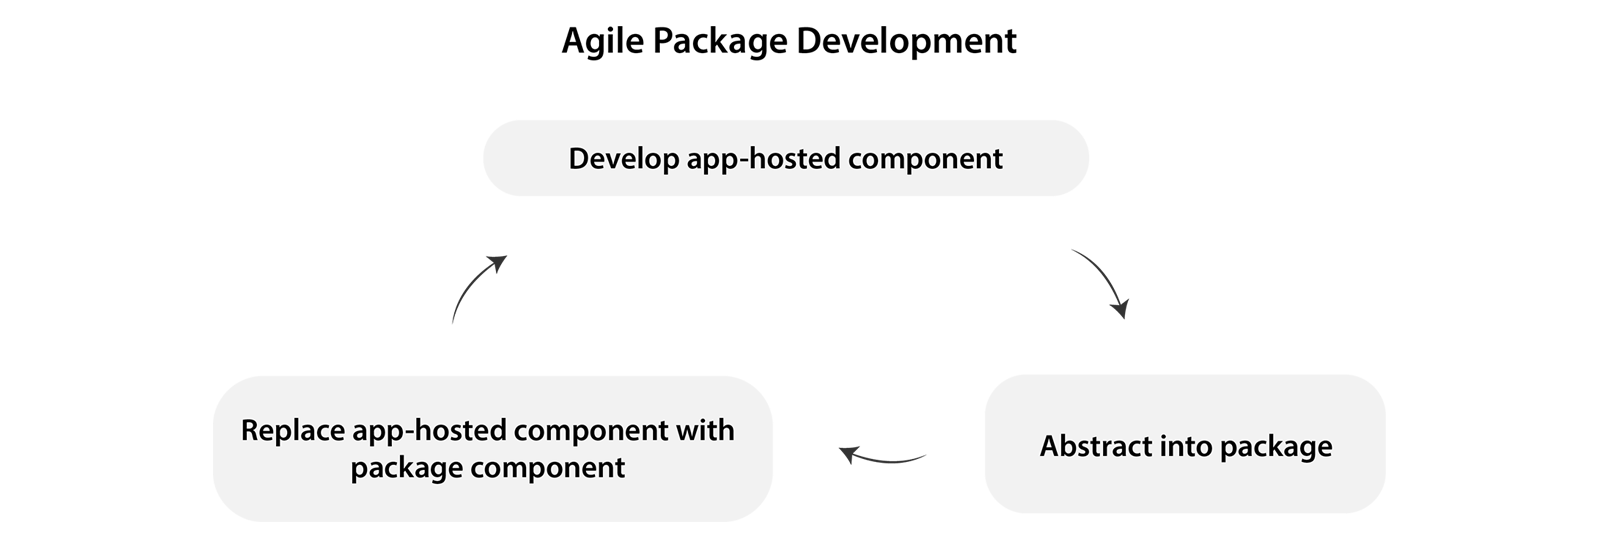
This approach has the advantage of having package dependencies already in place, such as the peer dependencies that packages may require.
这种方法的优点是已经具有程序包依赖性,例如程序包可能需要的对等依赖性。
A peer dependency is a dependency a package requires but is not installed within its node modules. Instead, it relies on the installed version of the host project.
对等依赖项是程序包需要但未安装在其节点模块内的依赖项。 相反,它依赖于宿主项目的安装版本。
We’ll cover the types of dependencies and workspace setup in more detail further down.
我们将在后面详细介绍依赖项的类型和工作区设置。
范围可用于加快软件包开发 (Scopes can be used to speed up package development)
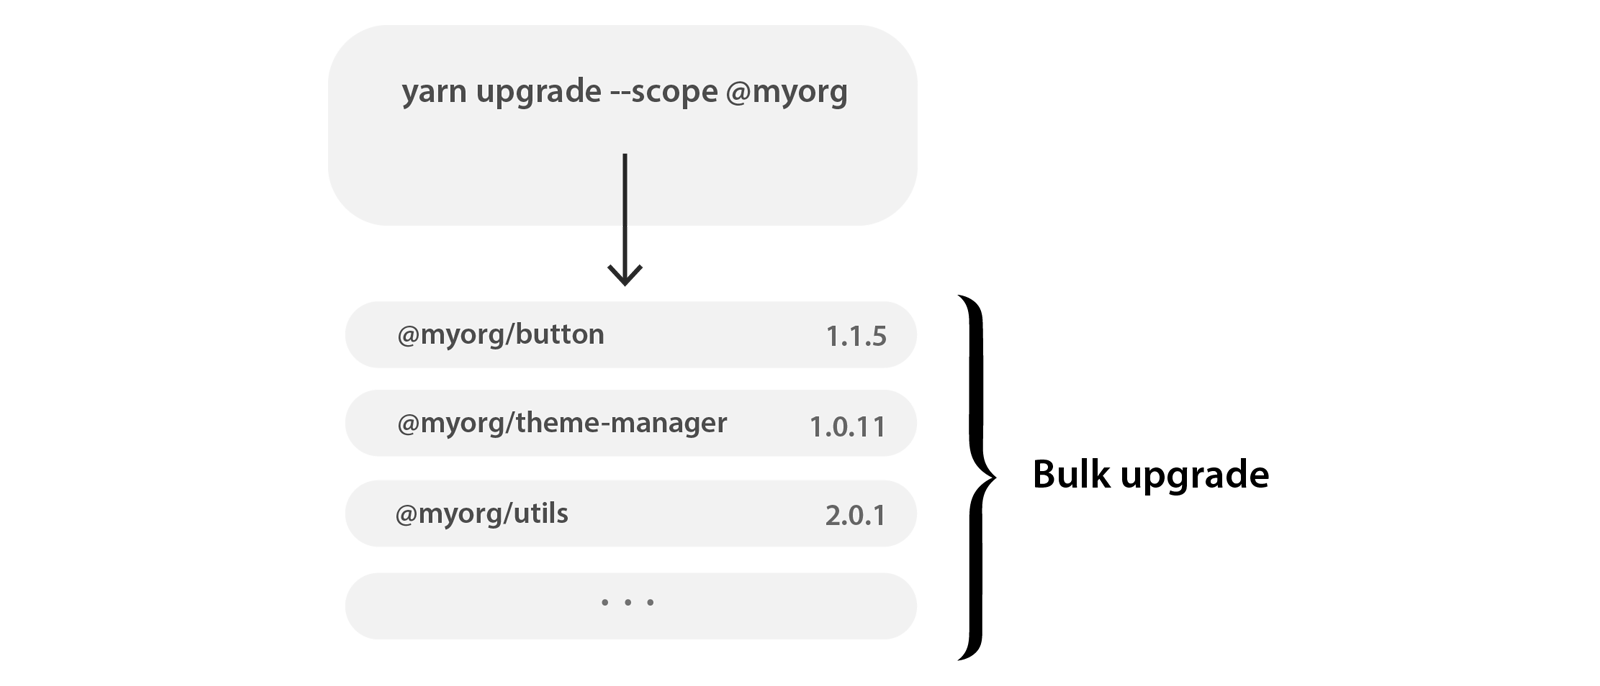
We’ll also cover how to use scoped packages as a way of grouping your related packages under one name — e.g. @my-org/<package_name>, allowing you to house all your packages under one organisation or branch. NPM or Yarn commands can then be executed on all packages under that scope simultaneously, thus speeding up development.
我们还将介绍如何使用作用域软件包作为将相关软件包分组为一个名称的一种方式,例如@my-org /<package_name> ,使您可以将所有软件包置于一个组织或分支机构下。 然后可以在该范围内的所有软件包上同时执行NPM或Yarn命令,从而加快了开发速度。
私人NPM注册管理机构解决方案 (Private NPM Registry Solutions)
Private registries allow developers to host their own packages in a private manner to compliment their internal ecosystem of app building blocks, and such a workflow has been gaining momentum in adoption. Private registries allow a developer or team to manage packages on their machine, or on a remote server in a team setting that requires authentication to access.
私有注册表允许开发人员以私有方式托管自己的程序包,以补充其内部应用程序构建基块的生态系统,并且这种工作流一直在被采用。 私有注册表允许开发人员或团队以需要进行身份验证才能访问的团队设置来管理其计算机上或远程服务器上的软件包。
The NPM registry of choice plays a big part of your development pipeline. This article will cite the Verdaccio private proxy registry as the solution to publishing packages. As Verdaccio acts as a proxy to the public NPM registry, it is flexible in that you can store your private packages on Verdaccio while simultaneously having access to the public NPM registry.
选择的NPM注册中心在您的开发流程中起着很大的作用。 本文将引用Verdaccio私有代理注册表作为发布程序包的解决方案。 由于Verdaccio可以充当公共NPM注册表的代理,因此它的灵活性在于,您可以将私有软件包存储在Verdaccio上,同时可以访问公共NPM注册表。
I have published a separate piece on Verdaccio that deep dives into setting up a remote private registry for your development team. Check out that piece here: Publish Private NPM Packages with Proxy Registry Verdaccio.
我在Verdaccio上发表了另一篇文章,深入探讨了为您的开发团队设置远程私人注册表的问题。 在此处查看该内容: 使用Proxy Registry Verdaccio发布私有NPM软件包 。
Private registries play a huge role in large entities where libraries of packages need to be stored and maintained under that particular organisation. Smaller teams can also leverage such a setup, and there are a couple of notable tools on the market now.
私有注册表在大型实体中发挥着重要作用,在大型实体中,软件包库需要在该特定组织下进行存储和维护。 较小的团队也可以利用这种设置,并且现在市场上有几个著名的工具。
Enterprise and large tech has caught on to this need. GitHub launched GitHub Packages in 2019 as they deemed the need for private registries a sizeable enough market worthy of pursuing. GitHub offer a pay-as-you-go model for using the service, the billing of which is based on storage and data transfer. This model offers a small amount of resources for free users too, that aim to onboard them into the GitHub ecosystem.
企业和大型技术已经满足了这一需求。 GitHub在2019年推出了GitHub Packages ,因为他们认为私人注册管理机构的需求是一个值得追求的足够大的市场。 GitHub提供了一种使用该服务的即付即用模型,其计费基于存储和数据传输 。 该模型也为免费用户提供了少量资源,旨在将他们加入GitHub生态系统。
NPMJS also offer a private registry service with a monthly subscription.
NPMJS 还提供按月订阅的私人注册服务。
返回开发套件 (Back to developing packages)
The next section will document the setup process of a TypeScript NPM package. As the majority of my articles are focused on React Native, the content here will be based on developing React Native packages, but the setup can be applied to any TypeScript project.
下一节将介绍TypeScript NPM软件包的设置过程。 由于我的大部分文章都集中在React Native上,因此这里的内容将基于开发React Native包,但是该设置可以应用于任何TypeScript项目。
TypeScript NPM软件包设置 (TypeScript NPM Package Setup)
VS Code is the best TypeScript-supported editor, which is no surprise since Microsoft maintain both the editor and TypeScript itself. For this reason, VS Code will be the editor of choice we’ll focus on here.
VS Code是TypeScript支持的最佳编辑器,这并不奇怪,因为Microsoft同时维护了该编辑器和TypeScript本身。 因此,VS Code将成为我们此处重点介绍的首选编辑器。
安装和配置TypeScript (Installing and Configuring TypeScript)
TypeScript is supported out of the box in VS Code, but the compiler, tsc, needs to be added to your project as a dev dependency.
打字稿是支持了在VS代码框的,但是编译器, tsc ,需要被添加到您的项目作为一个开发依赖。
A dev (developer) dependency is a dependency that is installed on the developer’s machine, required for developing the package, but not required when importing the package code itself.
一个 DEV(开发者)的依赖 是安装在开发人员的机器,用于开发包所需的依赖关系,但进口本身的包代码时不是必需的。
If you are developing a package from scratch, initiate your package and add typescript as a dev dependency:
如果您是从头开始开发软件包,请启动您的软件包并将typescript添加为dev依赖项:
yarn init
yarn add -D typescript
Verify the version of TypeScript installed in your package.json. At this time of writing, version 4.0.2 was the latest stable version:
验证package.json安装的TypeScript版本。 在撰写本文时,版本4.0.2是最新的稳定版本:
"devDependencies": {
  "typescript": "^4.0.2"
}
The tsc command will now immediately become available, enabling you to compile your TypeScript. We’ll look more at tsc further down, and how it can be automatically fix a range of errors based on pre-defined linting rules.
该 tsc 命令现在将立即变为可用,使您能够编译打字稿。 我们将在 tsc 进一步介绍 tsc ,以及如何根据预定义的插入规则自动修复一系列错误。
Upon installing TypeScript the immediate next step is to define your tsconfig.json file. This file defines compilation options including the output directory, whether type definition files should be included, module format of the compiled JavaScript, and a lot more. In fact, for a React Native project there are some specific configuration options that need to be defined within tsconfig.json.
安装TypeScript后,下一步就是定义tsconfig.json文件。 该文件定义了编译选项,包括输出目录,是否应包含类型定义文件,已编译JavaScript的模块格式等等。 实际上,对于React Native项目,需要在tsconfig.json定义一些特定的配置选项。
Consider the following configuration, with the more interesting properties highlighted in bold:
考虑以下配置,用粗体突出显示更有趣的属性:
// `tsconfig.json` for react native TypeScript package{
  "compilerOptions": {
    "target": "es6",
    "module": "es6",    "declaration": true,    "outDir": "./lib",
    "strict": true,
    "jsx": "react-native",
    "skipLibCheck": true,
  },
  "include": [
    "src"
  ],
  "exclude": [
    "node_modules",
    "**/__tests__/*"
  ]
}
Let’s break down some of these properties:
让我们分解其中一些属性:
React Native modules are coded using ES6 syntax, therefore the
es6value is given to the module property. Conversely, Node.js modules conform tocommonjssyntax. Since we are working with React Native,es6can also be the output format. Remember React Native projects will be further compiled into a final build before being uploaded to an App Store.React Native模块使用ES6语法编码,因此
es6值被赋予模块属性。 相反,Node.js模块符合commonjs语法。 由于我们正在使用React Native,因此es6也可以是输出格式。 请记住,React Native项目将被进一步编译成最终版本,然后再上传到App Store。The
jsxproperty tells the TypeScript compiler how to treat the JSX present in your project at compile time. There is areact-nativeoption built in.jsx属性告诉TypeScript编译器如何在编译时处理项目中存在的JSX。 有一个内置react-native选项。With this setup, the compiler takes files from the
src/folder and outputs the compiled JavaScript into alib/folder. It is thislib/folder that is uploaded to an NPM registry.通过此设置,编译器将从
src/文件夹中获取文件,并将编译后JavaScript输出到lib/文件夹中。 就是这个lib/文件夹上载到NPM注册表。skipLibCheckset totruewill bypass type checking for your imported libraries (e.g. your node modules). Turning on this option is viewed by some as decreasing the integrity of your code, but if your package relies on imports that have compile time errors due to poorly defined or missing types, thenskipLibCheckwill ignore these problems. The compiler will only consider your project files withskipLibCheckturned on.skipLibCheck设置为true将绕过导入库(例如,节点模块)的类型检查。 某些人认为打开此选项会降低代码的完整性,但是如果您的程序包依赖由于类型定义不佳或缺少类型而导致编译时错误的导入,则skipLibCheck将忽略这些问题。 编译器将仅在skipLibCheck下考虑您的项目文件。declarationset totrueallows the compiler to generate type definition files for each of the compiled JavaScript files. These files are denoted by the.d.tssuffix, and make your compiled JavaScript usable by TypeScript projects.declaration设置为true允许编译器为每个已编译JavaScript文件生成类型定义文件。 这些文件以.d.ts后缀表示,并使您的编译JavaScript可被TypeScript项目使用。
Concretely, the compiled JavaScript inside lib/ will be uploaded to NPM, along with the required meta files such as package.json. The src/ directory containing your TypeScript files will be ignored by NPM.
具体来说, lib/ 的已编译JavaScript 以及必需的元文件(例如 package.json 将被上载到NPM 。 包含TypeScript文件 的 src/ 目录将被NPM忽略。
确保仅将lib /文件夹上载到NPM (Ensuring only the lib/ folder is uploaded to NPM)
We’ve just configured the TypeScript compiler to compile the package into a lib/ folder, and therefore we’re only interested in uploading that folder to the NPM registry (along with the required package.json file and other meta files).
我们刚刚将TypeScript编译器配置为将包编译到lib/文件夹中,因此我们只对将该文件夹上载到NPM注册表(以及所需的package.json文件和其他元文件)感兴趣。
There is a quick way to do this — by defining a files property in your package.json in conjunction with main and types properties:
有一种快速的方法来执行此操作-通过在package.json中定义files属性以及main和types属性来实现:
filestakes an array of globs (file paths) as its value. Only these file paths, along with some required files (package.jsonitself being one of them) will be uploaded to NPM.files将glob(文件路径)数组作为其值。 只有这些文件路径以及一些必需的文件(package.json本身就是其中之一)将被上载到NPM。maindefines the index, or entry file, of the package. Since anindex.jswill not be found in the project root directory, we need to explicitly define where the entry file is.main定义包的索引或入口文件。 由于在项目根目录中找不到index.js,因此我们需要显式定义条目文件的位置。Similar to main,
typesdefines where the main type definition file is located, that is also in thelib/folder.与main相似,
types定义了主要类型定义文件所在的位置,也位于lib/文件夹中。
These 3 properties can be defined as follows:
这3个属性可以定义如下:
// package.json {
  ...
  "main": "lib/index.js",
  "types": "lib/index.d.ts",
  files": [
    "lib/**/*"
  ]
}
The ability to define whitelist of files in this manner is more efficient than a blacklist such as the .npmignore file, that would need to be amended every time a new file is added outside of the lib/ directory.
以这种方式定义文件白名单的能力比黑名单(例如.npmignore文件)更有效,每次将新文件添加到lib/目录之外时,都需要对其进行修改。
More information about the files property of package.json can be found here in the official NPM docs.
有关详细信息, files 的package.json的特性,可以发现 这里 在官方NPM文档。
VS代码扩展和TypeScript支持 (VS Code Extensions and TypeScript Support)
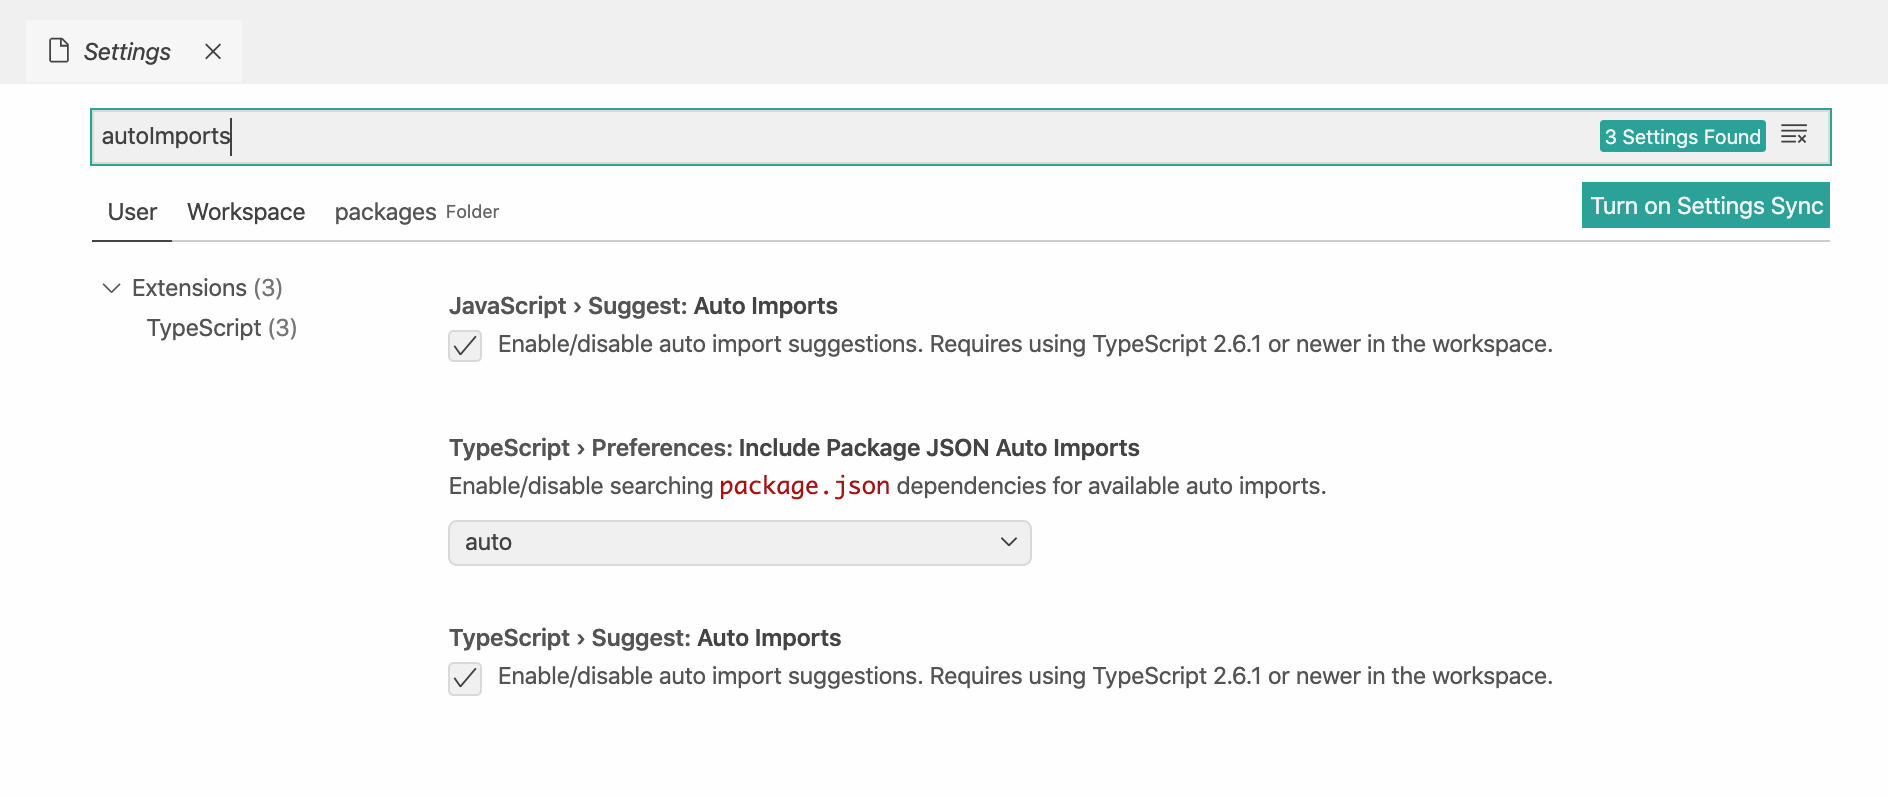
To aid in your development, VS Code can also be configured to automatically include import statements as you write code pertaining to a particular library you have installed via package.json. Turning on auto imports can be found under the TypeScript settings — simply search for autoImports to summon the options:
为了帮助您进行开发,还可以将VS Code配置为在编写与通过package.json安装的特定库有关的代码时自动包含导入语句。 可以在TypeScript设置下找到启用自动导入的功能-只需搜索autoImports即可召唤以下选项:
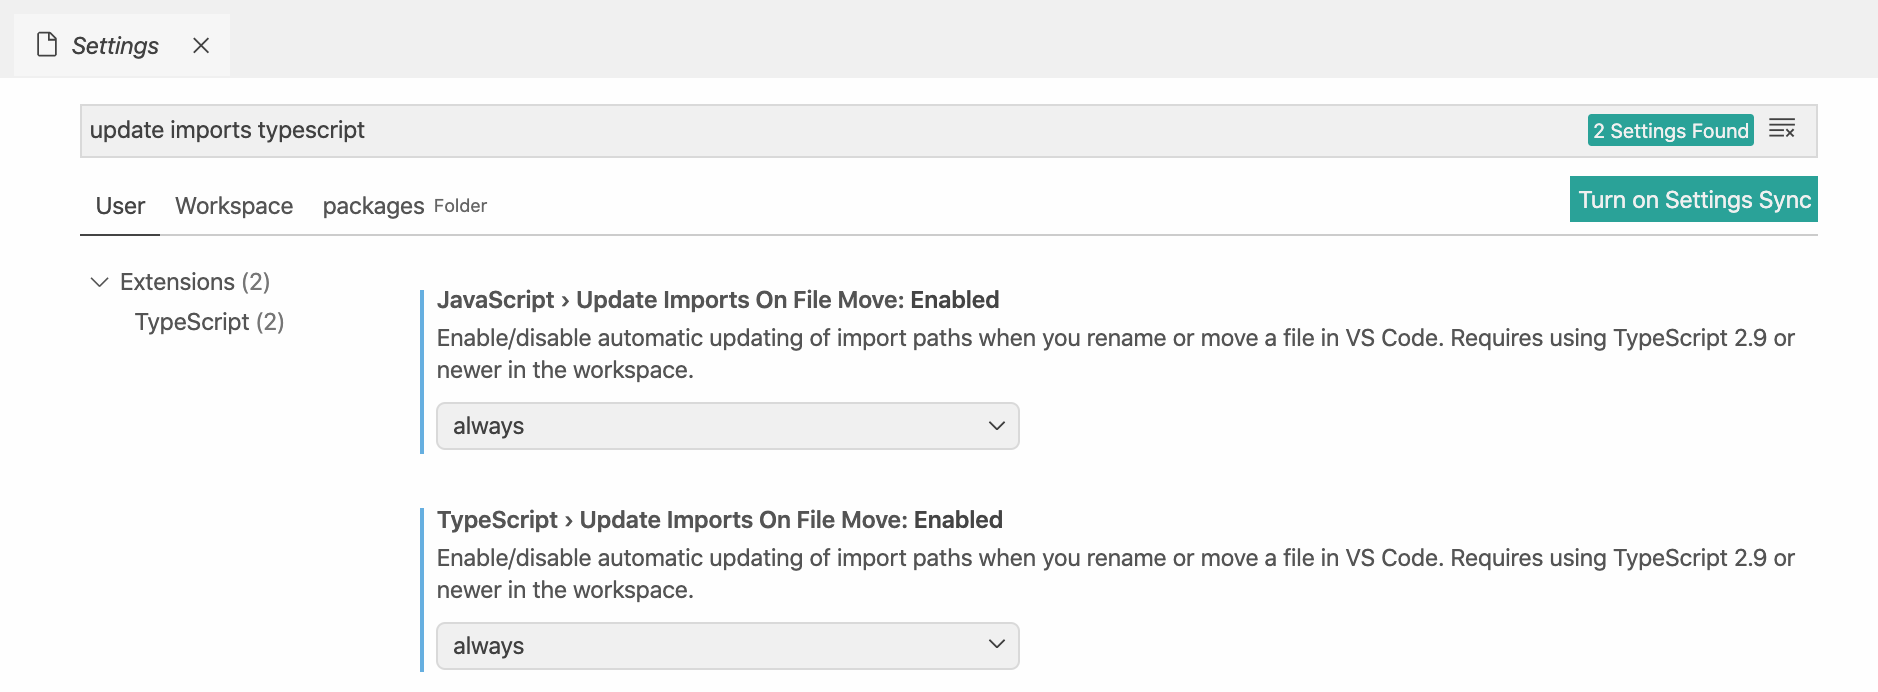
Another useful setting is to automatically update import statements if a file is moved (and thus changing the relative path to the imports). Search for update imports and enable this setting:
另一个有用的设置是在文件移动后自动更新导入语句(从而更改了导入的相对路径)。 搜索更新导入并启用此设置:
Another option worth toggling is the quote style TypeScript setting, allowing you to define single or double quotes, or automatically derive based on the file content.
值得切换的另一个选项是引号样式 TypeScript设置,它允许您定义单引号或双引号,或基于文件内容自动派生。
Completing function calls is also a time saving option, that can be turned on by simply searching for complete function calls in Settings.
完成功能调用也是一种节省时间的选项,只需在“设置”中搜索完整的 功能调用即可将其打开。
To save this article becoming a huge list of useful TypeScript configuration options, it is worth browsing the entirety of the TypeScript extension settings and automate tasks that you feel are valuable to your workflow.
为了将本文保存为有用的TypeScript配置选项的大量清单,值得浏览所有TypeScript扩展设置并自动执行您认为对工作流程有价值的任务。
React Native TypeScript代码片段支持 (React Native TypeScript Snippets Support)
Also worth mentioning here is a popular snippets extension that may be useful for the reader. The extension is called ES7 React/Redux/GraphQL/React-Native snippets and can be found here on VS marketplace.
同样值得一提的是流行的摘要扩展,可能对读者有用。 该扩展称为ES7React,和/终极版/ GraphQL /阵营原生 片段 ,可以发现这里的VS市场。
Once installed, open a TypeScript file and press SHIFT + CMD + R (macOS) to open the snippets menu. You can then type in a snippet’s corresponding code to insert that snippet into your document. For example, typing imp will fetch an import statement. Once the snippet is added to your file, press tab to move through the placeholder text and replace with your desired values.
安装后,打开TypeScript文件,然后按SHIFT + CMD + R (macOS)打开摘要菜单。 然后,您可以输入代码段的相应代码,以将该代码段插入文档中。 例如,键入imp将获取导入语句。 将代码段添加到文件后,按Tab键浏览占位符文本并替换为所需的值。
Here is what that imp snippet looks like:
这里是什么, imp段如下所示:
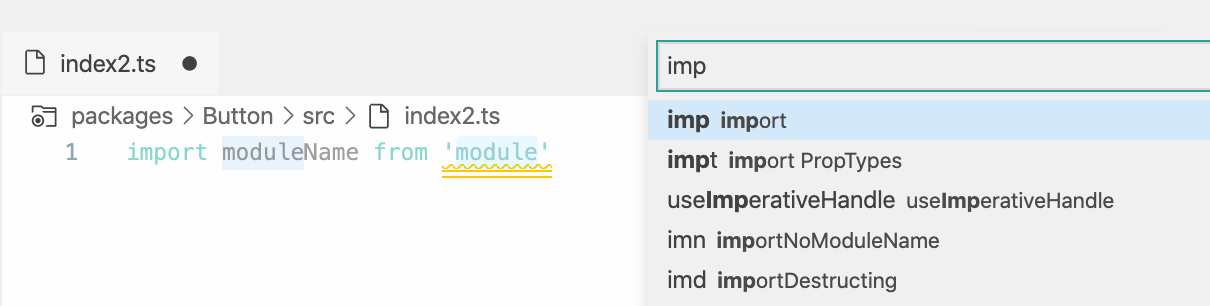
Committing some snippet codes to memory will speed up development, especially when inserting repetitive code blocks such as import statements.
将一些代码段提交到内存将加快开发速度,尤其是在插入重复的代码块(例如import语句)时。
TypeScript Linting设置 (TypeScript Linting Setup)
Continuing the TypeScript environment support, we will now turn to VS Code itself and the support it offers for TypeScript linting. Firstly, ensure that you have the TS Lint extension installed. TS Lint adds a range of settings to VS Code that aid in configuring your TypeScript linting setup.
继续提供TypeScript环境支持,我们现在将转向VS Code本身以及它为TypeScript棉绒提供的支持。 首先,请确保已安装TS Lint扩展。 TS Lint在VS Code中添加了一系列设置,这些设置有助于配置TypeScript linting设置。
One of those tools is to automatically fix certain errors upon saving a file. To set this up, search for codeActionsOnSave from the VS Code Settings tab, and then click Edit in settings.json.
这些工具之一是在保存文件时自动修复某些错误。 要进行设置, codeActionsOnSave从“ VS代码设置”选项卡中搜索codeActionsOnSave ,然后在settings.json中单击“ 编辑” 。
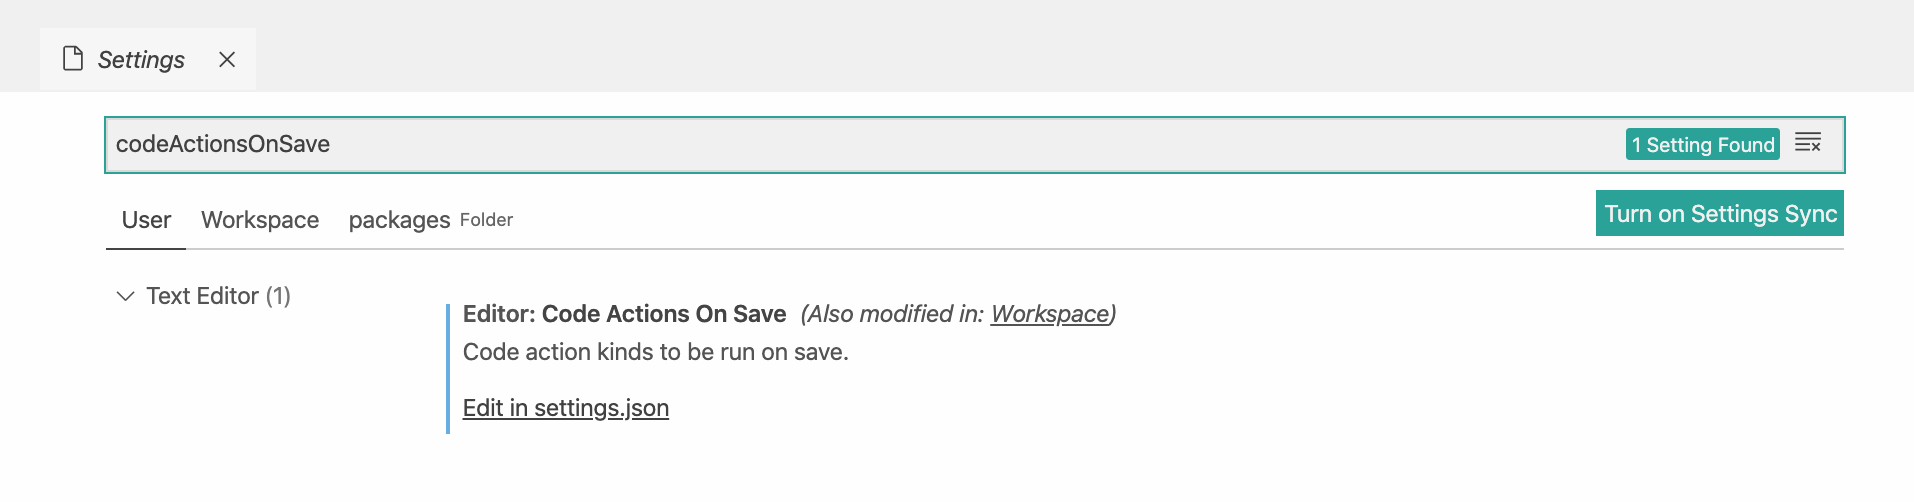
Replace the default null entry with the following JSON to allow auto fixing:
使用以下JSON替换默认的null条目以允许自动修复:
"editor.codeActionsOnSave": {
   "source.fixAll.tslint": true
},
In general, TS Lint provides some global configurations for TypeScript linting that will be familiar from the tsconfig.json file we explored earlier.
总的来说,TS Lint提供了一些TypeScript tsconfig.json全局配置,而我们之前探讨的tsconfig.json文件会很熟悉。
Simply search for TS Lint from your Settings tab to bring up the extension config options.
只需在“设置”标签中搜索TS Lint ,即可显示扩展名配置选项。
Although adhering to these global options (relative to the user or workspace) may be useful if a workspace only consists of one TypeScript project, I am personally more comfortable working with the tsconfig.json file directly from the Terminal and providing the tsconfig.json file via the -p or --project flag with tslint.
尽管如果工作区仅由一个TypeScript项目组成,则遵循这些全局选项(相对于用户或工作区)可能会很有用,但我个人更 tsconfig.json 直接从终端使用 tsconfig.json 文件 并提供 tsconfig.json 文件通过 带有 tslint 的 -p 或 --project 标志 。
In order for linting to work, tslint it needs rules to adhere to. TS Lint comes with some default rules termed the recommended rules. To apply these rules, create a tslint.json file within your project directory and add the following:
为了使tslint工作, tslint要遵守规则。 TS Lint附带了一些默认规则,称为推荐规则。 要应用这些规则,请在项目目录中创建一个tslint.json文件,并添加以下内容:
// tslint.json{
  "extends": [
    "tslint:recommended"
  ]
}
Check out the full list of recommended rules here on GitHub.
检查出的推荐规则的完整列表 在这里 GitHub上。
More rules can be added to the extends property, but the recommended rules are quite strict in and of themselves, forcing conventions such as alphabetical ordering, particular white-spacing, naming conventions, and more. If the reader is interested in exploring all the TS Linting rules, or even developing their own, start by visiting the list of core rules.
可以将更多规则添加到extends属性中,但是建议的规则本身非常严格,强制使用约定,例如字母顺序,特定的白色间距,命名约定等。 如果读者有兴趣探索所有TS Linting规则,甚至开发自己的规则,请先访问核心规则列表 。
整理和编译 (Linting and Compiling)
We will explore linting and compiling in more detail further down with a dummy package, but at this point you can indeed lint and compile your TypeScript:
我们将使用虚拟包进一步探讨linting和编译的细节,但是在这一点上,您确实可以lint和编译您的TypeScript:
The
tslintcommand will lint your project and flag any errors or warnings relative to your rules defined intslint.json.tslint命令将tslint您的项目并标记与tslint.json定义的规则有关的任何错误或警告。The
tsccommand will compile your project and output the compiled JavaScript in thelib/folder.tsc命令将编译您的项目,并在lib/文件夹中输出已编译JavaScript。
This section has covered a lot of TypeScript configuration and setup relative to VS Code. You should now be fully prepared to develop TypeScript NPM packages, or any TypeScript project!
本节介绍了许多与VS Code相关的TypeScript配置和设置。 现在,您应该已经准备好开发TypeScript NPM软件包或任何TypeScript项目!
Continuing with our goal of Creating a TypeScript-based React Native NPM Package, the next section will look at an implementation of a package that simply hosts a styled button. We’ll look deeper into workspace setup, and how to work with package dependencies.
继续我们创建基于TypeScript的React Native NPM软件包的目标,下一部分将介绍仅包含样式按钮的软件包的实现。 我们将更深入地研究工作区设置,以及如何使用程序包依赖项。
设置包裹工作区 (Setting up your Packages Workspace)
Mentioned earlier was the notion of housing your packages in a standalone project vs embedding them in an existing project. This decision determines where your package source code will be located.
前面提到的想法是将软件包放在独立项目中而不是将其嵌入现有项目中。 该决定确定您的程序包源代码将位于何处。
A standalone project is an entirely separate project directory to house your packages with its own package.json and set of dependencies. Embedding your packages in an existing project however will pertain to having a packages/ folder inside that project’s directory, and the modules of which can leverage the dependencies already installed for that project.
独立项目是一个完全独立的项目目录,用于使用自己的package.json和一组依赖项来容纳您的程序包。 但是,将软件包嵌入到现有项目中将与在该项目的目录中包含packages/文件夹有关,并且该packages/的模块可以利用已经为该项目安装的依赖项。
Weigh up which option better suits you by considering the following:
考虑以下因素,权衡最适合您的选项:
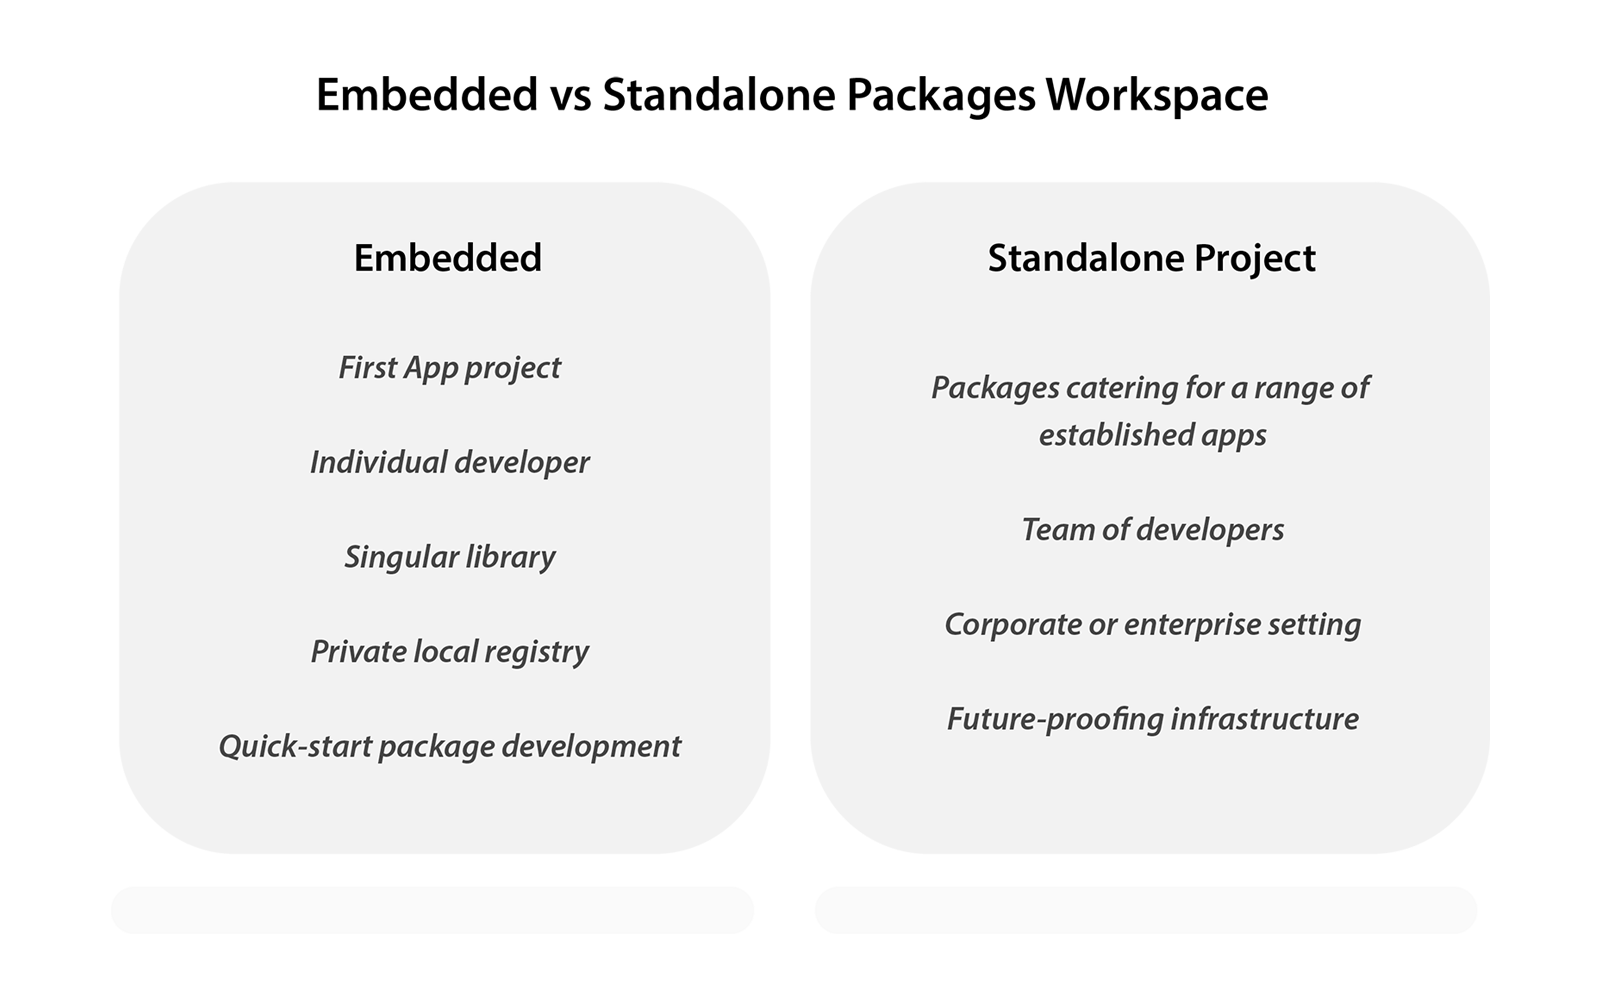
The embedded approach is interesting as any peer dependency required for your package to work will already be installed, as the packages being created will likely be targeting the app within the current workspace.
嵌入式方法很有趣,因为您的程序包运行所需的任何对等依赖项都将已经安装,因为所创建的程序包可能会针对当前工作空间中的应用程序。
Peer dependencies are dependencies that your package requires to work, but are not included in the package’s node modules. Instead, the package assumes that the hosting project will already have these dependencies installed, and uses that version instead.
对等依赖项 是程序包需要工作的依赖项,但不包含在程序包的节点模块中。 而是,程序包假定宿主项目已经安装了这些依赖项,并改用该版本。
Let’s consider a scenario where you are developing your first React Native app, and the components you create for this app will eventually be abstracted into packages that other apps will be able to import and use. In such a scenario it makes sense to develop the packages in the same environment as the app source code itself.
让我们考虑一个场景,在该场景中,您将开发第一个React Native应用程序,并且为此应用程序创建的组件最终将抽象为其他应用程序将能够导入和使用的包。 在这种情况下,在与应用程序源代码本身相同的环境中开发软件包是有意义的。
Doing so will remove the task of setting up peer dependencies for the package environment, as they would already be installed within the app environment:
这样做将消除为程序包环境设置对等依赖项的任务,因为它们已经安装在应用程序环境中:
// embedded package development workspacemy-app-workspace/
  package.json <- all peer dependencies satisfied as `dependencies`
  packages/ <- ignore in .gitignore
    Button/
       package.json <- cite `peerDependencies`       lib/
       src/
       ...
  src/
  ...
In such a setup, the packages/ folder could also be added to a separate VS Code workspace for a dedicated packages workspace. The dependencies installed for my-app will still be available and satisfy each package’s peer dependencies.
在这种设置中, packages/ 文件夹也可以添加到单独的VS Code工作区中,以用于专用的package工作区。 为 my-app 安装的依赖项 仍然可用,并且可以满足每个程序包的对等依赖项。
Peer dependencies can be listed in package.json inside a peerDependencies property. react and react-native are such peer dependencies that need to be installed alongside the package if it uses components such as View, Text, ScollView, etc. Treating React Native (and other packages) as peer dependencies prevents duplicate installations and multiple versions of the same package.
可以在peerDependencies属性内的package.json列出对等依赖peerDependencies 。 react和react-native是这样的对依赖关系需要沿着包装,如果它使用组分如View , Text , ScollView等治疗阵营天然(包等)作为对等体依赖性防止重复安装和的多个版本同一包。
Another example of a peer dependency could be @react-native-community/async-storage where your package needs to persist data on the device where the app in question does not need to know about such activity. It’s likely that this package will already be installed and used within the app itself. Adding it to peerDependencies is just like the dependencies list:
对等依赖项的另一个示例可能是@react-native-community/async-storage ,其中您的程序包需要将数据持久存储在设备上,而有关应用程序无需知道此类活动。 此程序包可能已经在应用程序本身中安装并使用。 将其添加到peerDependencies就像依赖项列表一样:
peerDependencies: {
   "@react-native-community/async-storage": "~1.11.0"
}
In the event you do choose to embed your package source code within your app workspace, be sure to add the packages/ directory to .gitignore. You can even hide the directory from the side menu bar by searching for Files: Exclude in the Settings tab, and add packages/ as a pattern.
如果您确实选择将包源代码嵌入到应用程序工作区中,请确保将packages/目录添加到.gitignore 。 您甚至可以通过在“设置”选项卡中搜索“文件:排除”,并从侧面菜单栏中隐藏目录,然后将packages/添加为模式。
This setup choice boils down to convenience and less maintenance of peerDependencies as you are developing packages. For package libraries designed for a multitude of projects from the off, then it makes sense to create a standalone project to manage the package source code.
在开发软件包时, 此设置选项归结为便利和对 peerDependencies 较少维护 。 对于从头开始为众多项目设计的程序包库,则有必要创建一个独立的项目来管理程序包源代码。
For the standalone project, have your package.json have installed all the peer dependencies that the packages rely on. Then in the packages directory, have separate package.json , and therefore different modules, for each of the packages:
对于独立项目,请让您的package.json安装了软件包依赖的所有对等依赖项。 然后在packages目录中,为每个软件包分别提供package.json和不同的模块:
// standalone package development workspacepackages-workspace/
  package.json <- install peer dependencies as `dependencies`
  packages/
    Button/
       package.json <- cite `peerDependencies`       lib/
       src/
       ...
    SmallButton/
       package.json <- cite `peerDependencies`       lib/
       src/
       ...
    ...
The above setup will ensure that VS Code will flag no errors pertaining to missing packages, while allowing you to configure the peer dependencies for each of your packages in question.
上面的设置将确保VS Code不会标记与丢失包有关的任何错误,同时允许您为每个有问题的包配置对等依赖项。
You will now know the best workspace solution to start developing your packages. We’ll next look at a simple example package where we’ll put everything together, and finally publish the package to an NPM registry.
现在,您将了解开始开发软件包的最佳工作区解决方案。 接下来,我们将看一个简单的示例程序包,将所有内容放在一起,最后将程序包发布到NPM注册表中。
TypeScript包示例:样式按钮 (An Example TypeScript Package: Styled Button)
This section will explore a demo project I have set up for this piece that is available on GitHub.
本节将探讨我为该文章设置的一个演示项目,该项目可在GitHub上找到 。
The project represents a standalone workspace that hosts one package, @myorg/Button. This component is simply a button using React Native’s TouchableOpacity, View and Text components, in addition to some styling. Note that the scope @myorg has been used here, with the intent of grouping all your packages under that one scope. We will see that scopes speed up the process of upgrading your packages in the next section.
该项目代表一个独立的工作空间,该工作空间承载一个包@myorg/Button 。 除了一些样式外,该组件只是使用React Native的TouchableOpacity , View和Text组件的按钮。 请注意,这里使用了作用域@myorg ,目的是将所有软件包分组在一个作用域下。 在下一节中,我们将看到示波器可以加快软件包升级的过程。
As the packages hosted in this project rely on React and React Native libraries, these are installed as dependencies in the top-most package.json.
由于此项目中托管的软件包依赖于React和React Native库,因此它们作为依赖项安装在最顶层的package.json 。
Again, this setup ensures that VS Code does not flag warnings or errors of missing dependencies. Project dependencies will not be installed within the package, who only refer to such dependencies as peer dependencies.
同样,此设置可确保VS Code不会标记警告或缺少依赖项的错误。 项目依赖项将不会安装在软件包中,后者仅将此类依赖项称为对等依赖项。
One simple method to bootstrap a packages project with the required dependencies is to run expo init and take the React dependencies from a bare workflow project.
引导具有所需依赖项的软件包项目的一种简单方法是运行 expo init 并从裸露的工作流项目中获取React依赖项。
The packages/ folder hosts our Button package that comes with its own package.json, similar in nature to what we discussed above. The @myorg/Button package itself contains everything we have discussed in this piece so far. This is the general structure of the project:
packages/文件夹托管我们的Button包,该Button包带有自己的package.json ,其本质与我们上面讨论的类似。 @myorg/Button包本身包含了到目前为止我们讨论的所有内容。 这是项目的一般结构:
// structure of packages projectrn-packages-demo/
  packages/
    Button/
      src/
        index.tsx
        styles.ts
        types.ts
      package.json
      tsconfig.json
      tslint.json  package.json
  ...
Note that each package contains its own package.json, tslint.json and tsconfig.json files. When considering how to upload packages to source control, one can either set up one repository to host all the packages (almost acting like a Monorepo), or upload each package to a separate repository.
请注意,每个软件包都包含其自己的package.json , tslint.json和tsconfig.json文件。 在考虑如何将程序包上传到源代码控制时,可以设置一个存储库来托管所有程序包(几乎像Monorepo一样 ),也可以将每个程序包上传到单独的存储库中。
I personally have opted for the former solution when developing organisation packages in a private registry, but the latter solution will be more favoured if the package is open sourced for community contributions.
我个人在私有注册表中开发组织软件包时选择了前者解决方案,但是如果该软件包是开源的,可用于社区贡献,则后一种解决方案将更受青睐。
tslint.json could have been defined on the top level, but in a modular fashion, having separate linting rules for each package will cover edge cases where rule changes need to be made for individual packages.
tslint.json 可能已经在顶层定义了,但是以模块化的方式,对每个程序包使用独立的掉毛规则将涵盖需要对单个程序包进行规则更改的极端情况。
整理,编译和发布 (Linting, Compiling and Publishing)
Taking a look at the @myorg/Button package.json file, we can see that there are some scripts defined to aid in linting and publishing:
看一下@myorg/Button package.json文件,我们可以看到已经定义了一些脚本来帮助linting和发布:
// package.json {
  ...
  "scripts": {
     "build": "tsc --project ./tsconfig.json",
     "pub": "npm version patch && publish --registry http://localhost:4873/",
    "lint": "tslint --fix -p ./tsconfig.json"
   }
}
These are some basic scripts to get you started, and can be run with yarn <script_name>. Let’s break down what is happening here:
这些是一些基本的脚本,可以帮助您入门,并且可以与yarn <script_name>一起运行。 让我们分解一下这里发生的事情:
The
buildscript usestscto compile the TypeScript insrc/, outputting the compiled JavaScript inlib/(as defined inpackage.jsonalso). Note that the--projector-Pflag can be used to point to a specifictsconfig.jsonfile.build脚本使用tsc来编译src/的TypeScript,并在lib/输出已编译JavaScript(同样在package.json定义)。 请注意,----project或-P标志可用于指向特定的tsconfig.json文件。The
pubscript increments the patch version number (the final number in the Semantic Versioning convention) and then publishes the package to the local private Verdaccio registry, that by default runs on localhost at port 4873. The--registryflag can be used to point to any registry of your choosing.pub脚本递增修补程序版本号( 语义版本约定中的最后一个数字),然后将程序包发布到本地私有Verdaccio注册表,该注册表默认情况下在localhost的端口4873上运行。----registry标志可用于指向到您选择的任何注册表。The
lintscript runstslintand analysis your TypeScript, pointing out any errors and warnings in the output relative to the rules defined intslint.json. The--fixflag allows the compiler to fix warnings automatically where it is intelligent enough to do so. Note that all linting CLI options can be found here.lint脚本运行tslint并分析您的TypeScript,指出与tslint.json定义的规则有关的输出中的任何错误和警告。--fix标志允许编译器在足够聪明的地方自动修复警告。 请注意,可以在此处找到所有linting CLI选项。
To test out the lint script, try changing the IButtonProps type to just ButtonProps, and see how the lint script responds when you run it again. Also try changing the ordering of the properties in styles.ts so they are not alphabetical to verify tslint picks up these changes.
为了测试出来的皮棉脚本,尝试改变 IButtonProps 类型只是 ButtonProps ,看看如何皮棉脚本响应,当您再次运行。 另外,请尝试更改 styles.ts中 属性的顺序,以 使它们不是字母顺序的,以验证 tslint 是否 tslint 了这些更改。
Everything we have discussed prior to this demo applies to it, including:
我们在此演示之前讨论的所有内容都适用于此,包括:
The
lib/folder is ignored throughout the project by.gitignoreto prevent the compiled JavaScript being committed to source control..gitignore将在整个项目中忽略lib/文件夹,以防止将已编译JavaScript提交给源代码管理。The
filesproperty inButton’s package.json ensures that only thelib/folder is published to NPM, along with the required meta files.Button的package.json中的files属性确保只有lib/文件夹以及所需的元文件才发布到NPM。peerDependenciesare also defined, with their version ranges supported by the package.还定义了
peerDependencies,其版本范围受程序包支持。Type definition files are generated alongside the compiled JavaScript files thanks to the
declaration: trueproperty of tsconfig.json. This will result in astyles.d.ts,index.d.tsandtypes.d.tsfiles being generated when yarn build is run, enabling TypeScript support for the package.由于
declaration: true了tsconfig.json的declaration: true属性,因此与定义JavaScript文件一起生成了类型定义文件。 这将导致在运行yarn build时生成styles.d.ts,index.d.ts和types.d.ts文件,从而为该包启用TypeScript支持。
Although out of the scope of this piece, NPM also has built-in support for package.json scripts whereby scripts of particular names are called at various stages of the publishing pipeline. The reader can familiarise themselves with those capabilities here.
尽管不在本文的讨论范围之内,但NPM还对package.json scripts提供了内置支持,从而可以在发布管道的各个阶段调用特定名称的脚本。 读者可以在这里熟悉这些功能。
The final thing this piece will cover is installing and upgrading your packages in an app project.
这一部分将介绍的最后一件事是在应用程序项目中安装和升级软件包。
安装和升级Button包 (Installing and Upgrading the Button package)
Briefly covering the installation and upgrade process, simply install your package with yarn (or npm):
简要介绍安装和升级过程,只需使用yarn(或npm)安装软件包即可:
yarn add @myorg/buttonIf you are using a private registry like Verdaccio, make sure your NPM registry is set globally prior to attempting the install:
如果您使用的是Verdaccio之类的专用注册表,请确保在尝试安装之前全局设置了NPM注册表:
npm set registry http://localhost:4873/It is common to rapidly iterate your packages as you are developing an app, especially in a private environment. To save time upgrading the packages, the scope can be utilised to upgrade every single package under that scope in your project. Simply use the --scope flag to do so:
在开发应用程序时,尤其是在私有环境中,通常会快速迭代您的包。 为了节省升级软件包的时间,可以使用该范围来升级项目中该范围下的每个单个软件包。 只需使用--scope标志即可:
// upgrading all packages under a scopeyarn upgrade --scope @myorgThis time saving command will bring all packages under the scope to the latest version (relative to the supported range defined in the app’s package.json).
此节省时间的命令会将范围内的所有程序包都带到最新版本(相对于应用程序的package.json中定义的支持范围)。
综上所述 (In Summary)
This piece covered all the major aspects (and lots of minor ones too!) of developing TypeScript based NPM packages for React Native. The reader should now be equipped with the tools and workflow to develop their own TypeScript packages for React Native.
这一部分涵盖了为React Native开发基于TypeScript的NPM软件包的所有主要方面(还有很多次要方面!)。 现在,读者应该已经配备了工具和工作流程,可以为React Native开发自己的TypeScript软件包。
The techniques discussed here are not limited to React Native. Now you know how to configure a TypeScript project in detail, the techniques discussed here can be applied to any TypeScript based project.
这里讨论的技术不限于React Native。 现在您知道了如何详细配置TypeScript项目,这里讨论的技术可以应用于任何基于TypeScript的项目。
The demo project discussed here is available on GitHub for the reader to refer to.
翻译自: https://medium.com/@rossbulat/how-to-develop-typescript-npm-packages-for-react-native-a00f88f8a96c




 已为社区贡献8条内容

所有评论(0)