Flutter 多子 Widget 布局之线性布局 Row、Column
文章目录
主要参考:Flutter 布局(七)- Row、Column详解
线性布局 Row、Column
Flutter中通过Row和Column来实现线性布局,也就是水平和垂直布局。
Row
水平布局
源码中的字段含义如下:
Row({
    Key key,
    MainAxisAlignment mainAxisAlignment = MainAxisAlignment.start,//children在主轴方向上的对齐方式
    MainAxisSize mainAxisSize = MainAxisSize.max,// 在主轴方向占有空间的值
    CrossAxisAlignment crossAxisAlignment = CrossAxisAlignment.center,//children在交叉轴方向的对齐方式
    TextDirection textDirection,// 水平方向上的文字摆放顺序
    VerticalDirection verticalDirection = VerticalDirection.down,// 竖直方向上 children 摆放顺序
    TextBaseline textBaseline,// 文本基准线
    List<Widget> children = const <Widget>[],// 子 widget 集合
  })
每个字段又有相关的参数可设置,熟悉各个字段值的含义有助于我们快速准确使用字段。
MainAxisAlignment
MainAxisAlignment 的取值有:start, end, center, spaceBetween, spaceAround, spaceEvenly
效果图如下: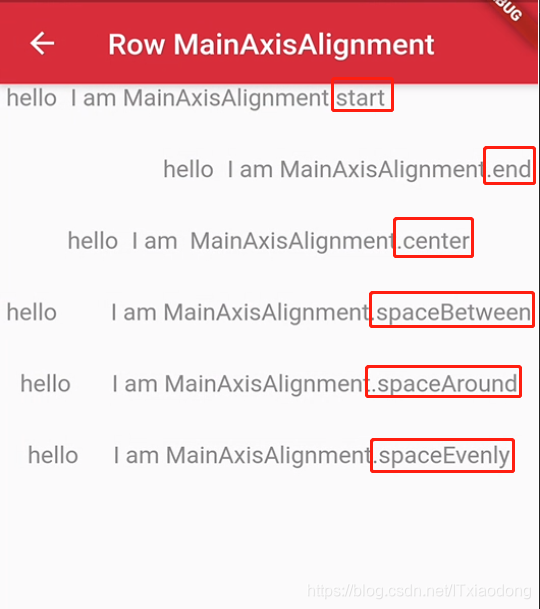
伪代码如下:
Row(
  mainAxisAlignment: MainAxisAlignment.end,
  children: <Widget>[
    Text(" hello "),
    Text(" I am MainAxisAlignment.end "),
  ],
),
start:将children从屏幕左侧起点开始排列end:将children从屏幕右侧做起点开始排列center:将children从屏幕中间做起点开始排列spaceBetween:将主轴方向上的空白区域均分,使得children之间的空白区域相等,首尾child都靠近首尾,没有间隙;spaceAround:将主轴方向上的空白区域均分,使得children之间的空白区域相等,但是首尾child的空白区域为1/2;spaceEvenly:将主轴方向上的空白区域均分,使得children之间的空白区域相等,包括首尾child;
再来细看spaceBetween,spaceAround,spaceEvenly 这三个字段效果图对比上面的文字描述: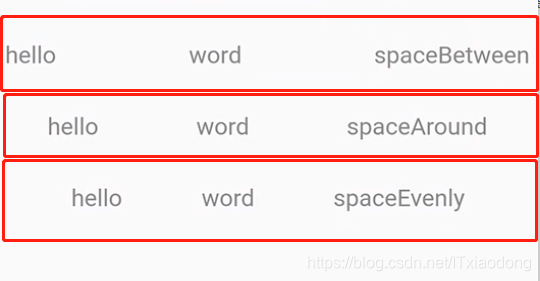
伪代码如下:
Row(
  mainAxisAlignment: MainAxisAlignment.spaceBetween,
  children: <Widget>[
    Text(" hello "),
    Text(" word "),
    Text(" spaceBetween "),
  ],
),
CrossAxisAlignment
CrossAxisAlignment表示交叉轴,Row的主轴是水平方向,交叉轴暂时没想到好的示例,这里就不做图示了。
CrossAxisAlignment的取值有:baseline, center, end, start, stretch
baseline:在交叉轴方向,使得children的baseline对齐center:children在交叉轴上居中展示end:children在交叉轴上末尾展示start:children在交叉轴上起点处展示stretch:让children填满交叉轴方向
TextDirection
水平方向上的文字(
child)摆放顺序,TextDirection的取值有:rtl, ltr
rtl:文本从右向左排列ltr:文本从左向右排列(默认)
效果图: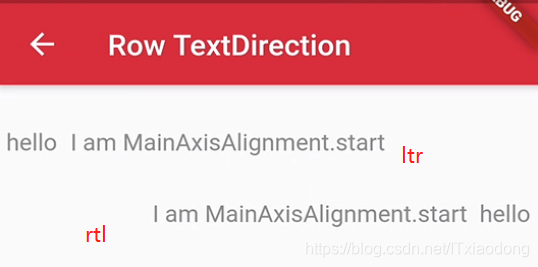
伪代码:
Row(
  mainAxisAlignment: MainAxisAlignment.start,
  textDirection: TextDirection.ltr,
  children: <Widget>[
    Text(" hello "),
    Text(" I am MainAxisAlignment.start "),
  ],
),
MainAxisSize
MainAxisSize的取值有:min, max
max:最大化使用主轴方向的可用空间(默认)min:与max相反,是最小化使用主轴方向的可用空间
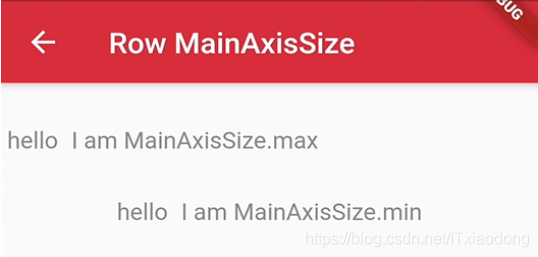
伪代码:
Row(
  mainAxisAlignment: MainAxisAlignment.start,
  mainAxisSize: MainAxisSize.min,
  children: <Widget>[
    Text(" hello "),
    Text(" I am MainAxisAlignment.start "),
  ],
),
VerticalDirection
竖直方向上(
child)摆放顺序,VerticalDirection的取值有:up, down
up: 表示Row纵轴(垂直)从上到下进行布局down: 表示Row纵轴(垂直)从下到上进行布局
Column
垂直布局,
Column参数和Row一样,不同的是布局方向为垂直,主轴纵轴方向相反。
MainAxisAlignment
Column的主轴是垂直方向,交叉轴暂时没想到好的示例,这里先不介绍了。
CrossAxisAlignment
效果图如下: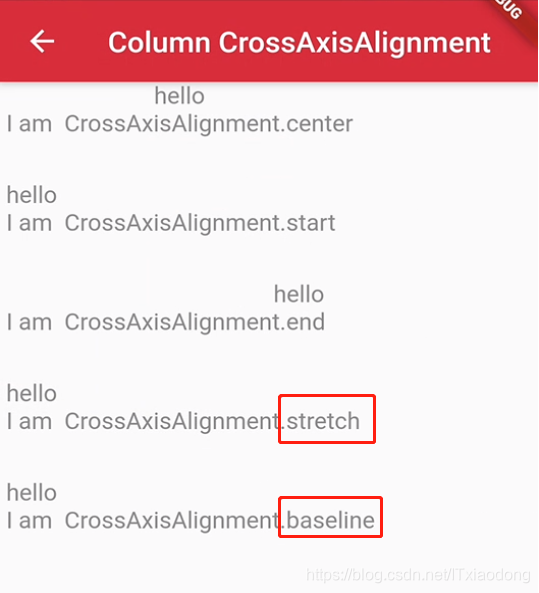
伪代码:
Column(
  crossAxisAlignment: CrossAxisAlignment.center,
  children: <Widget>[
    Text(" hello "),
    Text(" I am  CrossAxisAlignment.center "),
  ],
),
从效果图上看stretch、baseline还是区分不了。所以再来看了效果图: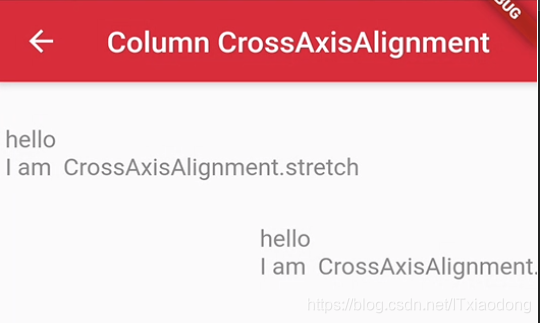
伪代码实现:
Column(
  children: <Widget>[
    SizedBox(
      height: 30,
    ),
    Column(
      crossAxisAlignment: CrossAxisAlignment.stretch,
      children: <Widget>[
        Text(" hello "),
        Text(" I am  CrossAxisAlignment.stretch "),
      ],
    ),
    SizedBox(
      height: 30,
    ),
    Column(
      crossAxisAlignment: CrossAxisAlignment.baseline,
      textBaseline: TextBaseline.alphabetic,
      children: <Widget>[
        Text(" hello "),
        Text(" I am  CrossAxisAlignment.baseline "),
      ],
    ),
  ],
));
分析一波:baseline的含义是:在交叉轴方向,使得children的baseline对齐。
而现在是Column组件,交叉轴默认是水平方向,并且默认的主轴方向是居中开始,
所以文字是从水平方向居中开始摆列。因此上面的效果图也就很好解释了。
stretch的含义是:让children填满交叉轴方向,从效果图来看没毛病。
剩下的下篇写吧,文章太长,看着容易困!
完~

开源鸿蒙跨平台开发社区汇聚开发者与厂商,共建“一次开发,多端部署”的开源生态,致力于降低跨端开发门槛,推动万物智联创新。
更多推荐
 0
0 0
0- 0


 已为社区贡献22条内容

所有评论(0)