

In this tutorial, we will show you how to integrate push notification to the React Native Mobile Apps (Android or iOS) using React Native Firebase (react-native-firebase) module. React Native Firebase makes using Firebase with React Native simple. It provides a light-weight layer on-top of the native Firebase SDKs (iOS & Android) whilst mirroring the Firebase Web SDKs API as closely as possible. One of the React Native Firebase Module features is Cloud Messaging or FCM. The first steps of this tutorial almost the same as the previous React Native Firebase tutorial.
在本教程中,我们将向您展示如何使用React Native Firebase (react-native-firebase)模块将推送通知集成到React Native移动应用程序(Android或iOS) 。 React Native Firebase使将Firebase与React Native一起使用变得简单。 它在本机Firebase SDK(iOS和Android)的顶部提供了一个轻量级的层,同时尽可能地镜像了Firebase Web SDK SDK。 React Native Firebase模块的功能之一是Cloud Messaging或FCM。 本教程的第一步与以前的React Native Firebase教程几乎相同。
目录: (Table of Contents:)
- Setup Google Firebase Cloud Messaging (FCM) 设置Google Firebase云消息传递(FCM)
- Install React Native CLI and Create App 安装React Native CLI并创建应用
- Install and Configure React Native Firebase 安装和配置React Native Firebase
- Implementing FCM Push Notification 实施FCM推送通知
- Run and Test React Native Firebase App 运行并测试React Native Firebase应用
The following tools, frameworks, and modules are required for this tutorial:
本教程需要以下工具,框架和模块:
Node.js (NPM or Yarn)
Node.js (NPM或纱线)
- Android Studio or SDK for Android 适用于Android的Android Studio或SDK
- XCode for iOS 适用于iOS的XCode
- Terminal (OSX/Linux) or Command Line (Windows) 终端(OSX / Linux)或命令行(Windows)
- Text Editor or IDE (We are using Atom) 文本编辑器或IDE(我们正在使用Atom)
Before start to the main steps, make sure that you have installed Node.js and can run `npm` in the terminal or command line. To check the existing or installed Node.js environment open the terminal/command line then type this command.
在开始主要步骤之前,请确保已安装Node.js并可以在终端或命令行中运行` npm` 。 要检查现有或已安装的Node.js环境,请打开终端/命令行,然后键入此命令。
node -v
v10.15.1
npm -v
6.11.2
yarn -v
1.10.1
设置Google Firebase云消息传递(FCM) (Setup Google Firebase Cloud Messaging (FCM))
We are using Firebase Cloud Messaging (FCM) because it’s a cross-platform messaging solution that lets you reliably deliver messages at no cost. Open your browser then go to Google Firebase Console then log in using your Google account.
我们使用Firebase Cloud Messaging(FCM)是因为它是一个跨平台的消息传递解决方案,可让您可靠地免费传递消息。 打开浏览器,然后转到Google Firebase控制台,然后使用您的Google帐户登录。
From that page, click “+” add project button to create a Google Firebase project then it will be redirected to this page.
在该页面上,单击“ +”添加项目按钮以创建Google Firebase项目,然后将其重定向到此页面。

After filling the project name text field which our project name is “React Native” then click continue button and it will be redirected to this page.
填写项目名称文本字段后,我们的项目名称为“ React Native”,然后单击“继续”按钮,它将被重定向到此页面。

Scroll down then choose to not add Firebase analytics for now then click Create Project button. Now, you have a Google Firebase Project ready to use.
向下滚动,然后选择暂时不添加Firebase分析,然后单击“创建项目”按钮。 现在,您已经可以使用Google Firebase项目。

After click Continue button it will be redirected to this page.
单击继续按钮后,它将被重定向到此页面。

Next, click the iOS button to add a new iOS application.
接下来,单击iOS按钮以添加新的iOS应用程序。

Fill the iOS bundle ID field (ours: “com.djamware.reactnative”) then click the Register App button.
填写iOS捆绑包ID字段(我们的:“ com.djamware.reactnative”),然后单击“注册应用程序”按钮。

Download the GoogleService-info.plist file then click the Next Button several times to the last steps of the wizard then click the Continue to Console button to finish it. Do the same way for the Android application, so, you will have a configuration google-service.json file. Keep those configuration files for use with the React Native app later.
下载GoogleService-info.plist文件,然后多次单击“下一步”按钮进入向导的最后步骤,然后单击“继续使用控制台”按钮完成该操作。 对Android应用程序执行相同的操作,因此,您将拥有一个配置google-service.json文件。 保留这些配置文件,以便以后与React Native应用程序一起使用。
Next, click the Gear button then choose project settings.
接下来,单击齿轮按钮,然后选择项目设置。

Click the Cloud Messaging tab then it will take to this page.
单击“云消息传递”选项卡,然后转到此页面。

Write down the server key to your notepad or text editor. That Firebase server key will use to send the push notification from your server or just using Postman application.
将服务器密钥记下到记事本或文本编辑器中。 该Firebase服务器密钥将用于从服务器或仅使用Postman应用程序发送推送通知。
安装React Native CLI并创建应用 (Install React Native CLI and Create App)
This time we will use React Native CLI to create a React Native app because the Firebase Cloud Messaging will use natively. To install it, type this command in your App projects folder.
这次,我们将使用React Native CLI创建一个React Native应用程序,因为Firebase Cloud Messaging将在本地使用。 要安装它,请在您的App项目文件夹中键入此命令。
sudo npm install -g react-native-cliThen create a React Native App using this command from your projects directory.
然后从您的项目目录中使用此命令创建一个React Native App。
react-native init ReactNativeFcmNext, go to the newly created React App folder and run the React Native app to the simulator.
接下来,转到新创建的React App文件夹,并在模拟器上运行React Native应用程序。
cd ReactNativeFcm && react-native run-iosWhen a new terminal window opened, go to the React Native project folder then run the Metro bundler server.
当新的终端窗口打开时,转到React Native项目文件夹,然后运行Metro bundler服务器。
cd ~/Apps/ReactNativeFcm && yarn startNow, you will see this in the iOS simulator.
现在,您将在iOS模拟器中看到这一点。

Next, we will change the iOS and Android package name or bundle ID to match the Firebase configuration files. For iOS, open the `ios/ReactNativeFcm.xcworkspace` file using XCode.
接下来,我们将更改iOS和Android软件包名称或捆绑包ID以匹配Firebase配置文件。 对于iOS,使用XCode打开`ios / ReactNativeFcm.xcworkspace`文件。

Just change the Bundle Identifier (ours: com.djamware.reactnative) and it ready to use with the Firebase Cloud Messaging. For Android a little tricky, first, change the source folders which previously `android/app/src/main/java/com/reactnativefcm` become `android/app/src/main/java/com/djamware/reactnative`.
只需更改捆绑包标识符(我们的:com.djamware.reactnative),即可将其与Firebase Cloud Messaging结合使用。 对于Android来说,有点棘手,首先,将以前的android / app / src / main / java / com / reactnativefcm变为Android / app / src / main / java / com / djamware / reactnative的源文件夹。
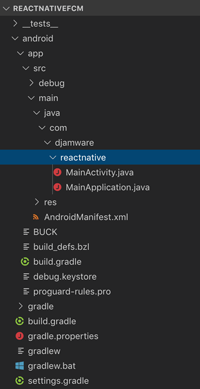
Next, open and edit `android/app/src/main/java/com/djamware/reactnative/MainActivity.java` then this package name.
接下来,打开并编辑`android / app / src / main / java / com / djamware / reactnative / MainActivity.java`,然后编辑该包名称。
package com.reactnativefcm;to
至
package com.djamware.reactnative;Do the same way to android/app/src/main/java/com/djamware/reactnative/MainApplication.java. Next, open and edit `android/app/src/main/AndroidManifest.xml` then change this line.
对android/app/src/main/java/com/djamware/reactnative/MainApplication.java执行相同的方法。 接下来,打开并编辑`android / app / src / main / AndroidManifest.xml`,然后更改此行。
<manifest xmlns:android="http://schemas.android.com/apk/res/android"
 package="com.reactnativefcm">
To
至
<manifest xmlns:android="http://schemas.android.com/apk/res/android"
 package="com.djamware.reactnative">
Next, open edit `android/app/build.gradle` then change the application ID to the new package.
接下来,打开edit`android / app / build.gradle`,然后将应用程序ID更改为新软件包。
android {
 ...defaultConfig {
   applicationId "com.djamware.reactnative"
   minSdkVersion rootProject.ext.minSdkVersion
   targetSdkVersion rootProject.ext.targetSdkVersion
   versionCode 1
   versionName "1.0"
 }
 ...
}
Next, open and edit android/app/BUCK then change the android_build_config and android_resource package name.
接下来,打开并编辑android/app/BUCK然后更改android_build_config和android_resource包名称。
android_build_config(
  name = "build_config",
  package = "com.djamware.reactnative",
)android_resource(
  name = "res",
  package = "com.djamware.reactnative",
  res = "src/main/res",
)
Finally, run this command from the android folder to clean up the Gradle.
最后,从android文件夹运行此命令以清理Gradle。
./gradlew clean安装和配置React Native Firebase (Install and Configure React Native Firebase)
We will use React Native Firebase (RNFirebase) module to access the Google Firebase services. React Native Firebase is a simple Firebase integration for React Native. To install it dependencies just type this command.
我们将使用React Native Firebase(RNFirebase)模块来访问Google Firebase服务。 React Native Firebase是React Native的简单Firebase集成。 要安装它的依赖关系,只需键入此命令。
npm install --save react-native-firebaseor
要么
yarn add react-native-firebaseNext, link the react-native-firebase to native iOS and Android apps by type this command.
接下来,通过键入此命令将react-native-firebase链接到本机iOS和Android应用程序。
react-native link react-native-firebase在Android上设置React Native Firebase (Setup React Native Firebase on Android)
Copy the previously downloaded google-services.json to android/app/ folder.
将先前下载的google-services.json复制到android/app/文件夹中。
cp ~/Downloads/google-services.json android/app/Next, open and edit android/build.gradle then add this classpath dependency of Google Services.
接下来,打开并编辑android/build.gradle然后添加此Google Services的类路径依赖项。
dependencies {
  classpath("com.android.tools.build:gradle:3.4.1")
  classpath 'com.google.gms:google-services:4.2.0'
}
Also, add the Google maven repository at repositories block and make orders like this.
另外,在存储库块中添加Google Maven存储库,并按以下方式进行订购。
repositories {
  google()
  maven {
        url 'https://maven.google.com'
  }
  jcenter()
}
Open and edit android/app/build.gradle then add this line to the bottom of the file.
打开并编辑android/app/build.gradle然后将此行添加到文件底部。
apply plugin: "com.google.gms.google-services"Add these lines of Firebase implementation to the dependencies.
将这些行的Firebase实现添加到依赖项中。
dependencies {
  ....
  implementation "com.google.android.gms:play-services-base:16.1.0"
  implementation "com.google.firebase:firebase-core:17.0.1"
  implementation "com.google.firebase:firebase-messaging:19.0.1"
  implementation 'me.leolin:ShortcutBadger:1.1.21@aar'
  ....
}
Next, open and edit android/app/src/main/java/com/djamware/reactnative/MainApplication.java then add these imports of RNFirebaseMessagingPackage and RNFirebaseNotificationsPackage.
接下来,打开并编辑android/app/src/main/java/com/djamware/reactnative/MainApplication.java然后添加这些导入的RNFirebaseMessagingPackage和RNFirebaseNotificationsPackage。
import io.invertase.firebase.messaging.RNFirebaseMessagingPackage;
import io.invertase.firebase.notifications.RNFirebaseNotificationsPackage;
Add that packages to the list of packages.
将该软件包添加到软件包列表中。
@Override
protected List<ReactPackage> getPackages() {
 @SuppressWarnings("UnnecessaryLocalVariable")
 List<ReactPackage> packages = new PackageList(this).getPackages();
 // Packages that cannot be autolinked yet can be added manually here, for example:
 // packages.add(new MyReactNativePackage());
 packages.add(new RNFirebaseMessagingPackage());
 packages.add(new RNFirebaseNotificationsPackage());
 return packages;
}
Next, open and edit android/app/src/main/AndroidManifest.xml then add these Android permissions after INTERNET permission.
接下来,打开并编辑android/app/src/main/AndroidManifest.xml然后在INTERNET权限之后添加这些Android权限。
<uses-permission android:name="android.permission.RECEIVE_BOOT_COMPLETED" />
<uses-permission android:name="android.permission.VIBRATE" />
Add the Firebase MESSAGING_EVENT before the closing of <application> tag.
在<application>标签关闭之前添加Firebase MESSAGING_EVENT。
<application ...>
 ...
 <service android:name="io.invertase.firebase.messaging.RNFirebaseMessagingService">
  <intent-filter>
   <action android:name="com.google.firebase.MESSAGING_EVENT" />
  </intent-filter>
 </service>
</application>
Run again this re-link commands from the terminal.
从终端再次运行此重新链接命令。
react-native unlink react-native-firebase
react-native link react-native-firebase
Setup React Native Firebase on iOS
在iOS上设置React Native Firebase
To use Firebase Cloud Messaging Push Notification with APNs (Apple Push Notification Service) we have to add the Apple Provisioning Profiles that enabled Push Notification as .P12 file to the Firebase Console under the iOS app. For that, you must have an Apple Developer Account with Enrollment to create App ID, Certificates, and Profiles. If you have the account, you can follow this Guide from the Firebase. After the APP ID, Certificates, and Provisioning Profiles created use the certificates in the XCode signing profile.
要将Firebase Cloud Messaging推送通知与APN一起使用(Apple推送通知服务),我们必须将启用了推送通知作为.P12文件的Apple Provisioning配置文件添加到iOS应用下的Firebase控制台。 为此,您必须具有注册的Apple开发人员帐户才能创建App ID,证书和配置文件。 如果您拥有该帐户,则可以从Firebase遵循本指南 。 创建APP ID,证书和设置配置文件后,请使用XCode签名配置文件中的证书。
Next, open the ios/ReactNativeFcm.xcworkspace from the XCode then add the previously downloaded GoogleService-Info.plist to the XCode project name.
接下来,从XCode打开ios/ReactNativeFcm.xcworkspace ,然后将先前下载的GoogleService-Info.plist添加到XCode项目名称中。

After added to the XCode project will be like this.
添加到XCode项目后将是这样。

In the XCode, enable the Capabilities for the remote notification by click on the project name in the left pane then click Capabilities tabs. Find and On the Background Modes then check the Remote notification.
在XCode中,通过单击左窗格中的项目名称,然后单击“功能”选项卡,为远程通知启用“功能”。 查找并在后台模式下,然后检查远程通知。
Next, open and edit Pods/podfile then add these lines of Firebase Pods.
接下来,打开并编辑Pods/podfile然后添加这些行的Firebase Pods。
pod 'Firebase/Core'
pod 'Firebase/Messaging'
Change the Pod path for RNFirebase to be like this.
更改RNFirebase的Pod路径是这样的。
pod 'RNFirebase', :path => '../node_modules/react-native-firebase/ios'Or find and match RNFirebase podspec in the node_modules otherwise you will get this error.
或者在node_modules中找到并匹配RNFirebase podspec,否则将出现此错误。
[!] No podspec found for Run this command from the terminal inside the ios folder.
从ios文件夹内的终端运行此命令。
cd ios
pod update
Next, open and edit ReactNativeFcm/AppDelegate.m then add these import of the Firebase, React Native Firebase Notifications, and Messaging.
接下来,打开并编辑ReactNativeFcm/AppDelegate.m然后添加以下导入的Firebase,React Native Firebase Notifications和Messaging。
#import <Firebase.h>
#import "RNFirebaseNotifications.h"
#import "RNFirebaseMessaging.h"
At the beginning of the didFinishLaunchingWithOptions:(NSDictionary *)launchOptions method add these lines to initialize Firebase and RNFirebaseNotifications.
在didFinishLaunchingWithOptions:(NSDictionary *)launchOptions方法的开头,添加以下行以初始化Firebase和RNFirebaseNotifications。
[FIRApp configure];
[RNFirebaseNotifications configure];
Add a new method to receive RNFirebaseNotifications local notification.
添加新方法以接收RNFirebaseNotifications本地通知。
- (void)application:(UIApplication *)application didReceiveLocalNotification:(UILocalNotification *)notification {
 [[RNFirebaseNotifications instance] didReceiveLocalNotification:notification];
}
Add a new method to receive a remote RNFirebaseNotifications.
添加新方法以接收远程RNFirebaseNotifications。
- (void)application:(UIApplication *)application didReceiveRemoteNotification:(nonnull NSDictionary *)userInfo
fetchCompletionHandler:(nonnull void (^)(UIBackgroundFetchResult))completionHandler{
 [[RNFirebaseNotifications instance] didReceiveRemoteNotification:userInfo fetchCompletionHandler:completionHandler];
}
Add a new method to register to the Firebase and get FCM token.
添加新方法以注册到Firebase并获取FCM令牌。
- (void)application:(UIApplication *)application didRegisterUserNotificationSettings:(UIUserNotificationSettings *)notificationSettings {
 [[RNFirebaseMessaging instance] didRegisterUserNotificationSettings:notificationSettings];
}
实施FCM推送通知 (Implementing FCM Push Notification)
After everything set up and configured for the Android and iOS (in XCode), now, we have to implement the FCM push notification in React Native side using React Native Firebase module. Just open and edit App.js then add or modify these imports of Firebase, React Hooks useEffect, and React Native Alert.
在为Android和iOS(在XCode中)进行了所有设置和配置之后,现在,我们必须使用React Native Firebase模块在React Native端实现FCM推送通知。 只需打开并编辑App.js然后添加或修改这些导入的Firebase, React Hooks useEffect和React Native Alert。
import React, {Fragment,useEffect} from 'react';
import {
 SafeAreaView,
 StyleSheet,
 ScrollView,
 View,
 Text,
 StatusBar,
 Alert
} from 'react-native';
import firebase from 'react-native-firebase';
Implement the use effect function or method that run checkPermission and messageListener functions.
实现运行checkPermission和messageListener函数的使用效果函数或方法。
useEffect(() => {
 this.checkPermission();
 this.messageListener();
}, []);
Add a function to check the permissions.
添加一个功能来检查权限。
checkPermission = async () => {
 const enabled = await firebase.messaging().hasPermission();
 if (enabled) {
   this.getFcmToken();
 } else {
   this.requestPermission();
 }
}
Add a function to get FCM token from the Firebase and show the token to the React Native Alert.
添加一个功能以从Firebase获取FCM令牌并将该令牌显示给React Native Alert。
getFcmToken = async () => {
 const fcmToken = await firebase.messaging().getToken();
 if (fcmToken) {
  console.log(fcmToken);
  this.showAlert('Your Firebase Token is:', fcmToken);
 } else {
  this.showAlert('Failed', 'No token received');
 }
}
Add a function to request new permission to use Firebase Notification services.
添加功能以请求使用Firebase Notification Services的新权限。
requestPermission = async () => {
 try {
  await firebase.messaging().requestPermission();
  // User has authorised
 } catch (error) {
   // User has rejected permissions
 }
}
Add a function to listen to the incoming messages or Push Notification from the Firebase Cloud Messaging (FCM) then show them as an Alert when the App is open.
添加功能以侦听来自Firebase Cloud Messaging(FCM)的传入消息或推式通知,然后在打开应用程序时将其显示为警报。
messageListener = async () => {
 this.notificationListener = firebase.notifications().onNotification((notification) => {
   const { title, body } = notification;
   this.showAlert(title, body);
 });this.notificationOpenedListener = firebase.notifications().onNotificationOpened((notificationOpen) => {
   const { title, body } = notificationOpen.notification;
   this.showAlert(title, body);
 });const notificationOpen = await firebase.notifications().getInitialNotification();
 if (notificationOpen) {
   const { title, body } = notificationOpen.notification;
   this.showAlert(title, body);
 }this.messageListener = firebase.messaging().onMessage((message) => {
  console.log(JSON.stringify(message));
 });
}
Add a function to show an alert with a title and message params.
添加功能以显示带有标题和消息参数的警报。
showAlert = (title, message) => {
 Alert.alert(
  title,
  message,
  [
   {text: 'OK', onPress: () => console.log('OK Pressed')},
  ],
  {cancelable: false},
 );
}
运行并测试React Native Firebase应用 (Run and Test React Native Firebase App)
To run the whole React Native Firebase App, first, re-link again the React Native to React Native Firebase.
要运行整个React Native Firebase应用程序,首先,再次将React Native重新链接到React Native Firebase。
react-native unlink react-native-firebase
react-native link react-native-firebase
Run the React Native app to the Android device using this command. Make sure the Android device connected using USB cable and USB Debugging is enabled so it can be detected using ADB command.
使用此命令在Android设备上运行React Native应用。 确保已启用使用USB电缆和USB调试连接的Android设备,以便可以使用ADB命令检测到它。
react-native run-iosThe new terminal tab will open then run the Metro Bundler after going to the root of the project folder.
新的终端选项卡将打开,然后在转到项目文件夹的根目录后运行Metro Bundler。
cd ~/Apps/ReactNativeFcm && yarn startFor the iOS, we can open the ios/ReactNativeFcm.xcworkspace from the XCode then use the valid provisioning profile signing then run the iOS app from there while the Metro Bundler runs from the terminal.
对于iOS,我们可以从XCode打开ios/ReactNativeFcm.xcworkspace ,然后使用有效的配置文件签名,然后从此处运行iOS应用,而Metro Bundler从终端运行。
Next, open the Postman app then change the method to POST and the address to <a href="https://fcm.googleapis.com/fcm/send." target="_blank">https://fcm.googleapis.com/fcm/send`. In the headers tab, add Authorization with the value of the Firebase Cloud Messaging Key that previously gets when setup the Firebase. Also, add the Content-Type of application/json as the second headers.
接下来,打开Postman应用,然后将方法更改为POST,并将地址更改为<a href="https://fcm.googleapis.com/fcm/send 。” target =“ _ blank”> https:// fcm.googleapis.com / fcm / send` 。 在标题选项卡中,添加授权,并在设置Firebase时先获取Firebase Cloud Messaging Key的值。 另外,将application/json的Content-Type添加为第二个标头。

In the body tabs, choose the RAW and fill with the JSON like below.
在主体选项卡中,选择RAW并使用JSON填充,如下所示。
{
    "to" : "cFgZQf_bGtc:APA91bF0xbAObLc1CwyBe8lINHaZ_V2PvmsYJ53URUYT1gQwBcglYIi_fdnnpl7KEkNeWOZgmaTWu-hsFGDT7BNaMsEZl37VybPHSXaU0vKZwMl6HfV8VzZlmluIbHTqxwSD7r8Fmy4i",
    "notification" : {
        "body" : "The first message from the React Native and Firebase",
        "title" : "React Native Firebase",
        "content_available" : true,
        "priority" : "high"
    },
    "data" : {
        "body" : "The first message from the React Native and Firebase",
        "title" : "React Native Firebase",
        "content_available" : true,
        "priority" : "high"
    }
}
You can change the “to” with the received FCM token that showed up in the alert when the React Native app started in the devices. Click the Send button and you will see the push notification in the device like this.
当设备上启动React Native应用程序时,您可以使用警报中显示的接收到的FCM令牌将“ to”更改为。 单击发送按钮,您将在这样的设备中看到推送通知。

翻译自: https://medium.com/@hamidrdeveloper/react-native-mobile-apps-push-notifications-52b3be541f84


 已为社区贡献60条内容

所有评论(0)