firebase登录验证_如何使用Firebase通过三步向身份验证本机添加身份验证
firebase登录验证Authentication allows us to secure our apps, or limit access for non-user members. Authentication can also be used, for example, to limit access to a paid service or specific service.身份验..
firebase登录验证
Authentication allows us to secure our apps, or limit access for non-user members. Authentication can also be used, for example, to limit access to a paid service or specific service.
身份验证使我们能够保护我们的应用程序安全,或限制非用户成员的访问权限。 身份验证也可以用于例如限制对付费服务或特定服务的访问。
That's just one example of how authentication can be in your app. Today we will add authentication to a React Native app using Firebase.
那只是在您的应用程序中如何进行身份验证的一个示例。 今天,我们将使用Firebase将身份验证添加到React Native应用程序。
1安装react-native-firebase (1 Installing react-native-firebase)
The first thing we do is install and initialize Firebase inside our app. In React Native we need to use a Firebase Container for React Native. We are going to use react-native-firebase.
我们要做的第一件事是在应用程序内部安装并初始化Firebase。 在React Native中,我们需要为Fire Native使用Firebase容器。 我们将使用react-native-firebase 。
If you are about to start a new React Native app from scratch and you would like to use Firebase, you are lucky - you can install react-native-firebase pre-integrated using the React Native CLI.
如果您将要从头开始一个新的React Native应用程序,并且想使用Firebase,那么您很幸运-您可以安装使用React Native CLI预集成的react-native-firebase。
//
npx @react-native-community/cli init --template=@react-native-firebase/template authenticationFirebase
//** source: https://invertase.io/oss/react-native-firebase/quick-start/new-project
Then just install the pod for iOS by running the following command inside the root directory of your app.
然后,只需在应用程序的根目录中运行以下命令,即可为iOS安装pod。
cd ios && pod installIf you are having issues installing a new project with Firebase please refer to react-native-firebase docs
如果您在使用Firebase安装新项目时遇到问题,请参阅react-native-firebase文档
将react-native-firebase添加到现有项目 (Adding react-native-firebase to an existing project)
Install the react-native-firebase package using yarn or npm
使用yarn或npm安装react-native-firebase软件包
yarn add @react-native-firebase/appor:
要么:
npm install @react-native-firebase/appThen install pods for iOS.
然后安装iOS的Pod。
shell cd ios && pod install
shell cd ios && pod install
运行应用 (Running the app)
For iOS, there are two ways to do it: I personally use Xcode, as it gives me a clear idea if something went wrong and the build failed.

对于iOS,有两种方法可以实现:我个人使用Xcode,因为它可以使我清楚地知道出了什么问题并且构建失败。
Always make sure the package is running - hit yarn start to start the app.
始终确保程序包正在运行- yarn start打yarn start以启动应用程序。
The second way to run the app on iOS is running the react-native run-ios command - and that's it.
在iOS上运行应用程序的第二种方法是运行react-native run-ios命令-就是这样。
添加Firebase凭证 (Adding firebase credentials)
This step requires us to create a new project in the Firebase console .
此步骤需要我们在Firebase控制台中创建一个新项目。
After creating a new project on the dashboard page select add Firebase to iOS app. This will show you the steps to add credentials to iOS like below.
在仪表板页面上创建新项目后,选择将Firebase添加到iOS应用 。 这将向您显示将凭证添加到iOS的步骤,如下所示。
It consists of a few steps :
它包括几个步骤:
-
Download the
GoogleService-info.plistfile and put it inside the iOS folder within your project.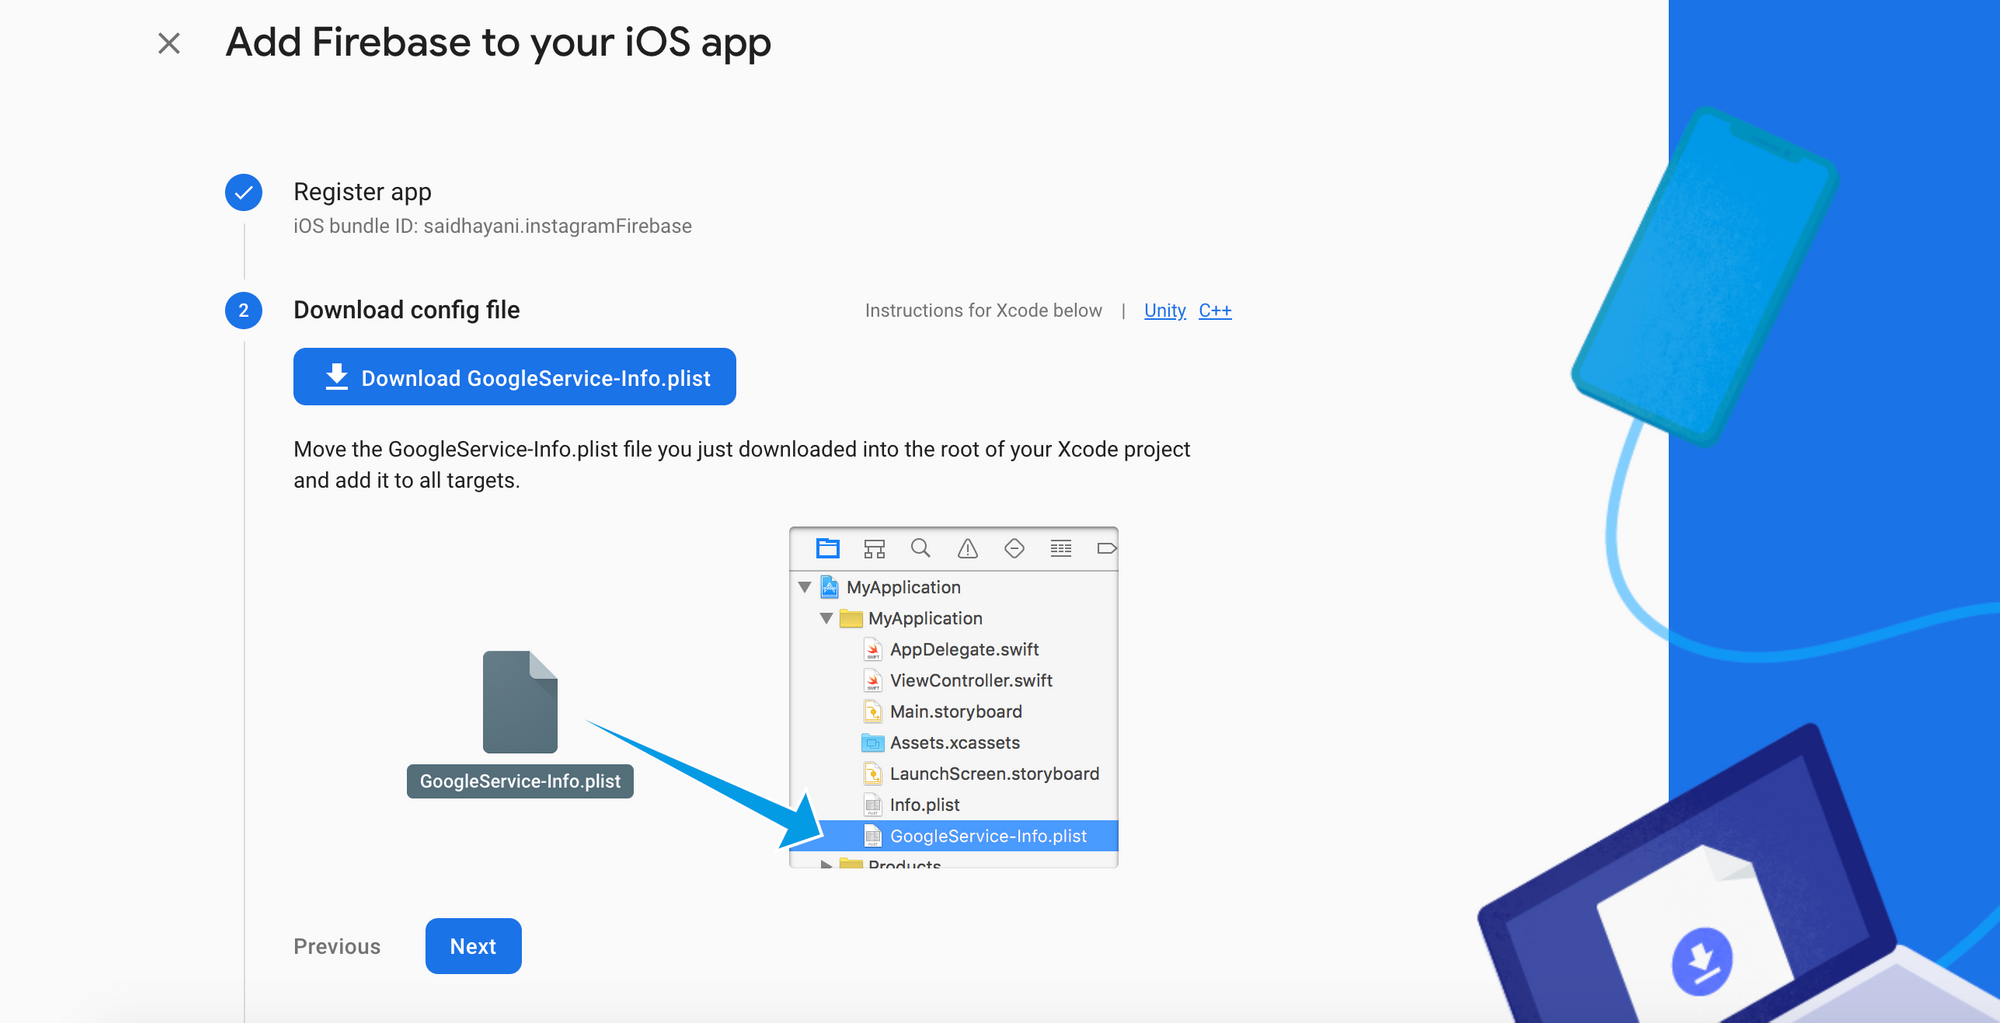
下载
GoogleService-info.plist文件,并将其放在项目中的iOS文件夹中。 -
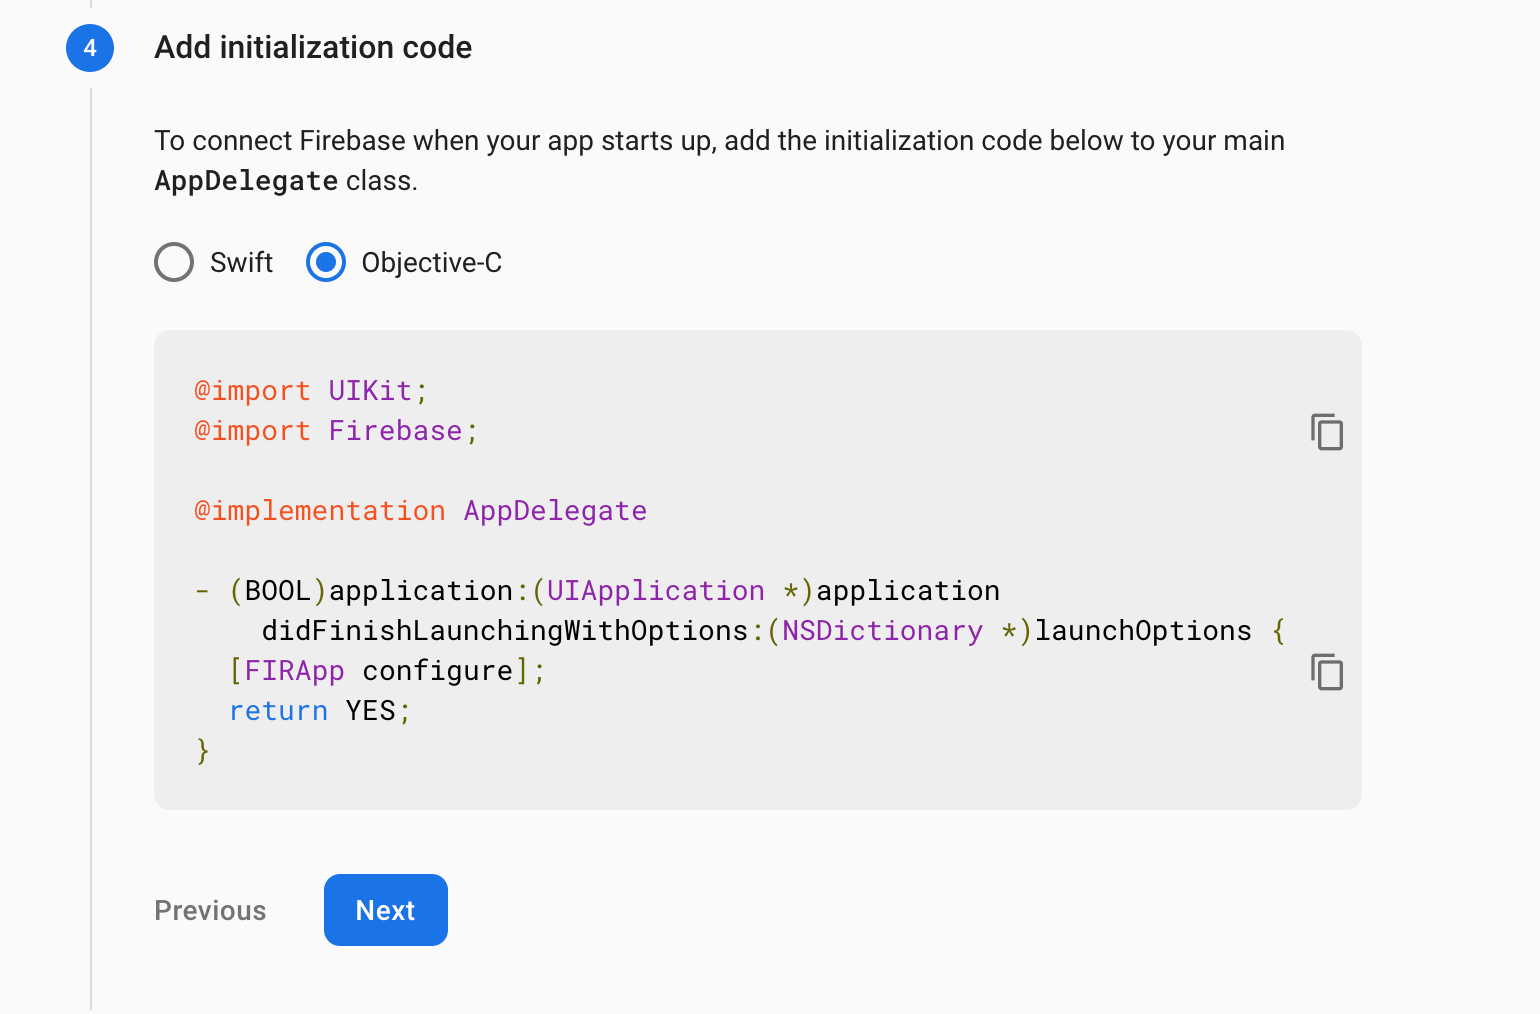
Initialize Firebase
初始化Firebase
对于Android (For Android)
Android has a different setup for Firebase. In project settings in the Firebase console select add Firebase to Android.

Android为Firebase设置了不同的设置。 在Firebase控制台的项目设置中,选择“ 将Firebase添加到Android” 。
You can put any name you like in the app name input - just make sure it conforms to the Firebase requirements. Then click Register.
您可以在应用程序名称输入中输入您喜欢的任何名称-只需确保它符合Firebase要求即可。 然后单击注册 。
After that, you need to download the google-services.json file and put it within the android/app folder.
之后,您需要下载google-services.json文件并将其放在android / app文件夹中。
Then the next step is to initialize the Android SDK.
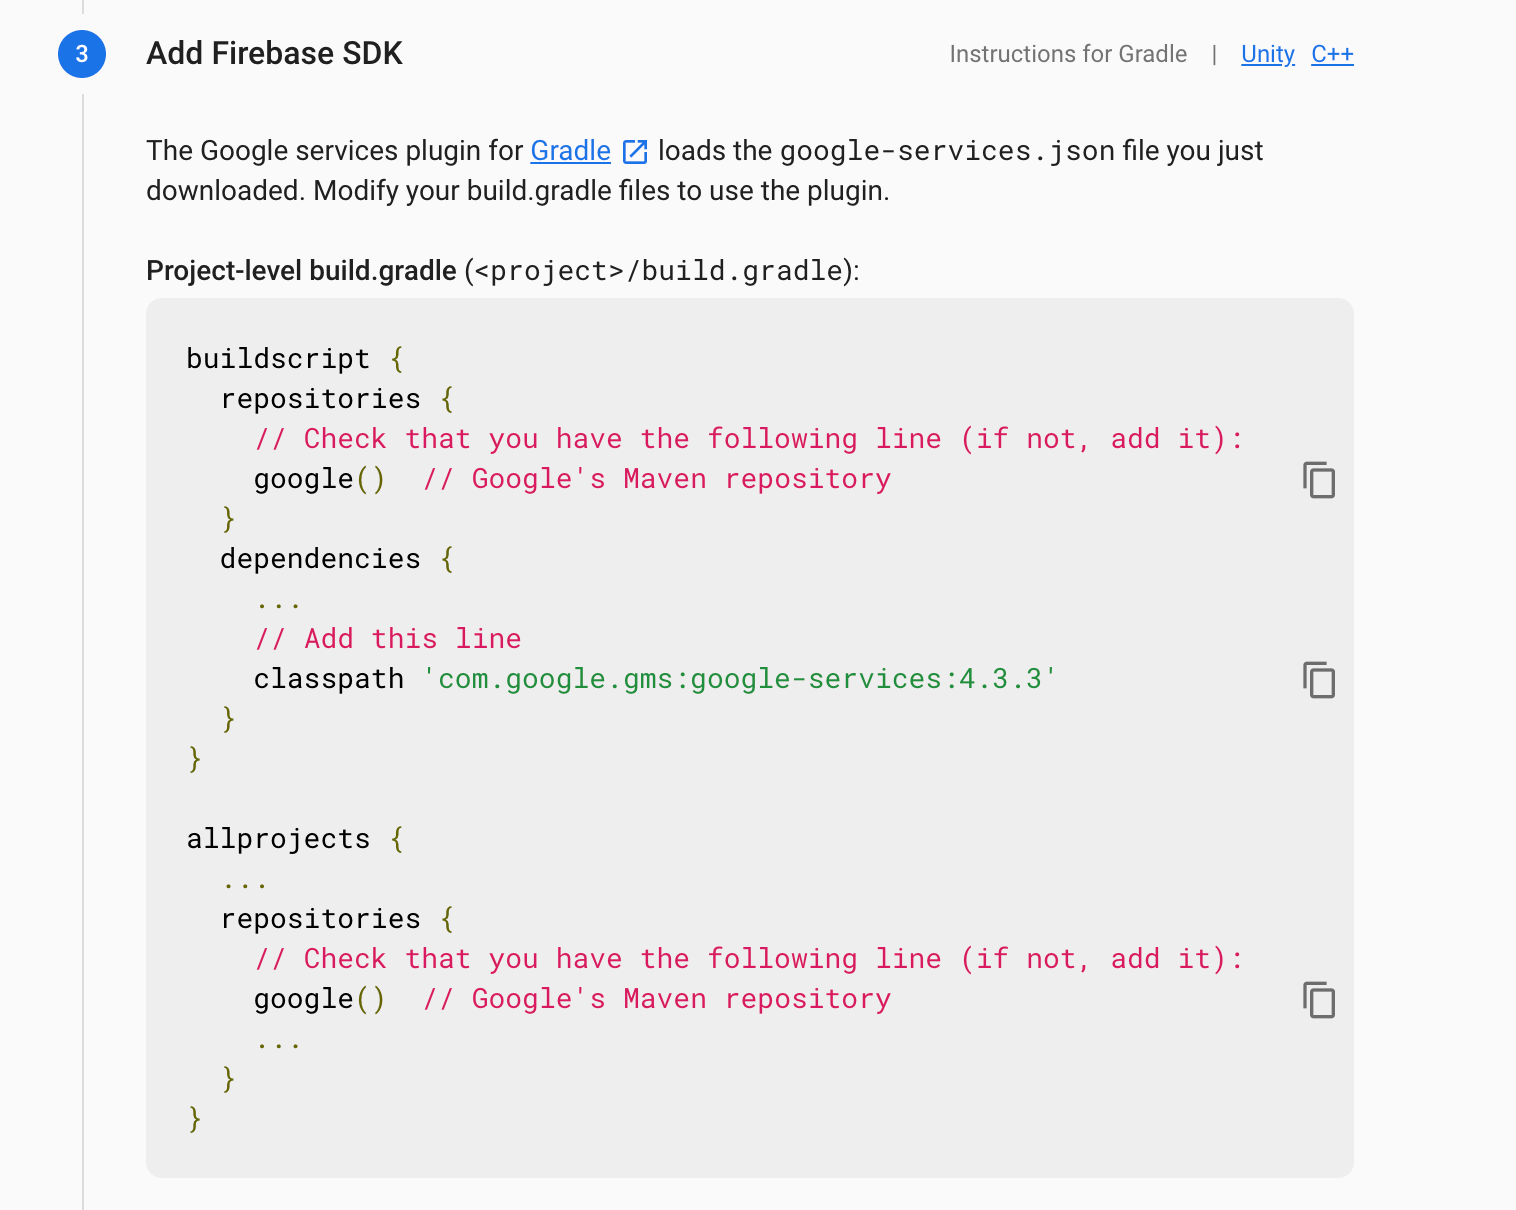
然后,下一步是初始化Android SDK。
The last step is to apply the Firebase plugin inside: android/app/build.gradle .
最后一步是在内部应用Firebase插件: android/app/build.gradle 。
apply plugin: 'com.google.gms.google-services'If you have any issues running the steps above you can always refer to the Firebase docs or react-native-firebase websites.
如果您在执行上述步骤时遇到任何问题,可以随时参考Firebase文档或react-native-firebase网站。
Now that we are done with the integration, the next step is to implement Firebase functions to create users and sign in in React Native.
现在我们完成了集成,下一步是实现Firebase函数以创建用户并登录React Native。
添加登录,登录 (Adding SignIn, Login)
This phase is simple: just some React and JavaScript code to call Firebase functions. I'm going to create a simple UI for Login and SignUp (this is not necessary for this tutorial so you can skip this step).
这个阶段很简单:只需一些React和JavaScript代码即可调用Firebase函数。 我将为“登录”和“注册”创建一个简单的UI(本教程不需要这样做,因此您可以跳过此步骤)。
I will put the full source code at the end of article *
我将完整的源代码放在文章的结尾*
We will use the createUserWithEmailAndPassword function to sign up for a new user. I already implemented all the validation on the form - we just need to call this function to create a user.
我们将使用createUserWithEmailAndPassword函数来注册新用户。 我已经在表单上实现了所有验证-我们只需要调用此函数来创建用户。
When the user presses the Continue button, __doSignUp will be called and the code looks like this:
当用户按下继续按钮时,将调用__doSignUp ,代码如下所示:
const __doSignUp = () => {
  if (!email) {
    setError("Email required *")
    setValid(false)
    return
  } else if (!password && password.trim() && password.length > 6) {
    setError("Weak password, minimum 5 chars")
    setValid(false)
    return
  } else if (!__isValidEmail(email)) {
    setError("Invalid Email")
    setValid(false)
    return
  }

  __doCreateUser(email, password)
}

const __doCreateUser = async (email, password) => {
  try {
    let response = await auth().createUserWithEmailAndPassword(email, password)
    if (response) {
      console.log(tag, "🍎", response)
    }
  } catch (e) {
    console.error(e.message)
  }
}
Make sure you installed @react-native-firebase/authto be able to call auth().createUserWithEmailAndPassword(email, password)
确保安装了@react-native-firebase/auth才能调用auth().createUserWithEmailAndPassword(email, password)
// import auth
import auth from "@react-native-firebase/auth"
The function that creates a new user in Firebase looks like this:
在Firebase中创建新用户的函数如下所示:
const __doCreateUser = async (email, password) =>{
    try {
     let response =  await auth().createUserWithEmailAndPassword(email, password);
      if(response){
        console.log(tag,"🍎",response)
      }
    } catch (e) {
      console.error(e.message);
    }
If the function throws an error, make sure to enable the email / password method in the authentication section in the Firebase console.
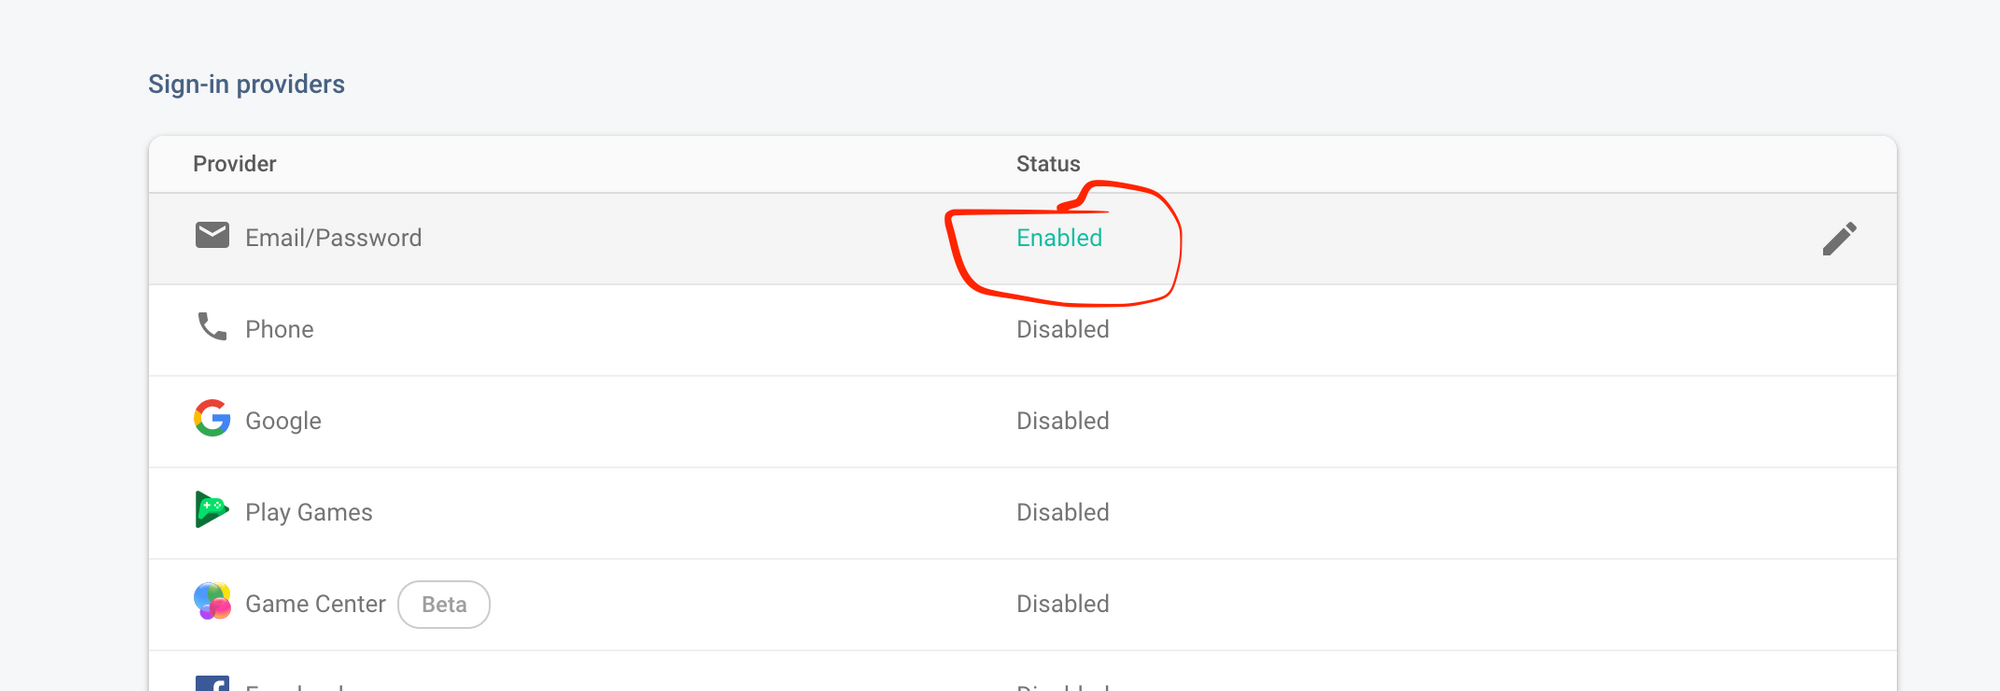
如果该函数引发错误,请确保在Firebase控制台的“身份验证”部分中启用电子邮件/密码方法。
If everything went well, and the data entered (email, password) is valid, an alert will show up. If you check the Authentication section in the Firebase console you will notice that a new user has been created.
如果一切顺利,并且输入的数据(电子邮件,密码)有效,则会显示警报。 如果您在Firebase控制台中选中“身份验证”部分,您会注意到已经创建了一个新用户。
Here is the source code of SignInComponent.
这是SignInComponent的源代码。
const SigInComponent = () => {
  const [email, setEmail] = useState("")
  const [password, setPassword] = useState("")
  const [fetching, setFetching] = useState(false)
  const [error, setError] = useState("")
  const [isValid, setValid] = useState(true)
  const __doSignUp = () => {
    if (!email) {
      setError("Email required *")
      setValid(false)
      return
    } else if (!password && password.trim() && password.length > 6) {
      setError("Weak password, minimum 5 chars")
      setValid(false)
      return
    } else if (!__isValidEmail(email)) {
      setError("Invalid Email")
      setValid(false)
      return
    }

    __doCreateUser(email, password)
  }

  const __doCreateUser = async (email, password) => {
    try {
      let response = await auth().createUserWithEmailAndPassword(
        email,
        password
      )
      if (response && response.user) {
        Alert.alert("Success ✅", "Account created successfully")
      }
    } catch (e) {
      console.error(e.message)
    }
  }

  return (
    <SafeAreaView style={styles.containerStyle}>
      <View style={{ flex: 0.2 }}>
        {!!fetching && <ActivityIndicator color={blue} />}
      </View>
      <View style={styles.headerContainerStyle}>
        <Text style={styles.headerTitleStyle}> Sign Up </Text>
      </View>
      <View style={styles.formContainerStyle}>
        <TextInput
          label={"Email"}
          autoCapitalize={false}
          keyboardType="email-address"
          style={styles.textInputStyle}
          placeholder="Mail address"
          onChangeText={text => {
            setError
            setEmail(text)
          }}
          error={isValid}
        />

        <TextInput
          label={"Password"}
          secureTextEntry
          autoCapitalize={false}
          style={styles.textInputStyle}
          selectionColor={blue}
          placeholder="Password"
          error={isValid}
          onChangeText={text => setPassword(text)}
        />
      </View>
      {error ? (
        <View style={styles.errorLabelContainerStyle}>
          <Text style={styles.errorTextStyle}>{error}</Text>
        </View>
      ) : null}
      <View style={styles.signInButtonContainerStyle}>
        <TouchableHighlight
          style={styles.signInButtonStyle}
          onPress={__doSignUp}
          underlayColor={blue}
        >
          <View
            style={{
              flexDirection: "row",
              justifyContent: "space-around",
            }}
          >
            <Text style={styles.signInButtonTextStyle}>Continue</Text>
          </View>
        </TouchableHighlight>
      </View>
    </SafeAreaView>
  )
}
For LoginComponent it’s mostly the same the only thing we need to change is we use signInWithEmailAndPassword method instead.
对于LoginComponent ,几乎相同,唯一需要更改的是使用signInWithEmailAndPassword方法。
const __doSingIn = async (email, password) => {
  try {
    let response = await auth().signInWithEmailAndPassword(email, password)
    if (response && response.user) {
      Alert.alert("Success ✅", "Authenticated successfully")
    }
  } catch (e) {
    console.error(e.message)
  }
} {
// this.register("said1292@gmail.com", "123456");
this.__isTheUserAuthenticated();
}
__isTheUserAuthenticated = () => {
let user = firebase.auth().currentUser.uid;
if (user) {
console.log(tag, user);
this.setState({ authenticated: true });
} else {
this.setState({ authenticated: false });
}
};And we can change the UI based on if the user is authenticated or not. We can display user info by just using the same method.
我们可以根据用户是否通过身份验证来更改用户界面。 我们可以使用相同的方法来显示用户信息。
firebase.auth().currentUser.email // said543@gmail.comAnd to logout, you can just call await firebase.auth().signOut();
要注销,您只需调用await firebase.auth().signOut() ;
I’m sure integrating navigation like react-navigation would be awesome, but it was not our focus in this article. So feel free to add navigation so you can just navigate based on the user status.
我敢肯定,像react-navigation这样的集成导航会很棒,但这不是本文的重点。 因此,随时添加导航,以便您可以仅基于用户状态进行导航。
Feel free to check out the full source code 💻on GitHub
随时在GitHub上查看完整的源代码
Thanks for reading.
感谢您的阅读 。
Originally published on saidhayani.com
最初发布于saidhayani.com
了解有关React native的更多信息 。 (Learn more about React native.)
firebase登录验证

开源鸿蒙跨平台开发社区汇聚开发者与厂商,共建“一次开发,多端部署”的开源生态,致力于降低跨端开发门槛,推动万物智联创新。
更多推荐

 0
0 0
0- 0


 已为社区贡献17条内容

所有评论(0)