

ktor
After attending KotlinConf 2018 and inspired by Ryan Harter talk there (check it here), I've started working with Ktor to develop a backend to connect my apps. I have to say I'm really impressed how easy it was to develop a REST API, including JWT authentication, database connection and Docker deployment with Docker Compose.
在参加KotlinConf 2018并受到Ryan Harter的演讲启发( 在此处查看 )之后,我开始与Ktor合作开发后端以连接我的应用程序。 我必须说,我真的给开发REST API这么容易感到印象深刻,包括使用Docker Compose进行JWT身份验证,数据库连接和Docker部署。
Before we start, I would like to warn everyone about the aim of this article. There are several publications about how to code using Ktor, and the official documentation and community behind it are amazing, so I won't spend too much time explaining about how to get things done. This article will be focused on the next step, when you have something working but you want a clean and testable code. This is the architecture I'm using in a real life & production environment server to provide a REST API to my app MySecretSanta.
在开始之前,我想提醒大家本文的目的。 关于如何使用Ktor进行编码的出版物很多,其背后的官方文档和社区也很棒,因此我不会花太多时间来解释如何完成工作。 当您可以进行某些工作但想要一个干净且可测试的代码时,本文将重点关注下一步。 这是我在现实生活和生产环境服务器中使用的体系结构,用于为我的应用程序MySecretSanta提供REST API。
架构图 (Architecture diagram)
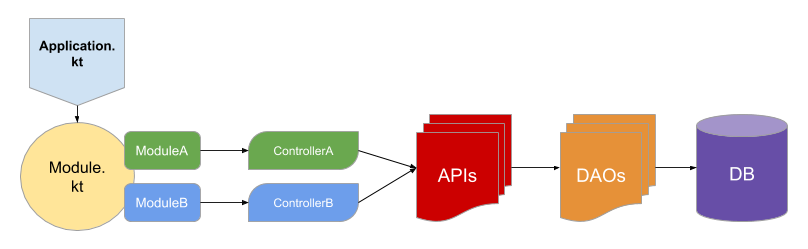
At the time of writing this article, Ktor server can only be run in JVM, so we will start with a Java main function placed in Application.kt file.
在撰写本文时,Ktor服务器只能在JVM中运行,因此我们将从放置在Application.kt文件中的Java 主要功能开始。
fun main(args: Array<String>) {


    val environment = System.getenv()["ENVIRONMENT"] ?: handleDefaultEnvironment()
    val config = extractConfig(environment, HoconApplicationConfig(ConfigFactory.load()))


    embeddedServer(Netty, port = config.port) {
        println("Starting instance in ${config.host}:${config.port}")
        module {
            install(Koin) {
                modules(
                    module {
                        single { config }
                        single<DatabaseProviderContract> { DatabaseProvider() }
                        single<JWTVerifier> { JwtConfig.verifier }
                        single<PasswordManagerContract> { PasswordManager }
                        single<TokenProvider> { JwtConfig }
                    },
                    ApiInjection.koinBeans,
                    ModulesInjection.koinBeans,
                    DaoInjection.koinBeans
                )
            }
            main()
        }
    }.start(wait = true)
}
This main function will be used to recover HOCON environment configuration, start embedded server with Netty, setup Koin dependency injector with our dependencies and calling the main module function. Let's call this part the project setup.
该主要功能将用于恢复HOCON环境配置,使用Netty启动嵌入式服务器,使用我们的依赖项设置Koin依赖项注入程序并调用主模块功能。 我们将此部分称为项目设置 。
Inside Module.kt file we will configure our Ktor server instance. This should be an Application extension function to be able to apply all the configurations. I consider database initialisation as part of server configuration, this is why I call databaseProvider.init() method here. As you can see in the following snippet, all Ktor features and interceptors are installed in this file. Status pages and route modules (registrationModule & userModule) are defined in different files.
在Module.kt文件中,我们将配置我们的Ktor服务器实例。 这应该是一个应用程序扩展功能,以便能够应用所有配置。 我认为数据库初始化是服务器配置的一部分,这就是为什么我在这里调用databaseProvider.init()方法的原因。 如下面的代码片段所示,所有Ktor功能和拦截器都安装在此文件中。 状态页面和路由模块( registrationModule和userModule ) 在不同的文件中定义。
fun Application.module() {


    val userApi by inject<UserApi>()
    val databaseProvider by inject<DatabaseProviderContract>()
    val jwtVerifier by inject<JWTVerifier>()
    //Init database here
    databaseProvider.init()


    install(CallLogging) {
        level = Level.DEBUG
    }
    install(ContentNegotiation) { gson { } }
    install(StatusPages) {
        generalStatusPages()
        userStatusPages()
        authStatusPages()
        exception<UnknownError> {
            call.respondText(
                "Internal server error",
                ContentType.Text.Plain,
                status = HttpStatusCode.InternalServerError
            )
        }
        exception<IllegalArgumentException> {
            call.respond(HttpStatusCode.BadRequest)
        }
    }


    install(Authentication) {
        authenticationModule(userApi, databaseProvider, jwtVerifier)
    }


    install(Routing) {
        static("/static") {
            resources("static")
        }
        registrationModule()
        authenticate("jwt") {
            userModule()
        }
    }
}
registrationModule and userModule are the equivalent of ModuleA and ModuleB in our architecture diagram. We are getting into the interesting part.
registrationModule和userModule在我们的体系结构图中等效于ModuleA和ModuleB。 我们正在进入有趣的部分。
路线定义 (Route definition)
We have left the configuration part and now we need to start defining routes. This is what registrationModule and userModule are doing, they will install routes to our root routing node of our application. As you can see in the following snippet, all routing modules will be a Routing extension function to be able to install new routes. Each of them will have a Koin injected controller instance, that will be responsible of doing the business logic in this module. This means this layer will only be responsible of defining routes, receive arguments and delegate logic to controllers.
我们已经离开了配置部分,现在我们需要开始定义路由。 这是registrationModule和userModule的工作,它们会将路由安装到我们应用程序的根路由节点。 如下面的代码片段所示,所有路由模块都将是一个路由扩展功能 ,以便能够安装新路由。 他们每个人都有一个Koin注入的控制器实例,它将负责执行此模块中的业务逻辑。 这意味着该层将仅负责定义路由,接收参数并将逻辑委托给控制器。
fun Routing.registrationModule() {


    val unauthenticatedController by inject<RegistrationController>()


    post("user") {
        val postUser = call.receive<PostUserBody>()
        val user = unauthenticatedController.createUser(postUser)
        call.respond(user)
    }


    post("authenticate") {
        val credentials = call.receive<LoginCredentials>()
        val loginTokenResponse = unauthenticatedController.authenticate(credentials)
        call.respond(loginTokenResponse)
    }


    post("token") {
        val credentials = call.receive<RefreshBody>()
        val credentialsResponse = unauthenticatedController.refreshToken(credentials)
        call.respond(credentialsResponse)
    }
}
业务逻辑(控制器) (Business logic (Controllers))
All business logic should be defined in a Controller. Following this advice you should be able to unit test all your business logic without worrying about any Ktor dependency. Controllers will use Koin injected API layer objects to fetch and store data. Controllers and API's should always implement an interface, in order to allow unit testing and disconnect other layers. Also, Controller's interfaces will help on tracking changes in your exposed API.
所有业务逻辑都应在控制器中定义。 遵循此建议,您应该能够对所有业务逻辑进行单元测试,而不必担心任何Ktor依赖性。 控制器将使用Koin注入的API层对象来获取和存储数据。 控制器和API应该始终实现一个接口,以便进行单元测试并断开其他层的连接。 另外, Controller的界面将有助于跟踪您公开的API中的更改。
You can feel free to change the name of this layer, as there are other architectures that will use the same name in other contexts.
您可以随意更改此层的名称,因为还有其他架构会在其他上下文中使用相同的名称。
class RegistrationControllerImp : BaseController(), RegistrationController, KoinComponent {


    private val userApi by inject<UserApi>()
    private val passwordManager by inject<PasswordManagerContract>()
    private val tokenProvider by inject<TokenProvider>()


    override suspend fun createUser(postUser: PostUserBody): ResponseUser {
        val user = dbQuery {
            userApi.getUserByUsername(postUser.username)?.let {
                throw InvalidUserException("User is already taken")
            }
            userApi.createUser(postUser) ?: throw UnknownError("Internal server error")
        }
        return user.toResponseUser()
    }


    override suspend fun authenticate(credentials: LoginCredentials) = dbQuery {
        userApi.getUserByUsername(credentials.username)?.let { user ->
            if (passwordManager.validatePassword(credentials.password, user.password)) {
                val credentialsResponse = tokenProvider.createTokens(user)
                LoginTokenResponse(credentialsResponse)
            } else {
                throw AuthenticationException("Wrong credentials")
            }
        } ?: throw AuthenticationException("Wrong credentials")
    }


    override suspend fun refreshToken(credentials: RefreshBody) = dbQuery {
        tokenProvider.verifyToken(credentials.refreshToken)?.let {
            userApi.getUserById(it)?.let {
                val credentialsResponse = tokenProvider.createTokens(it)
                LoginTokenResponse(credentialsResponse)
            } ?: throw AuthenticationException("Wrong credentials")
        } ?: throw AuthenticationException("Wrong credentials")
    }
}


interface RegistrationController {
    suspend fun createUser(postUser: PostUserBody): ResponseUser
    suspend fun authenticate(credentials: LoginCredentials): LoginTokenResponse
    suspend fun refreshToken(credentials: RefreshBody): LoginTokenResponse
}
API层 (API layer)
APIs will provide a clear interface to recover and store data in our server. They should implement an interface and, unlike DAOs, they won't talk directly to database and may need to do some data transformation.
API将提供清晰的接口以在我们的服务器中恢复和存储数据。 他们应该实现一个接口,并且与DAO不同,它们不会直接与数据库对话,并且可能需要进行一些数据转换。
DAO层 (DAO layer)
DAO objects will define each table and functions to access them. In my current implementation I'm using Exposed with SQL DSL, so each DAO object will be one table with CRUD functions.
DAO对象将定义每个表和访问它们的函数。 在当前的实现中,我将Exposed与SQL DSL结合使用 ,因此每个DAO对象将是一个具有CRUD函数的表。
翻译自: https://medium.com/swlh/architecture-proposal-to-build-servers-with-ktor-1069bfaf2926
ktor


 已为社区贡献11条内容

所有评论(0)