25. 移动端-部署发布-Fastlane
fastlane是自动化iOS和Android应用Beta部署和发布的工具,能处理代码签名、截图生成等繁琐任务 。
文章目录
- 前言
- 一、什么是 fastlane
- 二、安装Fastlane
- 三、iOS
- Getting started with *fastlane* for iOS
- 四、Android
- Getting started with *fastlane* for Android
- 五、cross-platform
- Getting started with *fastlane* for [React Native](https://facebook.github.io/react-native/)
- Getting started with *fastlane* for [Flutter](https://flutter.io/)
- Getting started with *fastlane* for [NativeScript](https://www.nativescript.org/)
前言
fastlane
fastlane 是一整套的客户端 CI 工具集合,替代开发者处理构建和发布 App 中繁琐的任务,可以非常快速简单的搭建一个自动化发布服务,并且支持Android,iOS,MacOS。Fastlane本身没有一套特殊语法,使用的 Ruby 语言。
一、什么是 fastlane
1. 简介
fastlane is the easiest way to automate beta deployments and releases for your iOS and Android apps. 🚀 It handles all tedious tasks, like generating screenshots, dealing with code signing, and releasing your application.
You can start by creating a Fastfile file in your repository, here’s one that defines your beta or App Store release process:
lane :beta do
  increment_build_number
  build_app
  upload_to_testflight
end

lane :release do
  capture_screenshots
  build_app
  upload_to_app_store       # Upload the screenshots and the binary to iTunes
  slack                     # Let your team-mates know the new version is live
end
You just defined 2 different lanes, one for beta deployment, one for App Store. To release your app in the App Store, all you have to do is
fastlane release
2.特性
🚀 Save hours every time you push a new release to the store or beta testing service
✨ Integrates with all your existing tools and services (more than 400 integrations)
📖 100% open source under the MIT license
🎩 Easy setup assistant to get started in a few minutes
⚒ Runs on your machine, it’s your app and your data
👻 Integrates with all major CI systems
🖥 Supports iOS, Mac, and Android apps
🔧 Extend and customise fastlane to fit your needs, you’re not dependent on anyone
💭 Never remember any commands anymore, just fastlane
🚢 Deploy from any computer, including a CI server
二、安装Fastlane
Getting Started
Installing fastlane
fastlane can be installed in multiple ways. The preferred method is with Bundler. fastlane can also be installed directly through Homebrew (if on macOS). It is possible to use macOS’s system Ruby, but it’s not recommended, as it can be hard to manage dependencies and cause conflicts.
Managed Ruby environment + Bundler (macOS/Linux/Windows)
Ruby
If you use macOS, system Ruby is not recommended. There are a variety of ways to install Ruby without having to modify your system environment. For macOS and Linux, rbenv is one of the most popular ways to manage your Ruby environment.
fastlane supports Ruby versions 2.5 or newer. Verify which Ruby version you’re using:
$ ruby --version
ruby 2.7.2p137 (2020-10-01 revision 5445e04352) [x86_64-darwin19]
Bundler
It is recommended that you use Bundler and Gemfile to define your dependency on fastlane. This will clearly define the fastlane version to be used and its dependencies, and will also speed up fastlane execution.
- Install Bundler by running
gem install bundler - Create a
./Gemfilein the root directory of your project with the content
source "https://rubygems.org"

gem "fastlane"
- Run
bundle updateand add both the./Gemfileand the./Gemfile.lockto version control - Every time you run fastlane, use
bundle exec fastlane [lane] - On your CI, add
bundle installas your first build step - To update fastlane, just run
bundle update fastlane
Homebrew (macOS)
This way, you don’t have to install Ruby separately, and instead homebrew installs the adequate Ruby version for fastlane. See this page for details.
brew install fastlane
System Ruby + RubyGems (macOS/Linux/Windows)
This is not recommended for your local environment, but you can still install fastlane to system Ruby’s environment. Using sudo often occurs unwanted results later due to file permission and makes managing your environment harder.
sudo gem install fastlane
Setting up fastlane
Navigate to your iOS or Android app and run
fastlane init
fastlane will automatically detect your project, and ask for any missing information.
For more details about how to get up and running, check out the getting started guides:
三、iOS
Getting started with fastlane for iOS
Setup Xcode for fastlane
Xcode command line tools (macOS)
xcode-select --install
Installing fastlane
fastlane can be installed in multiple ways. The preferred method is with Bundler. fastlane can also be installed directly through Homebrew (if on macOS). It is possible to use macOS’s system Ruby, but it’s not recommended, as it can be hard to manage dependencies and cause conflicts.
Managed Ruby environment + Bundler (macOS/Linux/Windows)
Ruby
If you use macOS, system Ruby is not recommended. There are a variety of ways to install Ruby without having to modify your system environment. For macOS and Linux, rbenv is one of the most popular ways to manage your Ruby environment.
fastlane supports Ruby versions 2.5 or newer. Verify which Ruby version you’re using:
$ ruby --version
ruby 2.7.2p137 (2020-10-01 revision 5445e04352) [x86_64-darwin19]
Bundler
It is recommended that you use Bundler and Gemfile to define your dependency on fastlane. This will clearly define the fastlane version to be used and its dependencies, and will also speed up fastlane execution.
- Install Bundler by running
gem install bundler - Create a
./Gemfilein the root directory of your project with the content
source "https://rubygems.org"

gem "fastlane"
- Run
bundle updateand add both the./Gemfileand the./Gemfile.lockto version control - Every time you run fastlane, use
bundle exec fastlane [lane] - On your CI, add
bundle installas your first build step - To update fastlane, just run
bundle update fastlane
Homebrew (macOS)
This way, you don’t have to install Ruby separately, and instead homebrew installs the adequate Ruby version for fastlane. See this page for details.
brew install fastlane
System Ruby + RubyGems (macOS/Linux/Windows)
This is not recommended for your local environment, but you can still install fastlane to system Ruby’s environment. Using sudo often occurs unwanted results later due to file permission and makes managing your environment harder.
sudo gem install fastlane
Setting up fastlane
Navigate your terminal to your project’s directory and run
fastlane init
Note that if you want to create your first app on your App Store Connect account, you need to set the developer name (company_name) with PRODUCE_COMPANY_NAME environment variable:
PRODUCE_COMPANY_NAME="YOUR COMPANY NAME" fastlane init
To get more information check company_name description in the Create app documentation.
To have your Fastfile configuration written in Swift (Beta)
fastlane init swift
Swift setup is still in beta. See Fastlane.swift docs for more information.
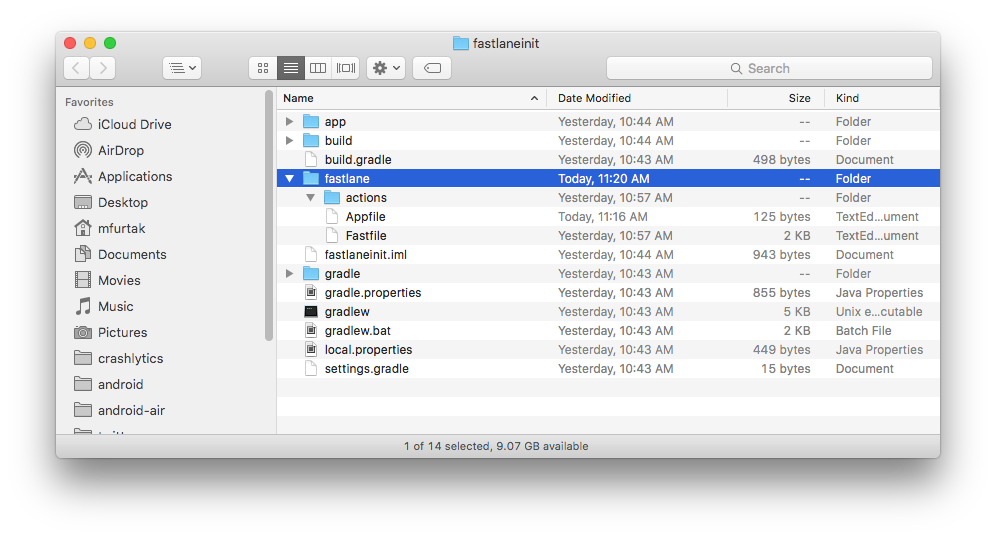
Depending on what kind of setup you choose, different files will be set up for you. If you chose to download the existing app metadata, you’ll end up with new folders that look like this:

The most interesting file is fastlane/Fastfile, which contains all the information that is needed to distribute your app.
What’s next?
fastlane created all the required files for you. Now you can go ahead and customise fastlane to generate screenshots, or automatically distribute new builds, and much, much more. Here are some examples:
- Generate localized iOS screenshots for the App Store
- Automatic iOS Beta deployment
- Automatic iOS App Store deployment
- Discover all fastlane actions
Do note that if the automation you’re building requires connectivity with Apple’s servers, such as for code signing when building your app, or uploading your app to the App Store Connect, and so on, you will need to authenticate. Check out Authenticating with Apple services to learn the best ways to authenticate, catered for your specific use case.
Set up environment variables
fastlane requires some environment variables set up to run correctly. In particular, having your locale not set to a UTF-8 locale will cause issues with building and uploading your build. In your shell profile add the following lines:
export LC_ALL=en_US.UTF-8
export LANG=en_US.UTF-8
You can find your shell profile at ~/.bashrc, ~/.bash_profile, ~/.profile or ~/.zshrc depending on your system.
Use a Gemfile
It is recommended that you use a Gemfile to define your dependency on fastlane. This will clearly define the used fastlane version, and its dependencies, and will also speed up using fastlane.
- Create a
./Gemfilein the root directory of your project with the content
source "https://rubygems.org"

gem "fastlane"
- Run
[sudo] bundle updateand add both the./Gemfileand the./Gemfile.lockto version control - Every time you run fastlane, use
bundle exec fastlane [lane] - On your CI, add
[sudo] bundle installas your first build step - To update fastlane, just run
[sudo] bundle update fastlane
四、Android
Getting started with fastlane for Android
Installing fastlane
fastlane can be installed in multiple ways. The preferred method is with Bundler. fastlane can also be installed directly through Homebrew (if on macOS). It is possible to use macOS’s system Ruby, but it’s not recommended, as it can be hard to manage dependencies and cause conflicts.
Managed Ruby environment + Bundler (macOS/Linux/Windows)
Ruby
If you use macOS, system Ruby is not recommended. There are a variety of ways to install Ruby without having to modify your system environment. For macOS and Linux, rbenv is one of the most popular ways to manage your Ruby environment.
fastlane supports Ruby versions 2.5 or newer. Verify which Ruby version you’re using:
$ ruby --version
ruby 2.7.2p137 (2020-10-01 revision 5445e04352) [x86_64-darwin19]
Bundler
It is recommended that you use Bundler and Gemfile to define your dependency on fastlane. This will clearly define the fastlane version to be used and its dependencies, and will also speed up fastlane execution.
- Install Bundler by running
gem install bundler - Create a
./Gemfilein the root directory of your project with the content
source "https://rubygems.org"

gem "fastlane"
- Run
bundle updateand add both the./Gemfileand the./Gemfile.lockto version control - Every time you run fastlane, use
bundle exec fastlane [lane] - On your CI, add
bundle installas your first build step - To update fastlane, just run
bundle update fastlane
Homebrew (macOS)
This way, you don’t have to install Ruby separately, and instead homebrew installs the adequate Ruby version for fastlane. See this page for details.
brew install fastlane
System Ruby + RubyGems (macOS/Linux/Windows)
This is not recommended for your local environment, but you can still install fastlane to system Ruby’s environment. Using sudo often occurs unwanted results later due to file permission and makes managing your environment harder.
sudo gem install fastlane
Setting up fastlane
Navigate your terminal to your project’s directory and run
fastlane init
You’ll be asked to confirm that you’re ready to begin, and then for a few pieces of information. To get started quickly:
- Provide the package name for your application when asked (e.g. io.fabric.yourapp)
- Press enter when asked for the path to your json secret file
- Answer ‘n’ when asked if you plan on uploading info to Google Play via fastlane (we can set this up later)
That’s it! fastlane will automatically generate a configuration for you based on the information provided.
You can see the newly created ./fastlane directory, with the following files:
Appfilewhich defines configuration information that is global to your appFastfilewhich defines the “lanes” that drive the behavior of fastlane
The most interesting file is fastlane/Fastfile, which contains all the information that is needed to distribute your app.
Setting up supply
supply is a fastlane tool that uploads app metadata, screenshots and binaries to Google Play. You can also select tracks for builds and promote builds to production!
For supply to be able to initialize, you need to have successfully uploaded an APK to your app in the Google Play Console at least once.
Setting it up requires downloading a credentials file from your Google Developers Service Account.
Collect your Google credentials
Tip: If you see Google Play Console or Google Developer Console in your local language, add &hl=en at the end of the URL (before any #...) to switch to English. All the links below already have this to make it easier to find the correct buttons.
Note: if you face issues when following these instructions, you might want to refer to the official documentation by Google.
- Open the Google Play Console
- Click Account Details, and note the Google Cloud Project ID listed there
- Enable the Google Play Developer API by selecting an existing Google Cloud Project that fits your needs and pushing ENABLE
- If you don’t have an existing project or prefer to have a dedicated one for fastlane, create a new one here and follow the instructions
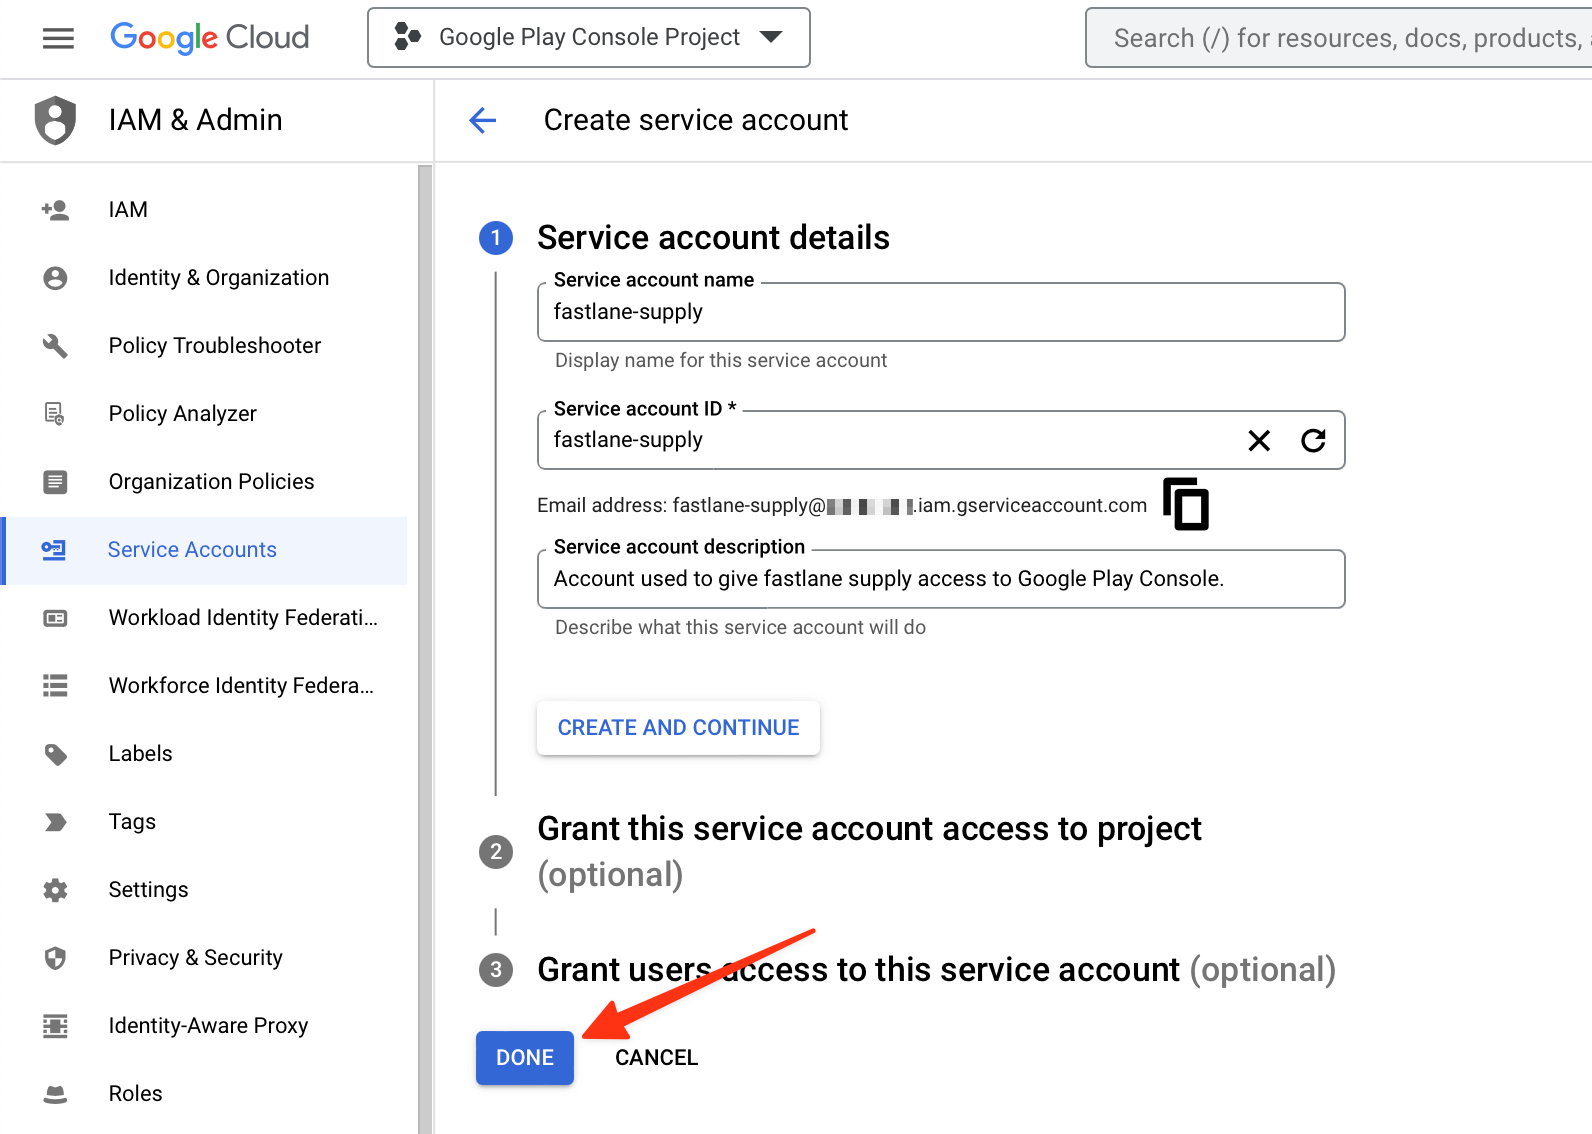
- Open Service Accounts on Google Cloud and select the project you’d like to use
- Click the CREATE SERVICE ACCOUNT button at the top of the Google Cloud Platform Console page
- Verify that you are on the correct Google Cloud Platform Project by looking for the Google Cloud Project ID from earlier within the light gray text in the second input, preceding
.iam.gserviceaccount.com, or by checking the project name in the navigation bar. If not, open the picker in the top navigation bar, and find the right one. - Provide a
Service account name(e.g. fastlane-supply) - Copy the generated email address that is noted below the
Service account-IDfield for later use - Click DONE (don’t click CREATE AND CONTINUE as the optional steps such as granting access are not needed):
- Click on the Actions vertical three-dot icon of the service account you just created
- Select Manage keys on the menu
- Click ADD KEY → Create New Key
- Make sure JSON is selected as the
Key type, and click CREATE - Save the file on your computer when prompted and remember where it was saved at
- Open the Google Play Console and select Users and Permissions
- Click Invite new users
- Paste the email address you saved for later use into the email address field
- Click on Account Permissions
- Choose the permissions you’d like this account to have. We recommend Admin (all permissions), but you may want to manually select all checkboxes and leave out some of the Releases permissions such as Release to production, exclude devices, and use Play App Signing
- Click on Invite User
You can use fastlane run validate_play_store_json_key json_key:/path/to/your/downloaded/file.json to test the connection to Google Play Store with the downloaded private key. Once that works, add the path to the JSON file to your Appfile:
json_key_file("path/to/your/play-store-credentials.json")
package_name("my.package.name")
The path is relative to where you normally run fastlane.
Configure supply
Edit your fastlane/Appfile and change the json_key_file line to have the path to your credentials file:
json_key_file "/path/to/your/downloaded/key.json"
Fetch your app metadata
If your app has been created on the Google Play developer console, you’re ready to start using supply to manage it! Run:
fastlane supply init
and all of your current Google Play store metadata will be downloaded to fastlane/metadata/android.
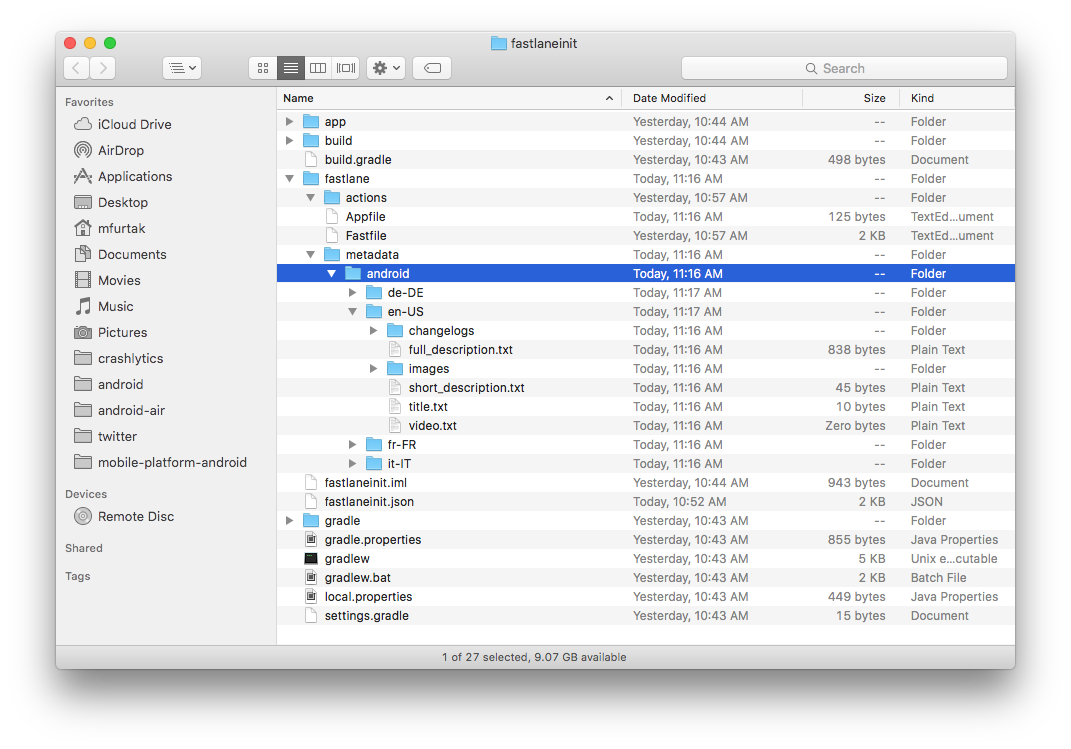
Due to limitations of the Google Play API, supply can’t download existing screenshots or videos.
What’s next?
fastlane is ready to generate screenshots and automatically distribute new builds! To learn more, check out:
Set up environment variables
fastlane requires some environment variables set up to run correctly. In particular, having your locale not set to a UTF-8 locale will cause issues with building and uploading your build. In your shell profile add the following lines:
export LC_ALL=en_US.UTF-8
export LANG=en_US.UTF-8
You can find your shell profile at ~/.bashrc, ~/.bash_profile, ~/.profile or ~/.zshrc depending on your system.
Use a Gemfile
It is recommended that you use a Gemfile to define your dependency on fastlane. This will clearly define the used fastlane version, and its dependencies, and will also speed up using fastlane.
- Create a
./Gemfilein the root directory of your project with the content
source "https://rubygems.org"

gem "fastlane"
- Run
[sudo] bundle updateand add both the./Gemfileand the./Gemfile.lockto version control - Every time you run fastlane, use
bundle exec fastlane [lane] - On your CI, add
[sudo] bundle installas your first build step - To update fastlane, just run
[sudo] bundle update fastlane
五、cross-platform
1. React Native
Getting started with fastlane for React Native
Most of the fastlane docs on this page apply to React Native projects as well.
As there is no official getting started guide yet, here are some publications by the fastlane community:
- Distributing beta builds with Fastlane on Android and iOS
- Shipping React Native apps with fastlane
- React Native, fastlane and Visual Studio App Center
- Conference talk “Automate your React Native world with fastlane”
- Team Focused Fastlane Tutorials
- Automatic Screenshots with Fastlane & Detox for React Native
- Automating React Native deployments for iOS with Fastlane
2. Flutter
Getting started with fastlane for Flutter
Most of the fastlane docs on this page apply to Flutter projects as well.
To get started, the Flutter team wrote an excellent official guide on Continuous Delivery using fastlane with Flutter.
3. NativeScript
Getting started with fastlane for NativeScript
Most of the fastlane docs on this page apply to NativeScript projects as well.
To get started, please follow this tutorial from the official NativeScript Blog: Automatic NativeScript App Deployments with fastlane.

开源鸿蒙跨平台开发社区汇聚开发者与厂商,共建“一次开发,多端部署”的开源生态,致力于降低跨端开发门槛,推动万物智联创新。
更多推荐
 19
19 0
0- 0


 已为社区贡献1条内容

所有评论(0)