

What is the difference between a react-native’s boilerplate “Welcome” app and this “Industry standard” app?
react-native的样板“ Welcome”应用程序与此“行业标准”应用程序之间有什么区别?
I am sure, here you’ll find answer to this question. Then I’ll take you along the journey how to create that industry standard app which will be customer acceptable and ready for deployment.
我敢肯定,您会在这里找到该问题的答案。 然后,我将带您了解如何创建行业标准的应用程序,该应用程序将为客户所接受并可以进行部署。
WHY?
为什么?
Main reason is, the getting started app you get after following the steps on “https://reactnative.dev/docs/environment-setup” will not be the one you want to publish on production for yourself or your corporate clients. You will require a name for your application that may contain space “My App” or a corporate bundle identifier “com.org.myapp” and many other things that you may search for scattered resources over the internet when the time comes.Also, you don’t want android robo for your production app. You want your app to show a beautiful splash screen when started.
主要原因是,按照“ https://reactnative.dev/docs/environment-setup ”中的步骤操作后获得的入门应用程序将不是您要为自己或企业客户发布的产品。 您需要为应用程序提供一个名称,该名称可能包含空格“我的应用程序”或公司捆绑包标识符“ com.org.myapp”,以及许多其他可以在时间到时在Internet上搜索零散资源的东西。不想将android robo用于您的生产应用。 您希望您的应用在启动时显示漂亮的启动屏幕。
What’s here? All the steps collated at one place for creating a professional react-native app.Without any further adue, let’s begin.
这是什么 所有步骤都集中在一个地方,以创建一个专业的本机应用程序。
This post covers the process of creating a new professional android application using react-native framework. This should be a one-time activity for any application. All the images and details in this document are captured while creating the “My App” app.As of this post, I will cover ANDROID platform in detail, and references for iOS whereever required.
这篇文章涵盖了使用react-native框架创建新的专业android应用程序的过程。 对于任何应用程序,这都是一次性活动。 在创建“我的应用程序”应用程序时,将捕获本文档中的所有图像和详细信息。截至本文之后,我将详细介绍ANDROID平台,并在需要时提供iOS参考。
Topics covered are as follows:
涵盖的主题如下:
- Infrastructure & environment setup. 基础架构和环境设置。
- Create a react-native app with appName. 使用appName创建一个本机应用程序。
- Run on android emulator and resolve port conflicts if any. 在android模拟器上运行,并解决端口冲突(如果有)。
- Update application name and bundle/package identifier. 更新应用程序名称和捆绑/软件包标识符。
- Add Native Splash Screen & Launcher Icon. 添加本机启动画面和启动器图标。
基础架构和环境设置 (Infrastructure & environment setup)
-
My system during demo: iMac desktop with “macOS Mojave” v-10.14.5
演示期间的系统:带“ macOS Mojave” v-10.14.5的iMac桌面
(You may have any OS. Make sure, you need macOS if you wish to run a iPhone build.)
(您可能有任何操作系统。如果要运行iPhone版本,请确保需要macOS。)
-
Download Android Studio and setup Emulator.
下载Android Studio并设置模拟器。
Please refer “
请参阅“
https://reactnative.dev/docs/environment-setup” for environment setup.
https://reactnative.dev/docs/environment-setup ”进行环境设置。
As I am using a mac, I will work on a terminal for commands. (For windows cmd or powershell may be used.)
当我使用Mac时,我将在终端上处理命令。 (对于Windows,可以使用cmd或powershell。)
- Editor: I am using VSCode. (It’s free and amazing. You should try it) 编辑器:我正在使用VSCode。 (它是免费的而且很棒。您应该尝试一下)
-
Download and install Node. My details:
下载并安装Node。 我的细节:
Node version: 12.17.0
节点版本:12.17.0
npm version: 6.14.5
npm版本:6.14.5
使用appname创建一个本机应用程序 (Create a react-native app with appname)
Let’s assume following:App Name : “My App”package / bundle : com.org.myapp
让我们假设以下内容:应用程序名称:“我的应用程序”程序包/捆绑包:com.org.myapp
NOTE: ‘$ ’ symbol throughout this post in all commands is only for display. you dont have to actually use it in commands.We are creating a react-native app using react-native-cli and not via expo.
注意 :本文中所有命令中的“ $”符号仅用于显示。 您不必在命令中实际使用它。我们正在使用react-native-cli而不是通过expo创建一个react-native应用。
- react-native version: 4.10.0 react-native版本:4.10.0

2. Open terminal at desired location to create new react-native app and use following commands:
2.在所需位置打开终端以创建新的本机应用程序,并使用以下命令:
$ npx react-native init myapp$ cd myapp$ code .
$ npx react-native初始myapp $ cd myapp $代码。
(“code .” this will open your project in VSCode. If it doesn’t, your terminal is not aligned with VSCode. You can manually open project in VSC)
(“ code”。这将在VSCode中打开您的项目。如果没有打开,则表明您的终端与VSCode不对齐。您可以在VSC中手动打开项目)
在android模拟器上运行并解决端口冲突 (如果有) (Run on android emulator and resolve port conflicts
(if any))
- Download and install android Studio. It will come with AVD(Android Virtual Device). 下载并安装android Studio。 它将带有AVD(Android虚拟设备)。
- You can create an android emulator in AVD with default/desired configuration. 您可以使用默认/所需配置在AVD中创建一个android仿真器。
-
Please give a name to your AVD (i used “MYAVD”). Keep it small and simple as its useful if you want to open AVD via terminal.
请给您的AVD命名(我用“ MYAVD”)。 如果您想通过终端打开AVD,请使其小而简单,因为它很有用。
(Its really helpful to start an AVD — emulator via cmd or terminal, as it saves us from loading a heavy android studio just to start the emulator.)
(通过cmd或终端启动AVD确实很有帮助,因为它使我们免于加载繁重的android studio来启动模拟器。)
-
Run emulator.
运行模拟器。
(This is a one time setup of emulator. Next time onwards, you can simply open you terminal and type “
(这是一次模拟器的设置。下次,您只需打开终端并输入“
$ emulator -avd MYAVD” to switch on your emulator)
$ emulator -avd MYAVD ”以打开模拟器)
- In VSCode, “Ctrl+`” will open terminal at project level. 在VSCode中,“ Ctrl +`”将在项目级别打开终端。
- In terminal, execute below commands: 在终端中,执行以下命令:
$ npm start
$ npm开始
- This will start the react-native app. Now we have to run it on an emulator. 这将启动react-native应用程序。 现在我们必须在模拟器上运行它。
- Open a new terminal window and run below command: 打开一个新的终端窗口并运行以下命令:
$ npm run android
$ npm运行android
- This will open your app on emulator. 这将在模拟器上打开您的应用程序。
如果您遇到“ 8081”的任何端口冲突问题 (If you face any port conflict issue with ‘8081’)
If you face any port conflict issue while executing “npm start”, like 8081 is already in use, only then follow the one-time config process below. Else, you are good to proceed to the next step — “Update application name and bundle/package”.
如果在执行“ npm start”时遇到任何端口冲突问题,例如已经使用了8081, 则请按照以下一次性配置过程进行操作。 否则,您可以继续进行下一步 -“更新应用程序名称和包/软件包”。
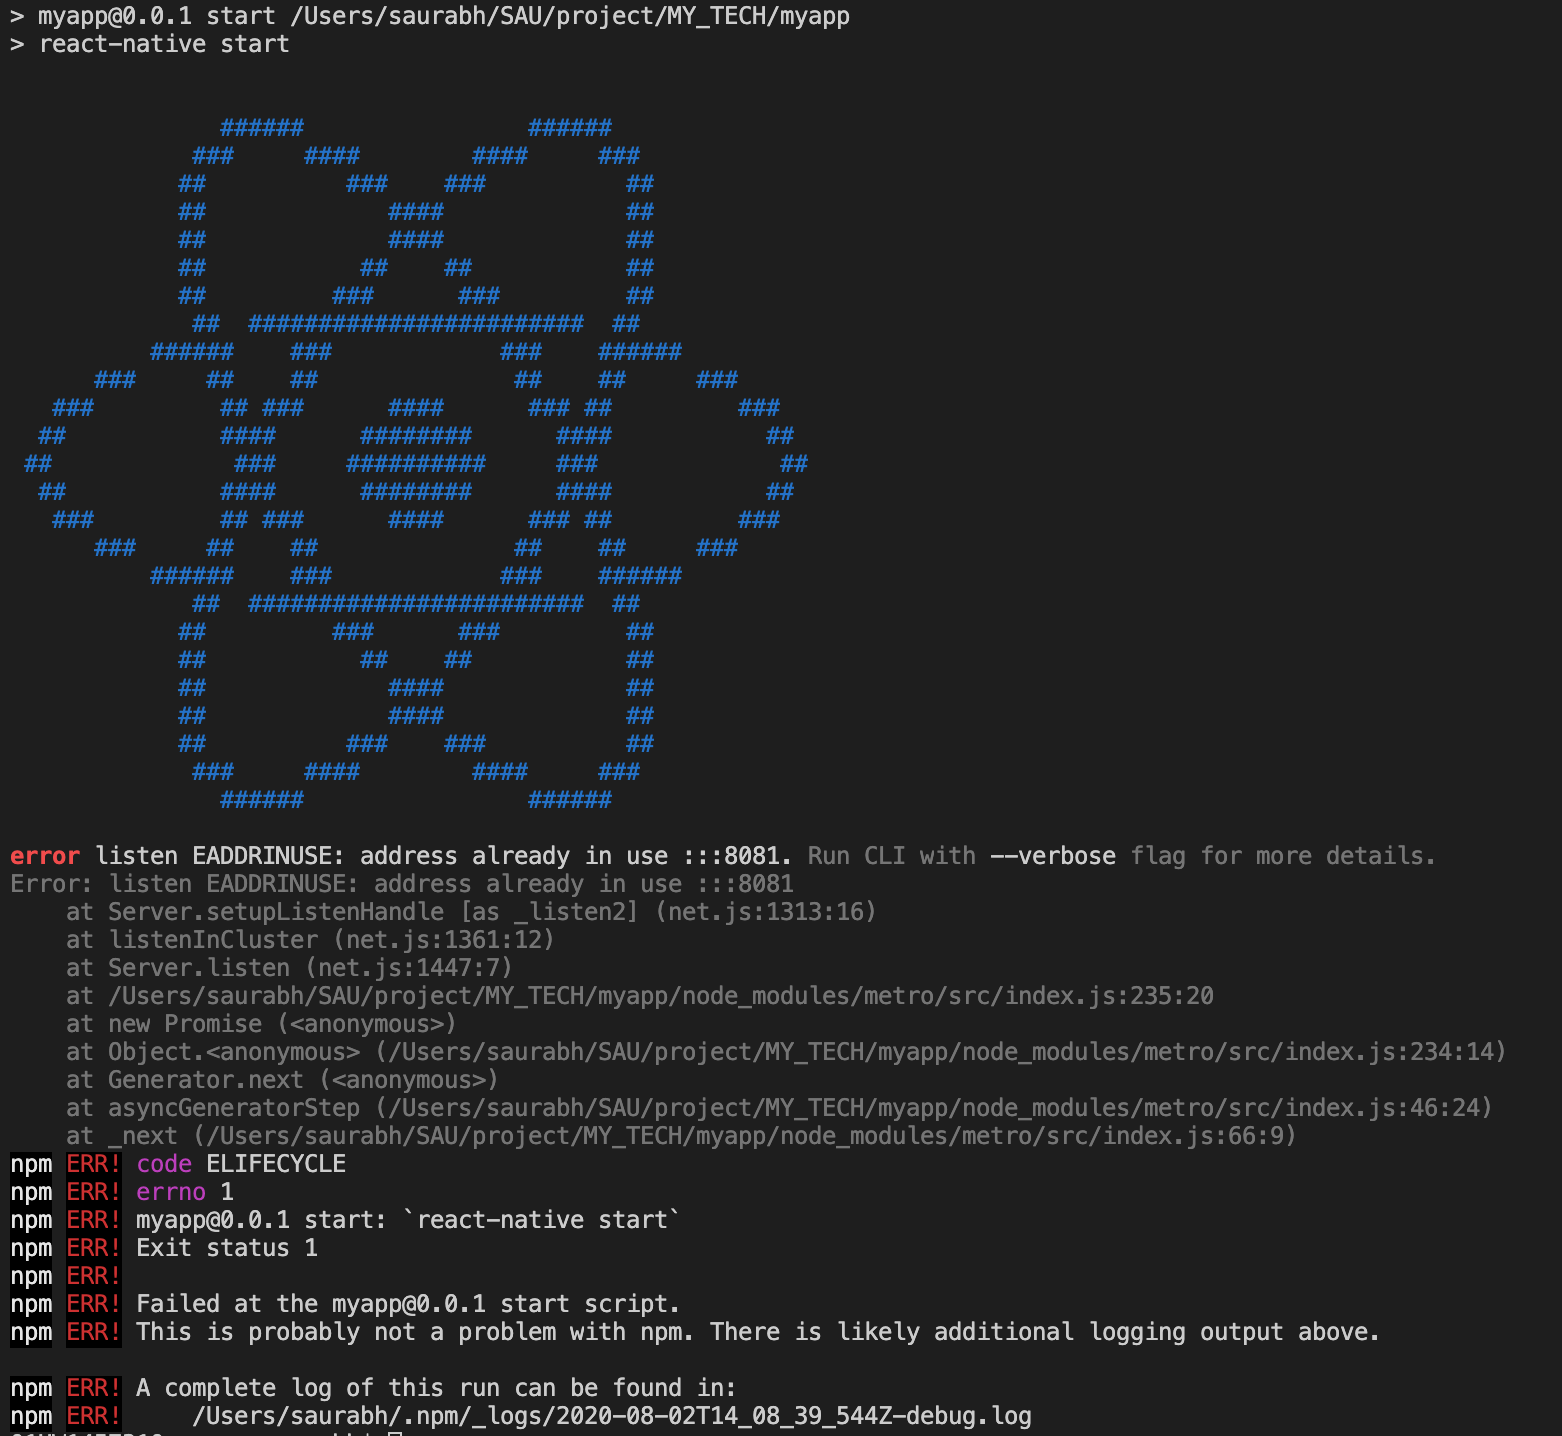
Let’s change the settings so our application listens to port “8090”:PURPOSE: Resolve the PORT conflict issue on iOS MAC. In my case, port 8081 was used by Mcafee.)
让我们更改设置,以便我们的应用程序侦听端口“ 8090”: 目的 :解决iOS MAC上的端口冲突问题。 就我而言,Mcafee使用了8081端口。)
- Launch emulator on 8090: 在8090上启动模拟器:
$ ./emulator -port 8090 -avd AVD2_1_HVGA
$ ./emulator -port 8090 -avd AVD2_1_HVGA
- Perform below changes in “package.json” (you will find this file at the root of your project): 在“ package.json”中执行以下更改(您将在项目的根目录中找到此文件):
change below 2 properties of “scripts” object as following:{“android”: “react-native run-android --port=8090”,“start”: “react-native start --port=8090”,}
更改以下“ scripts”对象的2个属性,如下所示:{“ android”:“ react-native run-android --port = 8090”,“ start”:“ react-native start --port = 8090”,}
-
Change app listening port in android emulator:
在android模拟器中更改应用程序监听端口:
(ref:
(参考:
https://medium.com/@hsuastegui/use-react-native-in-a-different-port-1109db5674d8)
https://medium.com/@hsuastegui/use-react-native-in-a-different-port-1109db5674d8 )
Open android studio and open our app’s android project in android studio.Now run the app in emulator. (First time, you have to run the app via android studio, else the app won’t work)Once the app is open in emulator, follow below steps:
打开android studio并在android studio中打开我们应用程序的android项目。现在在模拟器中运行该应用程序。 (第一次,您必须通过android studio运行该应用程序,否则该应用程序将无法运行)一旦在模拟器中打开该应用程序,请执行以下步骤:
hit “cmd+m” after the app opens in the emulator.hit “Settings” > “Debugging: Debug server host & port for device”enter “10.0.2.2:8090” and hit “OK”
在模拟器中打开应用程序后,单击“ cmd + m”。单击“设置”>“调试:调试设备的服务器主机和端口”,输入“ 10.0.2.2:8090”,然后单击“确定”。
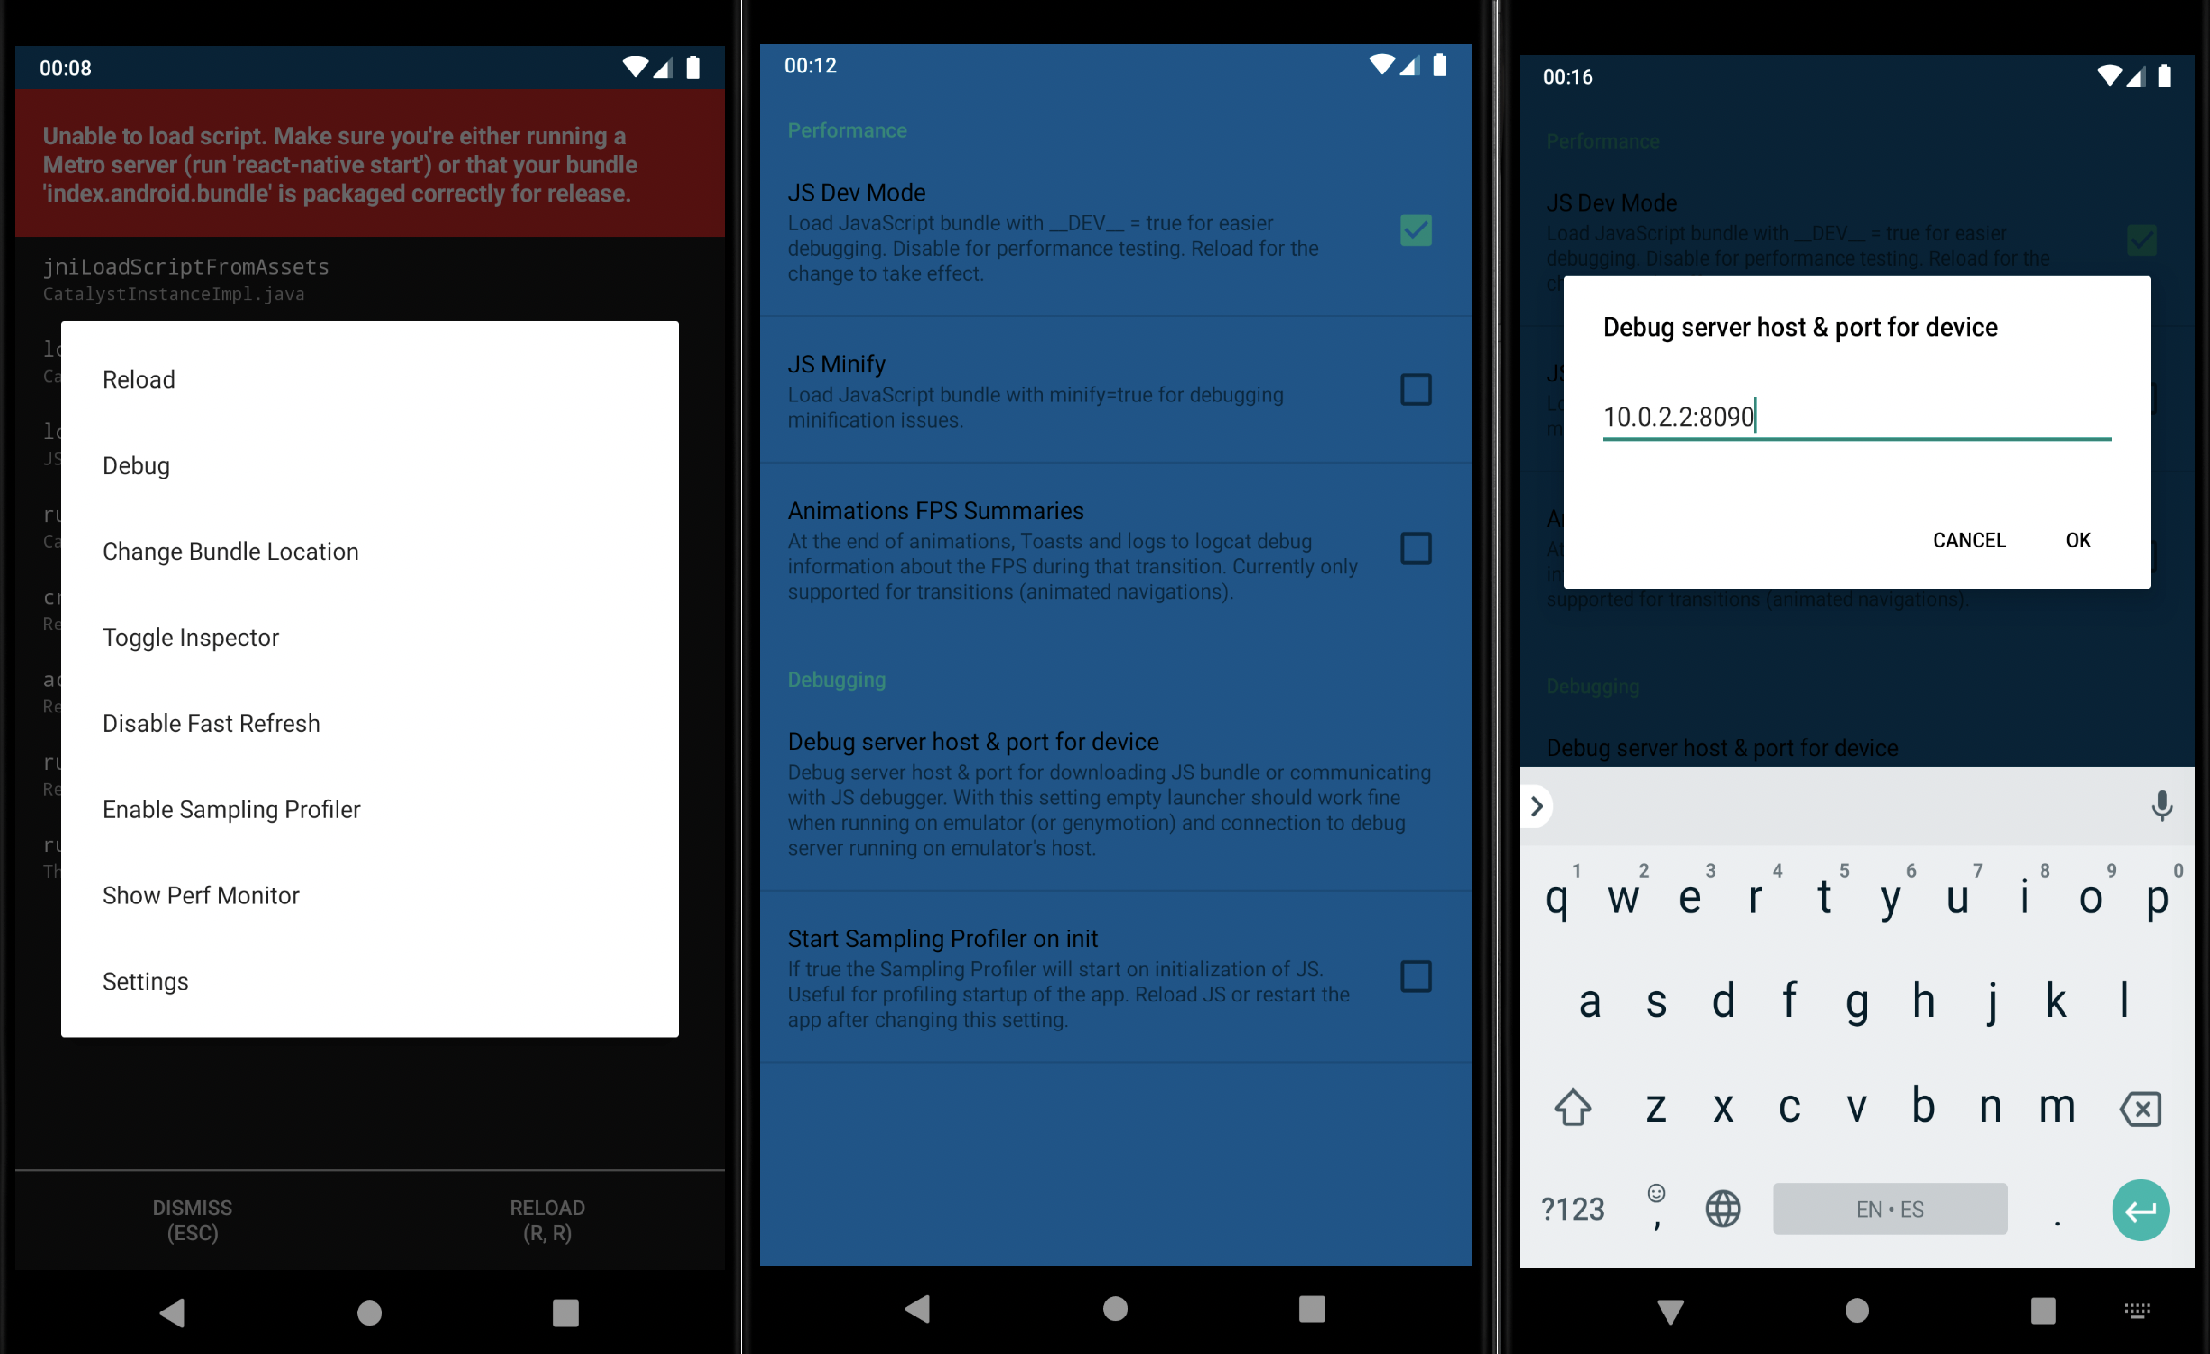
Now, continue from #6 of the previous step. (i.e. $ npm start)Kill the app in emulator.‘$ npm start’ in terminal to start react’s debug server.Start the app on emulator. Welcome to React screen will appear and project will run successfully.This should resolve all the port conflict issues. These are one-time settings. Next time onwards you don’t need to perform above steps.
现在,从上一步的#6继续。 (即$ npm start) 在模拟器中终止应用。在终端中使用'$ npm start'启动react的调试服务器。在模拟器上启动应用。 出现欢迎使用React屏幕,项目将成功运行。 这样可以解决所有端口冲突问题。 这些是一次性设置。 下次以后,您无需执行上述步骤。
更新应用程序名称和捆绑/软件包 (Update application name and bundle/package)
The default bundle identifier or package name of our react-native app will be something like “com.myapp”. We do not want to keep this identifier for our production app. Generally for both iOS and Android, industry prefers it to be like:“com.<org>.<app>” — eg. “com.abc.google” or “com.mytech.myapp”Remember, package name cannot have a space or special character. Atlease I’ve never tried that.So let’s change our app’s name and identifier.
我们的本机应用程序的默认包标识符或包名称将类似于“ com.myapp”。 我们不想为我们的生产应用程序保留此标识符。 通常,对于iOS和Android而言,行业都希望它像:“ com。<org>。<app>” —例如。 请记住,“ com.abc.google”或“ com.mytech.myapp”的程序包名称不能包含空格或特殊字符。 我从未尝试过。因此,让我们更改应用程序的名称和标识符。
- We will change the app name from “myapp” to “My App” 我们将应用名称从“ myapp”更改为“ My App”
- and change the android bundle/package name from “com.myapp” to “com.org.myapp” 并将android bundle / package名称从“ com.myapp”更改为“ com.org.myapp”
-
We will use “react-native-rename” for this. Make sure you install it globally and not in your app.
为此,我们将使用“ react-native-rename”。 确保您在全球范围内安装它,而不是在您的应用程序中。
Ref:
参考:
-
$ npm install -g react-native-rename
$ npm install -g react-native-rename
- react-native-rename --version //2.4.1 as of 10-jun-2020 react-native-rename --version //2.4.1截至2020年6月10日
-
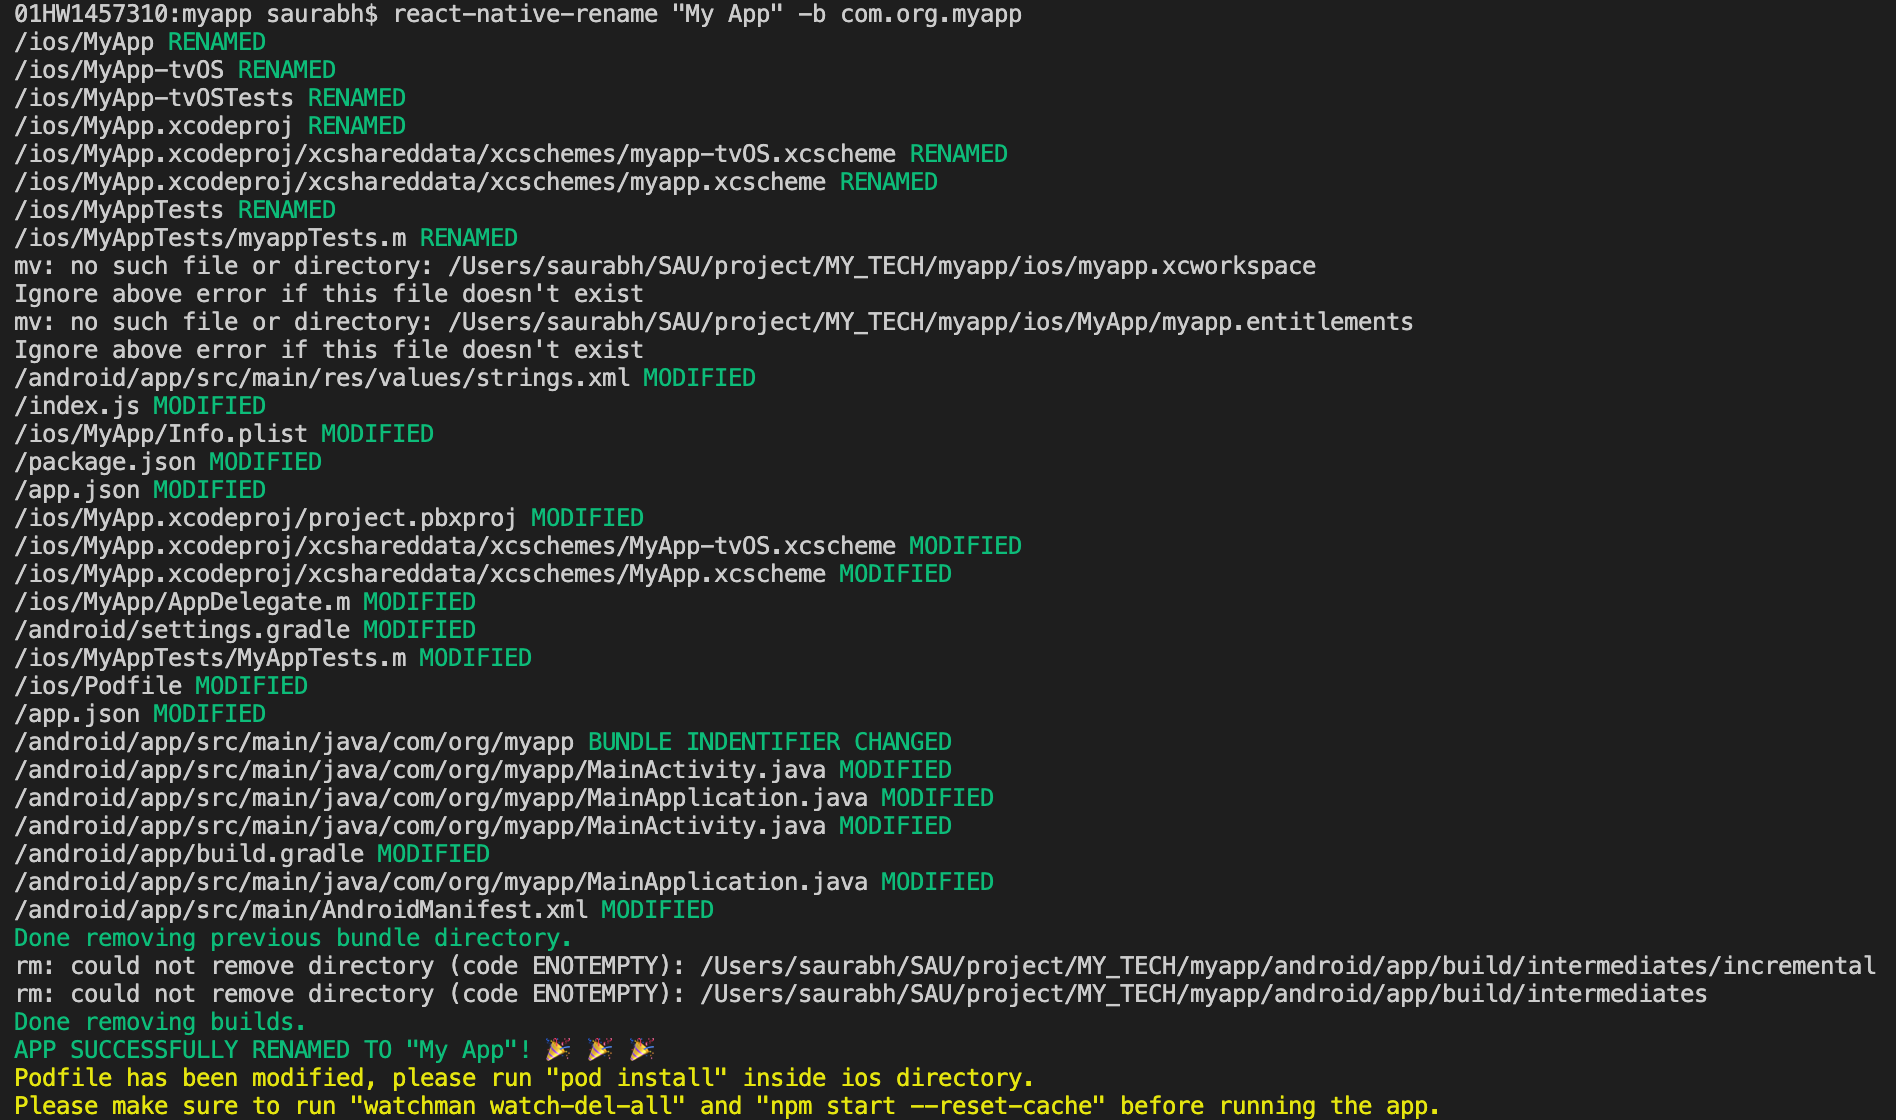
$ react-native-rename “My App” -b com.org.myapp
$ react-native-rename“我的应用程序” -b com.org.myapp
Here you can replace “My App” by your required app display name, and same for bundle identifier.
您可以在此处用所需的应用程序显示名称替换“我的应用程序”,并用捆绑标识符将其替换。
- Please note: This will update the package and app name throughout the “/android/”, “/ios/” directories and in “/app.json” file. 请注意:这将在“ / android /”,“ / ios /”目录以及“ /app.json”文件中更新程序包和应用程序名称。
- Navigate into “/android/app/src/main/java/com/org/myapp/” 导航到“ / android / app / src / main / java / com / org / myapp /”
-
Open all the java files and verify if the package name is updated. You may have to manually update it in all java activities created by you.
打开所有Java文件,并验证软件包名称是否已更新。 您可能必须在您创建的所有Java活动中手动更新它。
Make sure you do it, else custom activities won’t work. Ignore if you have not created any java file by yourself in this project.
确保您这样做,否则自定义活动将无法进行。 如果您没有在该项目中自己创建任何Java文件,请忽略。
- Re-open terminal inside VSCode where react-native app is running. 在运行react-native应用程序的VSCode内部重新打开终端。
- Kill the process using “ctrl+c” and run again using “npm start” 使用“ ctrl + c”杀死该进程,然后使用“ npm start”再次运行
- Once the app is running, use “npm run android” in another terminal. 应用运行后,在另一个终端上使用“ npm run android”。
- This will add a new app with name “My App” in the emulator and the package is also updated. 这将在仿真器中添加一个名为“我的应用程序”的新应用程序,并且软件包也将更新。
-
If you wish to verify the package name for android, then run following command in terminal:$ adb shell pm list packages -f
如果要验证android的软件包名称,请在终端中运行以下命令: $ adb shell pm list packages -f
- This will list all the packages in the emulator. Search for “apk=com.org.myapp” 这将列出模拟器中的所有软件包。 搜索“ apk = com.org.myapp”
Voila!!! we have successfully renamed our react-native application for android & iOS.
瞧! 我们已成功将我们的react-native应用程序重命名为android&iOS。
添加启动器图标(应用程序图标) (Add Launcher Icon (App icon))

Launcher-icon is also known as app-icon. There are a various articles and blogs suggesting you to manually copying the new icon in specific directory. Nothing wrong in that way, although it is an old way to do it.
启动器图标也称为应用程序图标。 有各种各样的文章和博客建议您手动将新图标复制到特定目录中。 尽管这样做是一种古老的方法,但这种方式没什么错。
Let’s target android first. From Android 8.0, concept of adaptive launcher icon is one of many standardisations that Android introduced.
让我们首先定位android。 从Android 8.0开始,自适应启动器图标的概念是Android引入的许多标准化之一。
-
Choose/create an image for your mobile app icon.
为您的移动应用程序图标选择/创建图像。
Make sure image size is below 1024kb and you get a (512*512 px) image, preferably square shaped ‘.png’ file for crisp & clear icon.
确保图像大小小于1024kb,并获得(512 * 512 px)图像,最好是正方形的“ .png”文件,以实现清晰清晰的图标。
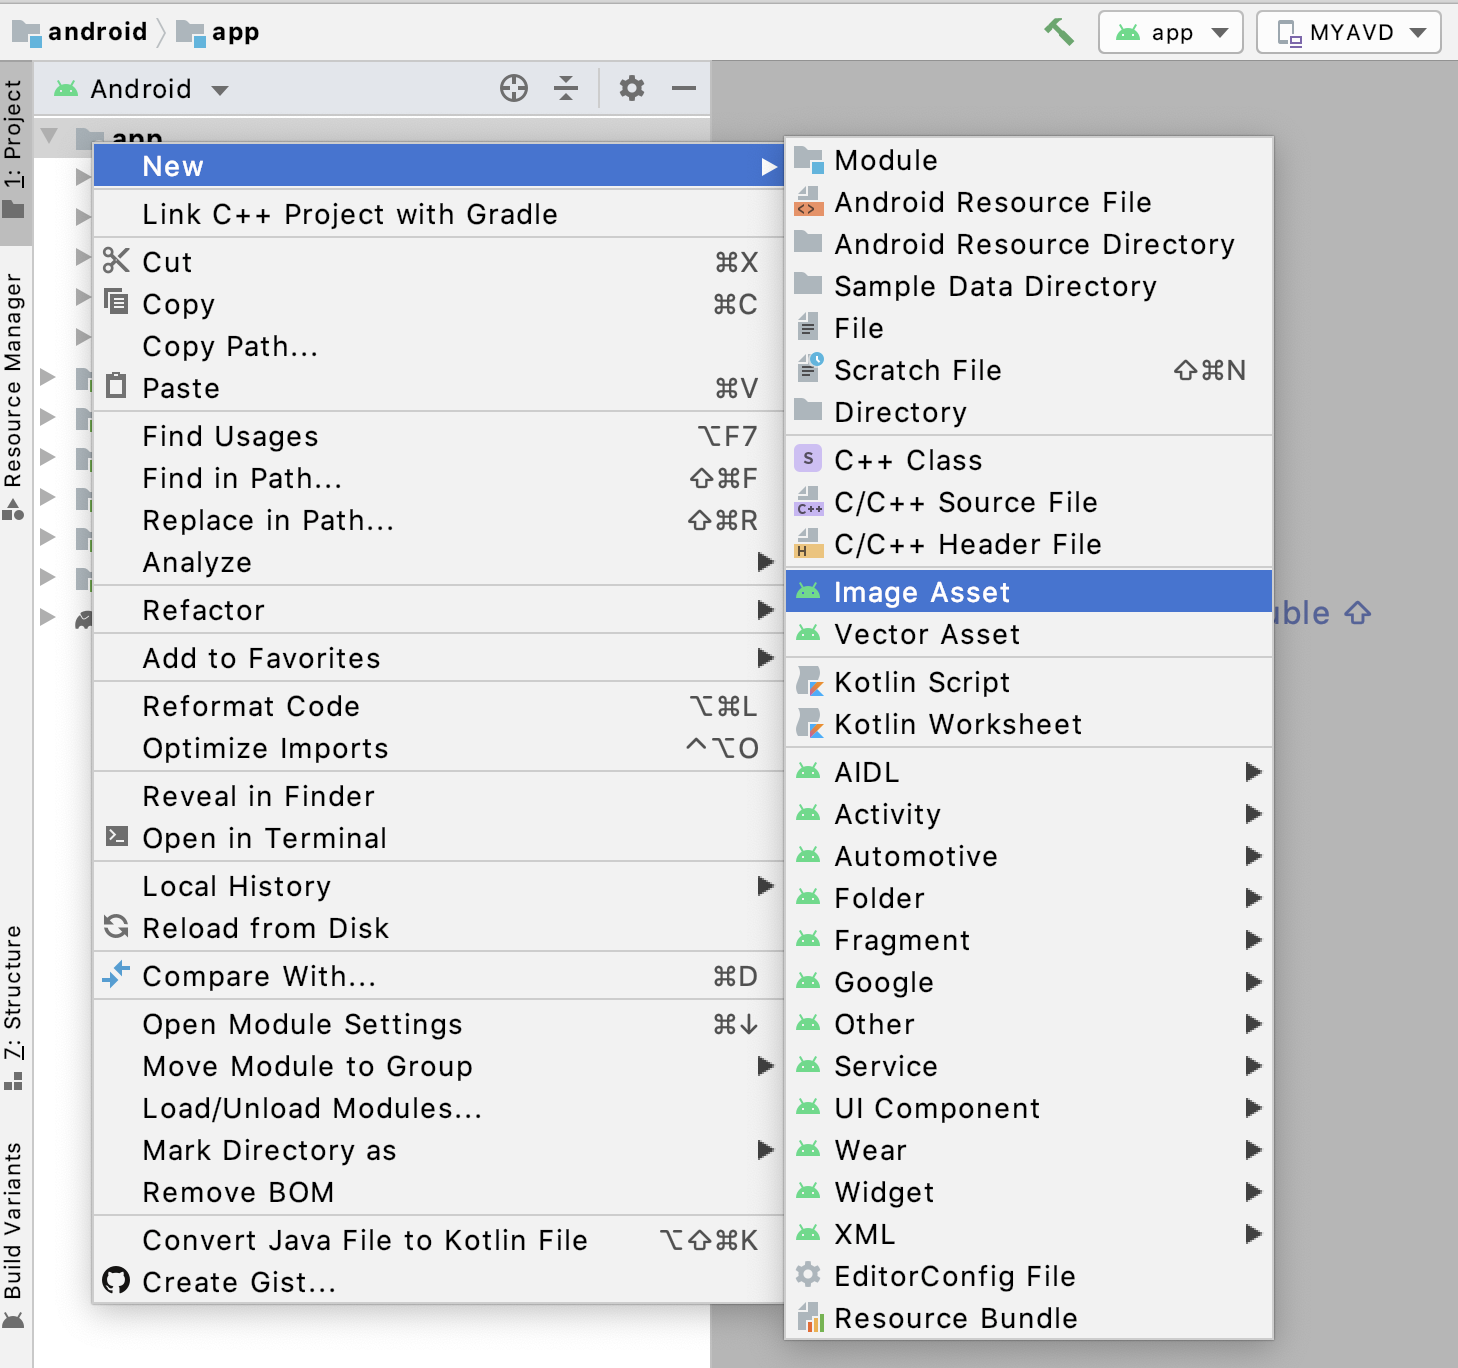
2. Open our project in android studio. Let it finish loading completely.Right click on project > New > Image Asset
2.在android studio中打开我们的项目。 让它完全完成加载。右键单击项目>新建>图像资产
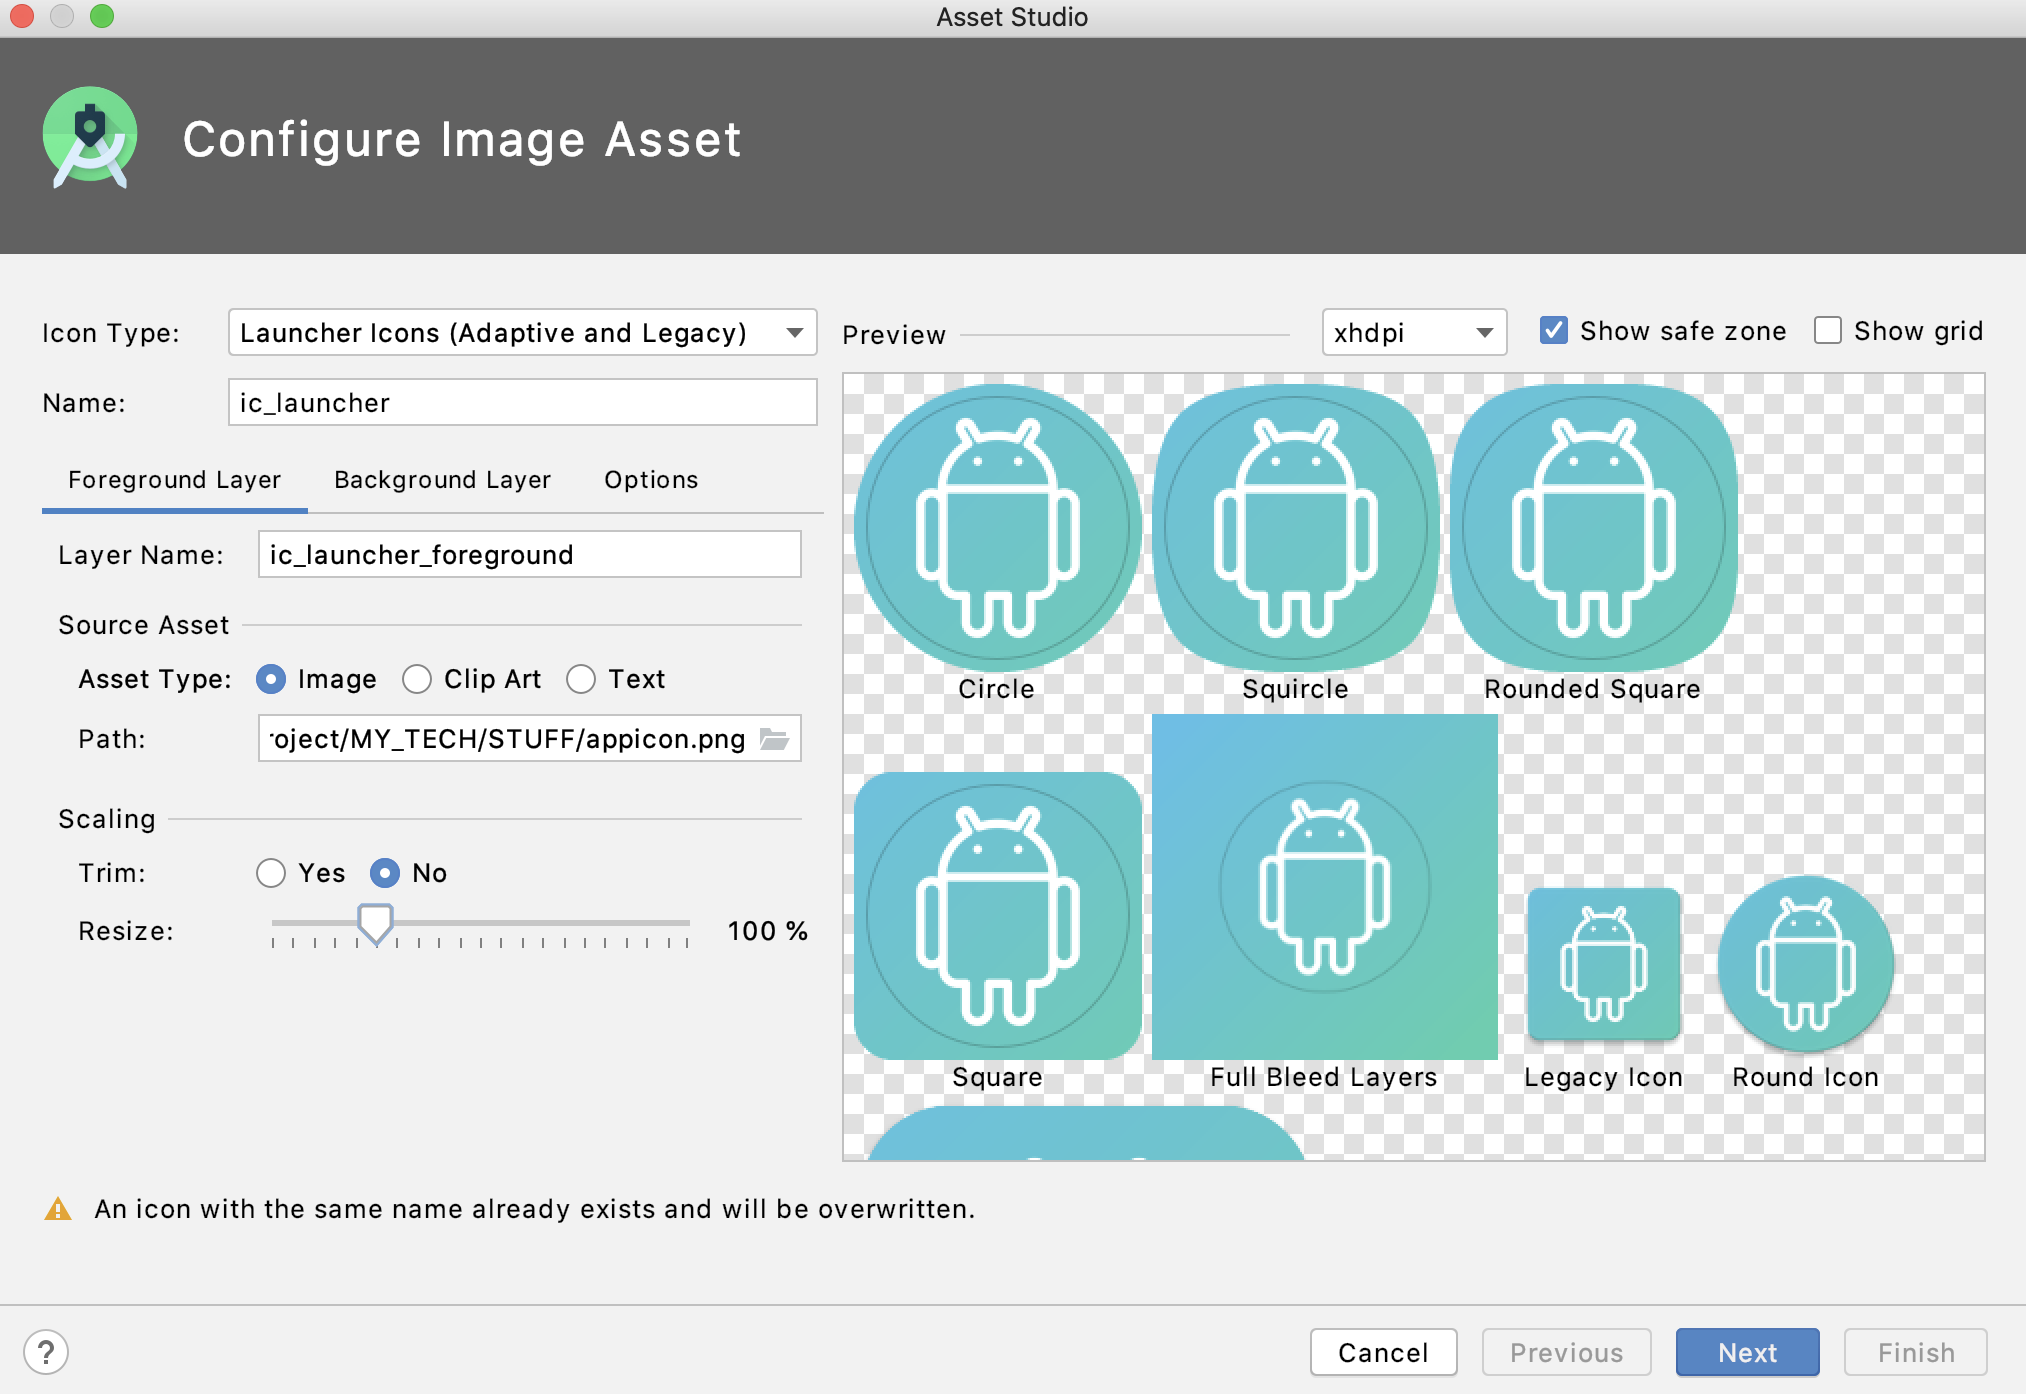
3. Using “Path:” field, browse and upload your desired app icon image.There are various options to zoom/skew, set background color, etcUse these options to bring out the best as required.
3.在“路径:”字段中,浏览并上传所需的应用程序图标图像。可以使用多种选项来缩放/倾斜,设置背景色等,以便根据需要发挥出最佳效果。
That’s it. Follow steps and click Finish. Your icons for android are set.
而已。 请按照下列步骤操作,然后单击完成。 您的Android图标已设置。
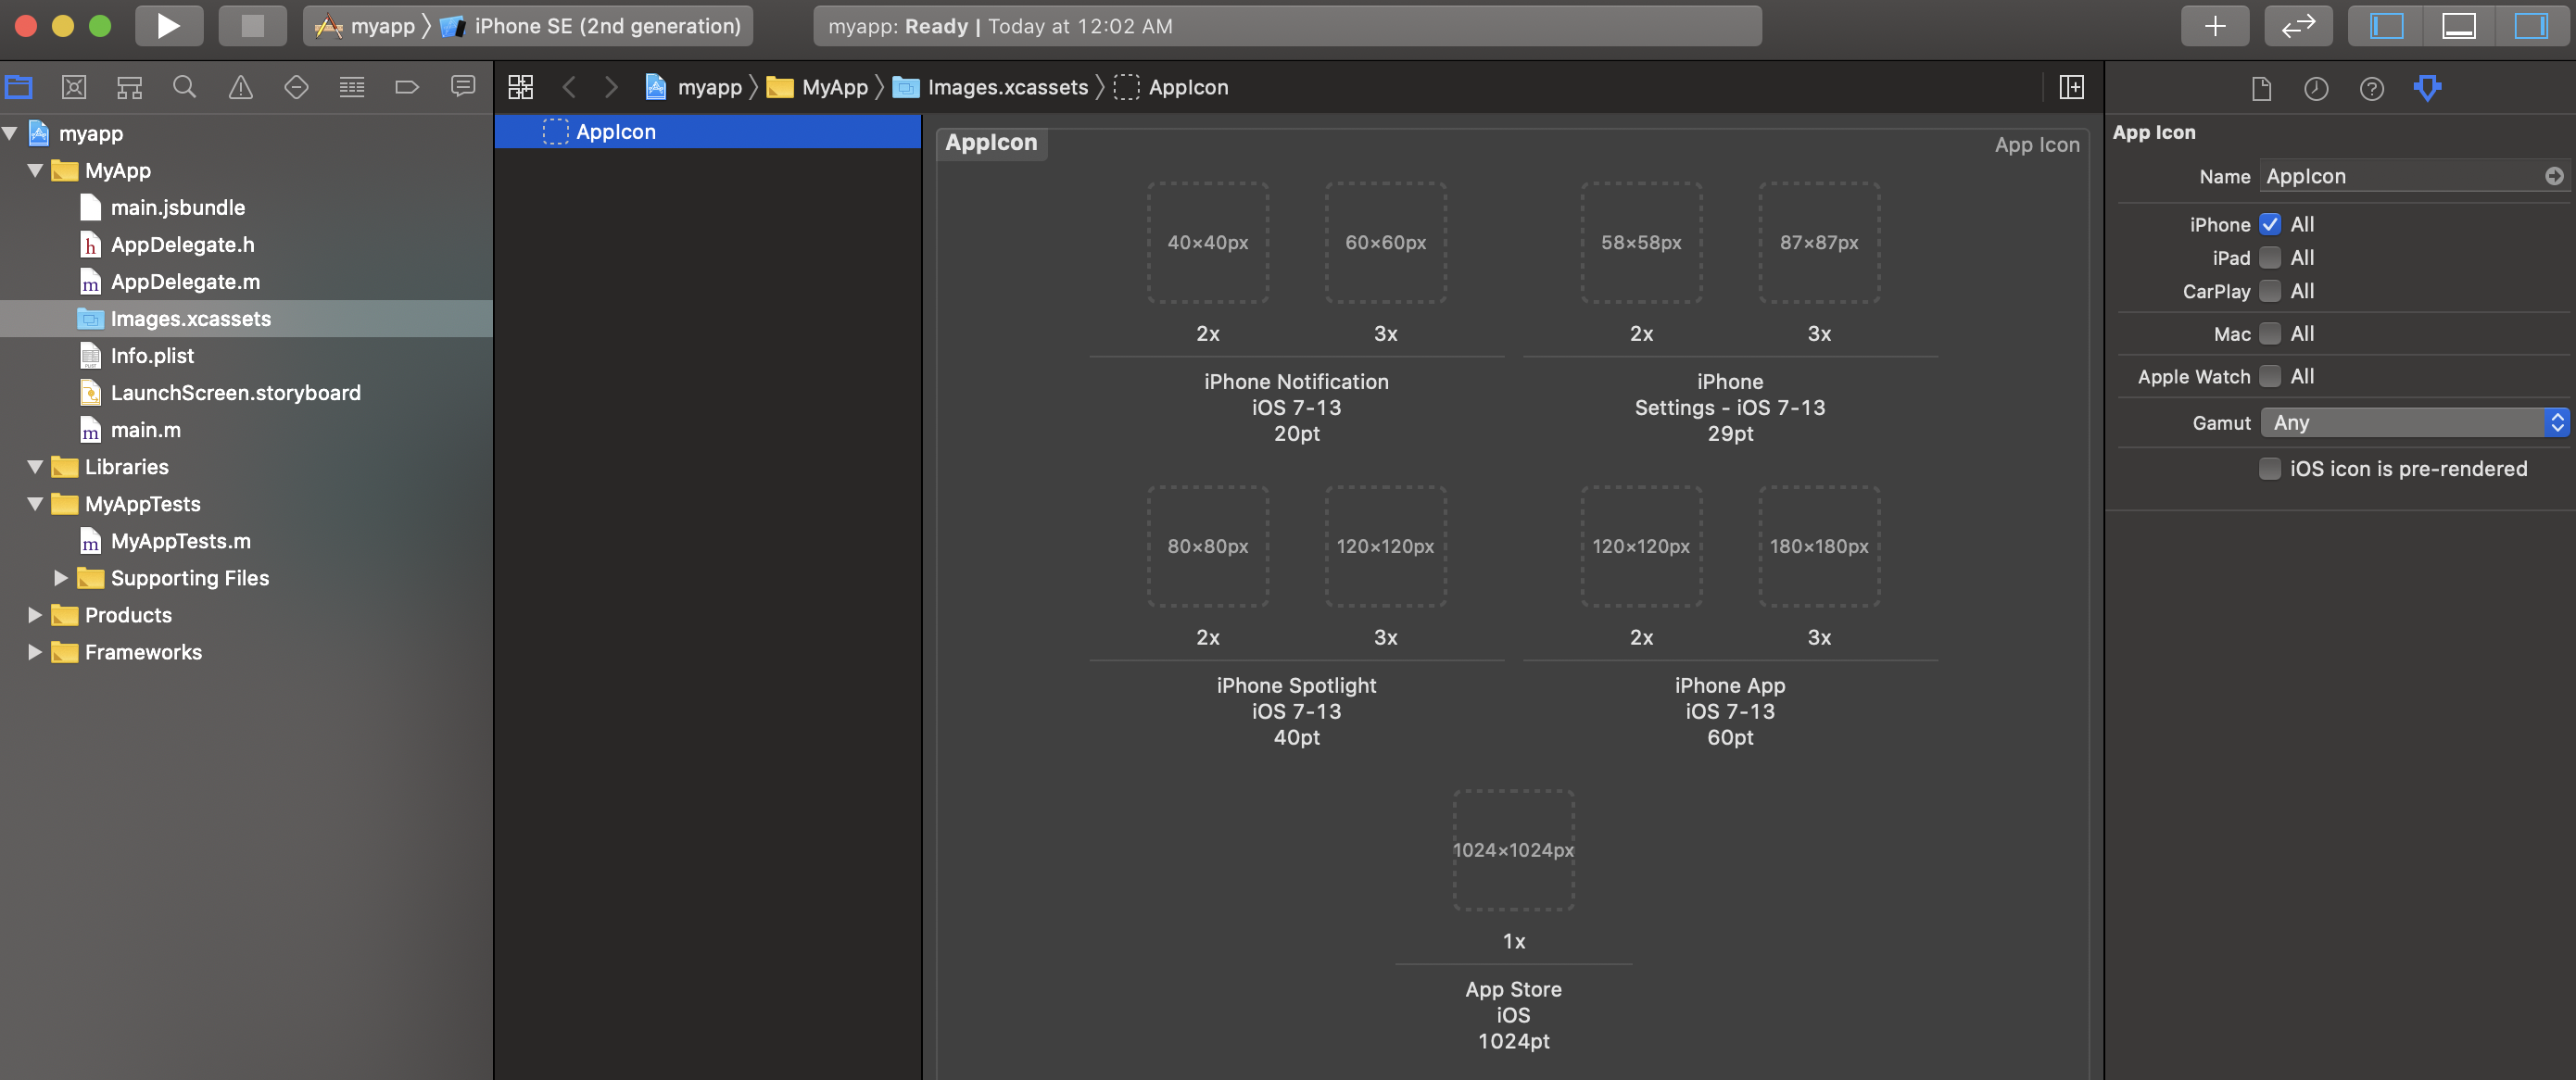
IOS has a comparactively simple process to change app icon.Open projectname.xcodeproj/projectname.xcworkspace.Click on the folder named ‘Images.xcassets’.Click on ‘AppIcon’ in first column.Drag-n-drop all the required icons as per the mentioned dimensions.(You can use online tool https://appicon.co to generate app icons of all dimensions.)
IOS有一个比较简单的过程来更改应用程序图标。打开projectname.xcodeproj / projectname.xcworkspace。单击名为``Images.xcassets''的文件夹。单击第一栏中的``AppIcon''。将所有必需的图标拖放为(您可以使用在线工具https://appicon.co生成所有尺寸的应用程序图标。)。
添加本地启动屏幕 (Add native Splash screen)
(without any glitches or flickering)
(没有任何小故障或闪烁)
For this step, I couldn’t find any better resource than the below medium post by “Appstud”. Its perfectly explained step by step and i give it full credits to seamlessly integrate splash screen in our react-native project using “react-native-splash-screen”.
对于这一步,我找不到比“ Appstud”下面的中等帖子更好的资源。 它一步一步地得到了完美的解释,我将使用“ react-native-splash-screen”将其完全集成到我们的react-native项目中。
Although, to cover in very short, let me try to add few steps for android.
虽然,总而言之,让我尝试为android添加一些步骤。
- $ npm install –save react-native-splash-screen $ npm install –保存react-native-splash-screen
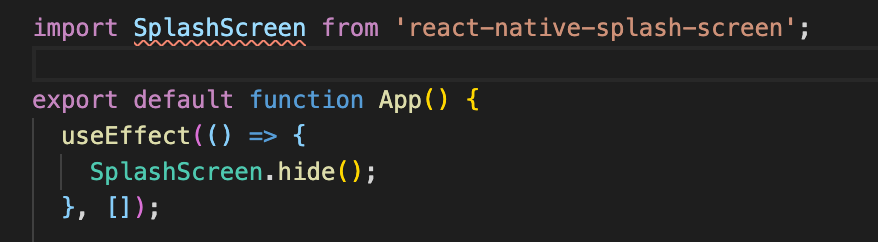
- Open “App.js” 打开“ App.js”
-
Add import statement with the other imports:
将import语句与其他导入一起添加:
import SplashScreen from ‘react-native-splash-screen’
从'react-native-splash-screen'导入SplashScreen
- Also import { useEffect } from react 还从react导入{useEffect}
- Add a useEffect hook in the component that calls SplashScreen.hide() 在调用SplashScreen.hide()的组件中添加一个useEffect钩子
6. Add the image assets to the project
6.将图像资产添加到项目
7. Android assets are located in “android/app/src/main/res”. There is a folder for each pixel density.
7. Android资产位于“ android / app / src / main / res”中。 每个像素密度都有一个文件夹。
8. Follow next steps to create the splash screen:
8.按照以下步骤创建初始屏幕:
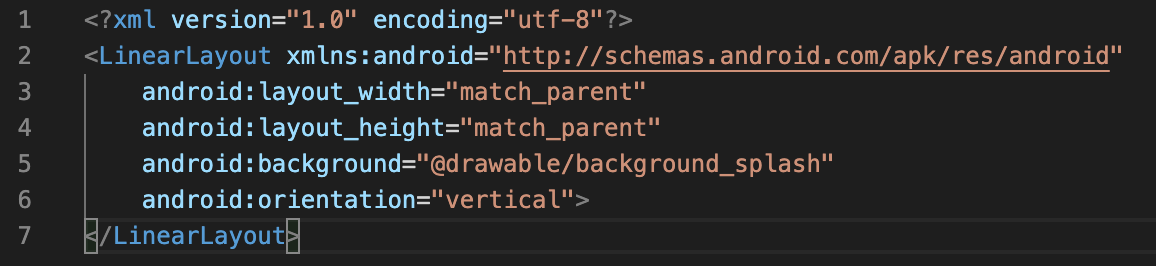
9. Create a background_splash.xml file in android/app/src/main/res/drawable (create the drawable directory if it doesn’t exist)
9.在android / app / src / main / res / drawable中创建一个background_splash.xml文件(如果不存在,则创建drawable目录)
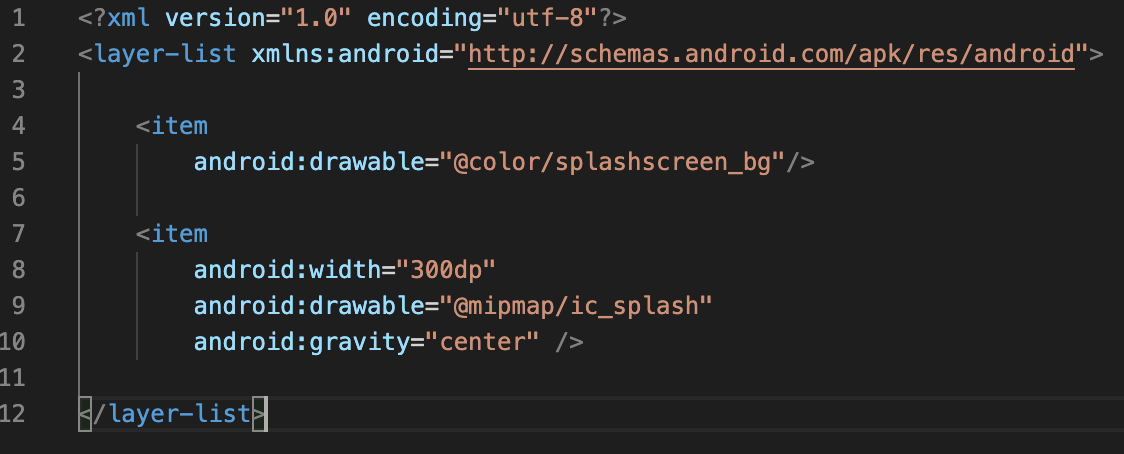
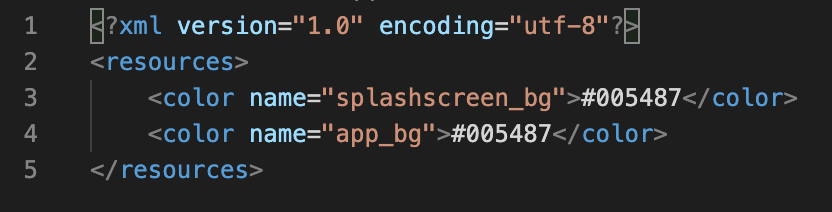
10. Create a colors.xml in android/app/src/main/res/values with the following contents:
10.在android / app / src / main / res / values中创建一个colors.xml,其内容如下:
11. Open android/app/src/main/res/values/styles.xml and replace the contents with
11.打开android / app / src / main / res / values / styles.xml并将内容替换为

12. Tell the app to boot on the splash screen
12.告诉应用程序在启动屏幕上启动
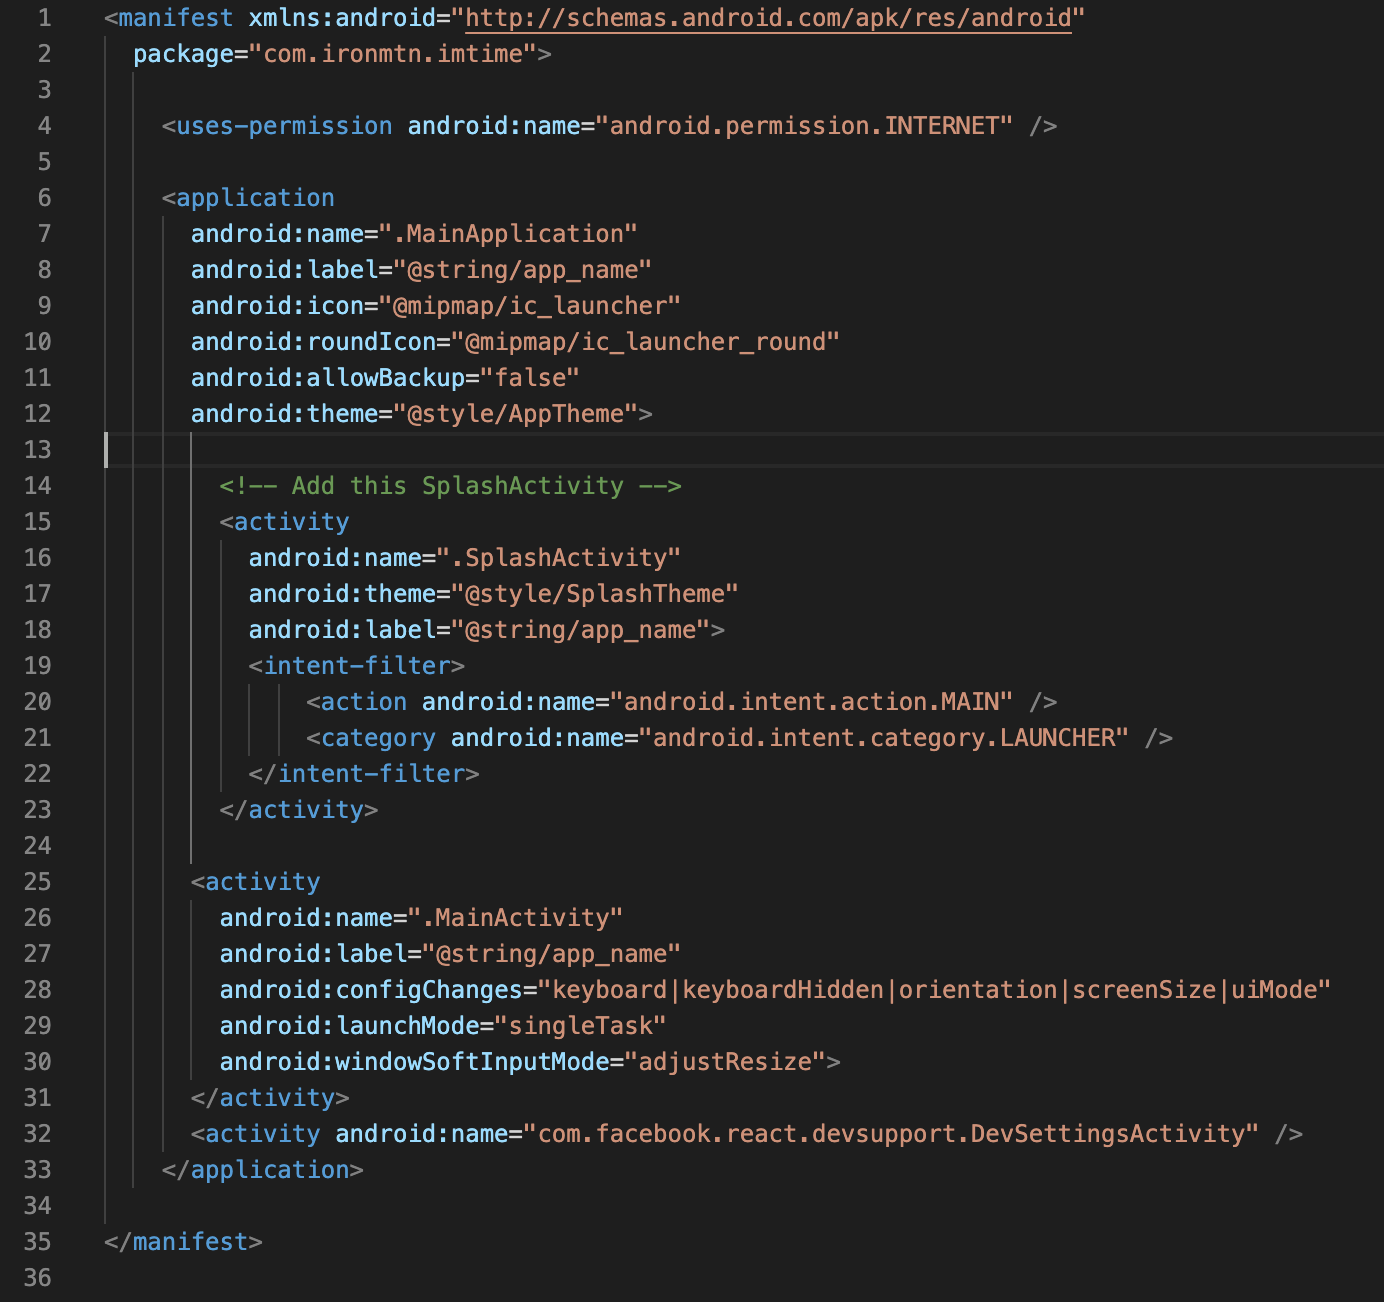
13. Open android/app/src/main/AndroidManifest.xml and modify the contents as follows:
13.打开android / app / src / main / AndroidManifest.xml并按如下所示修改内容:
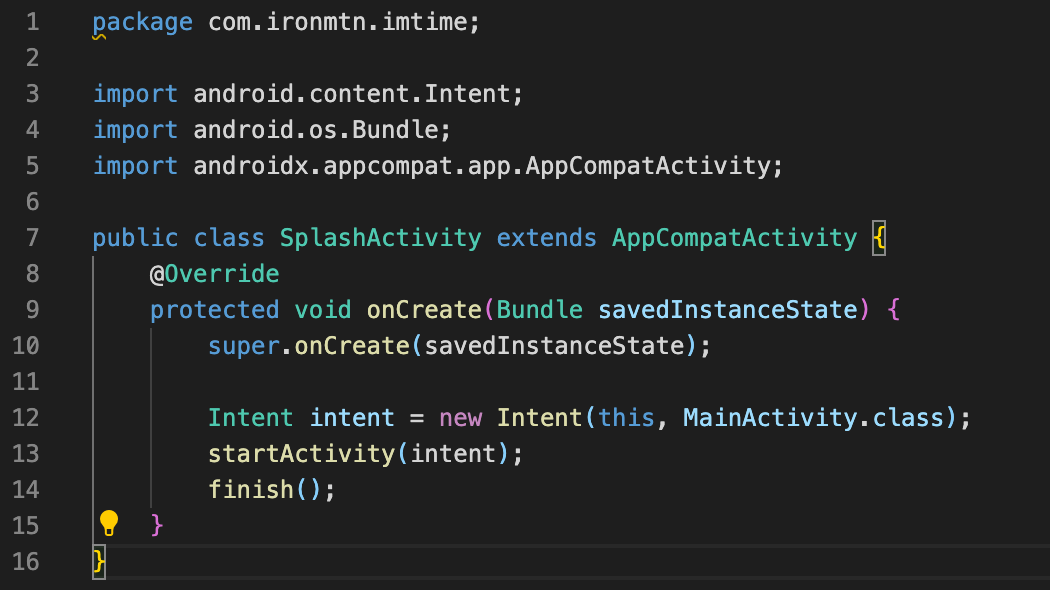
14. Create a file “android/app/src/main/java/[your_package_name]/SplashActivity.java” with the contents:
14.创建一个文件“ android / app / src / main / java / [your_package_name] /SplashActivity.java”,其内容为:
15. Install and configure react-native-splash-screen
15.安装和配置react-native-splash-screen
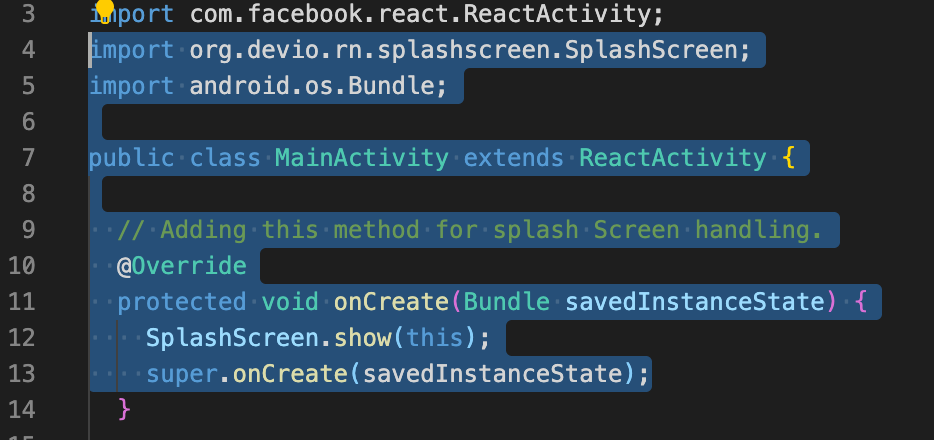
16. In android/app/src/main/java/[your_package_name]/MainActivity.java, make these modifications:
16.在android / app / src / main / java / [your_package_name] /MainActivity.java中,进行以下修改:
17. Create a file android/app/src/main/res/layout/launch_screen.xml (the name is important) with the contents:
17.创建一个文件android / app / src / main / res / layout / launch_screen.xml(名称很重要),其内容为:
Aah! That’s all folks.. it’s a bit lengthy process, although finally you should have a native, glitch-free and smooth running splash screen in your react-native android app.
啊! 这就是所有的人..这是一个漫长的过程,尽管最终您应该在本机android应用程序中拥有一个原生的,无故障且运行流畅的启动画面。
NOTE: I have covered major changes only for android. I request you to refer above mentioned medium post for changes pertaining to iOS, as this post is getting a bit too long. Apologies for the inconvenience.
注意: 我仅介绍了适用于android的重大更改。 我要求您参考上面提到的有关iOS的更改的中级帖子,因为该帖子太长了。 不便之处敬请原谅。
Now that you have an application skeleton ready, you can start adding some awesome features using react.
现在您已经准备好了应用程序框架,您可以开始使用react添加一些很棒的功能。
The react-native app structure / architecture will be explained in a separate architecture post very soon.
本机应用程序的结构/架构将很快在单独的架构文章中进行说明。
Thank you.Clapping is motivating :)
谢谢你,拍手很有动力:)


 已为社区贡献7条内容

所有评论(0)