idea 配置flutter项目_如何将 Flutter 代码部署到 Web 端 | 开发者说DTalk
本文原作者: IT工匠,原文发布于 IT工匠 (https://mp.weixin.qq.com/s/sTO43-F70b0yqTOfTbfW1Q)众所周知Google对于Flutter的期望是全平台统一UI开发,号称要做一套"一份代码、全平台部署"的UI框架,这一点在移动端已经很成熟了,国内有很多成功的案例,典型的像阿里的闲鱼客户端,但是Flutter所声称的桌面端和Web端的相关...
·
本文原作者: IT工匠,原文发布于 IT工匠 (https://mp.weixin.qq.com/s/sTO43-F70b0yqTOfTbfW1Q)众所周知
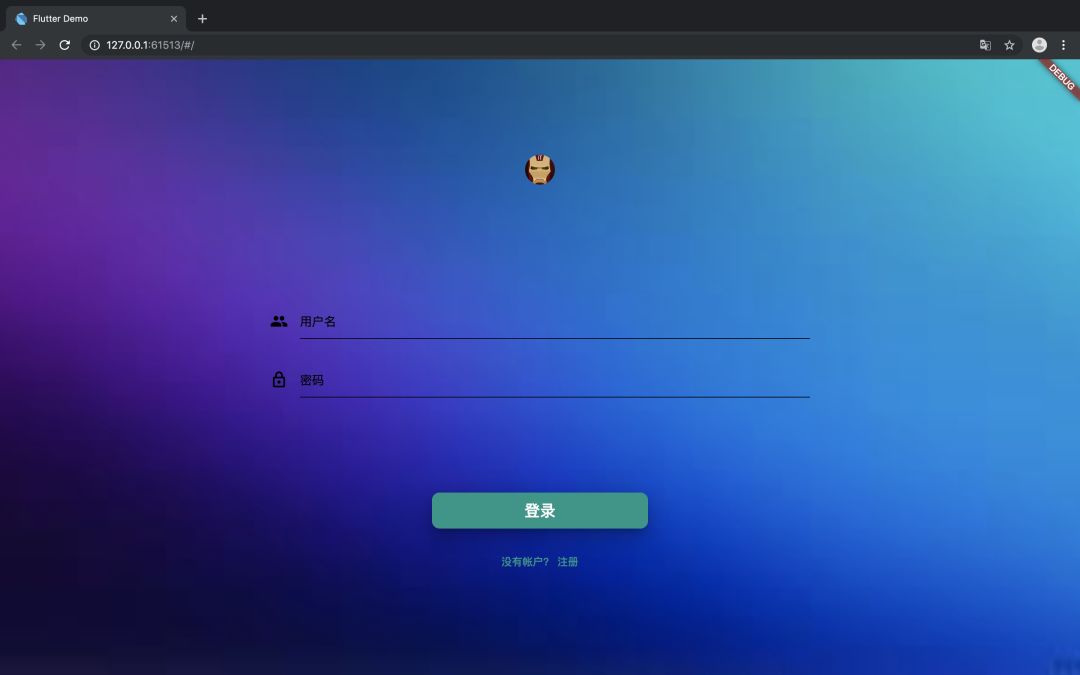
image-20190621195055828
可以看到,就是一个简单的登录界面,没有太复杂的逻辑,旨在帮助大家走通
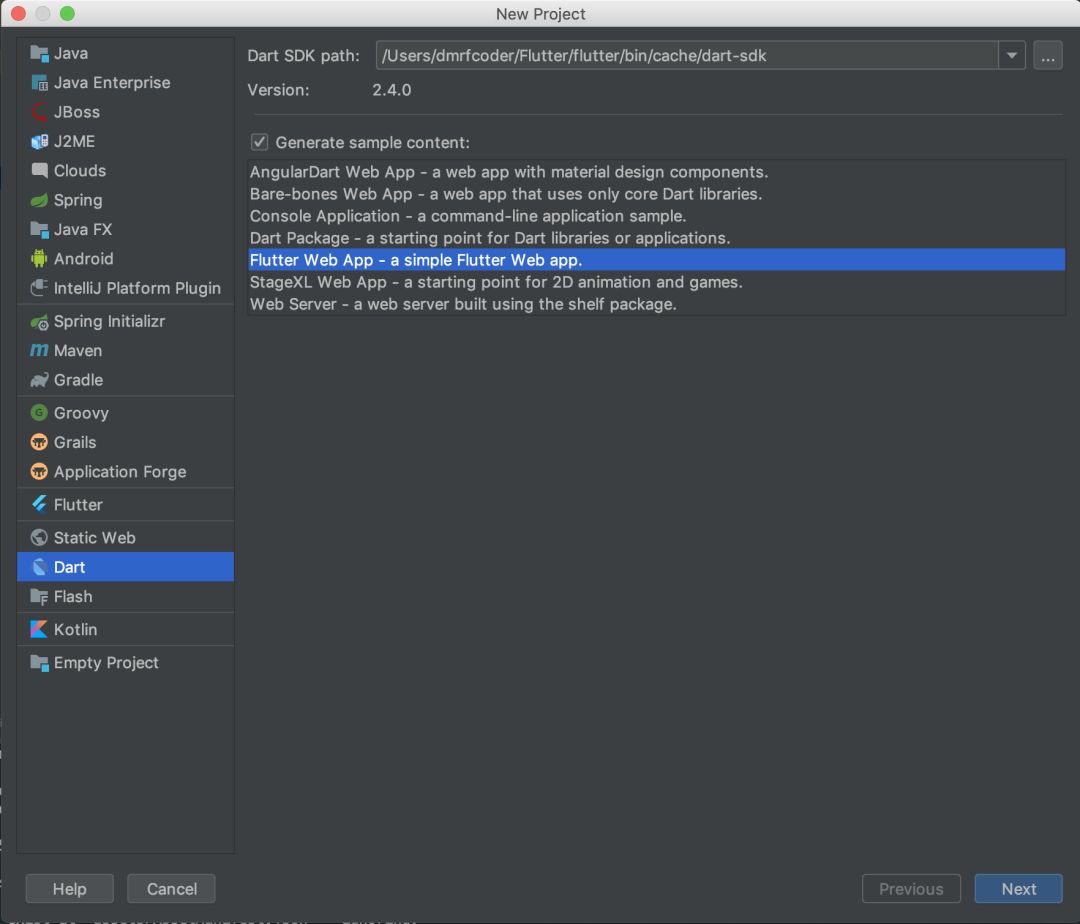
image-20190621200652154
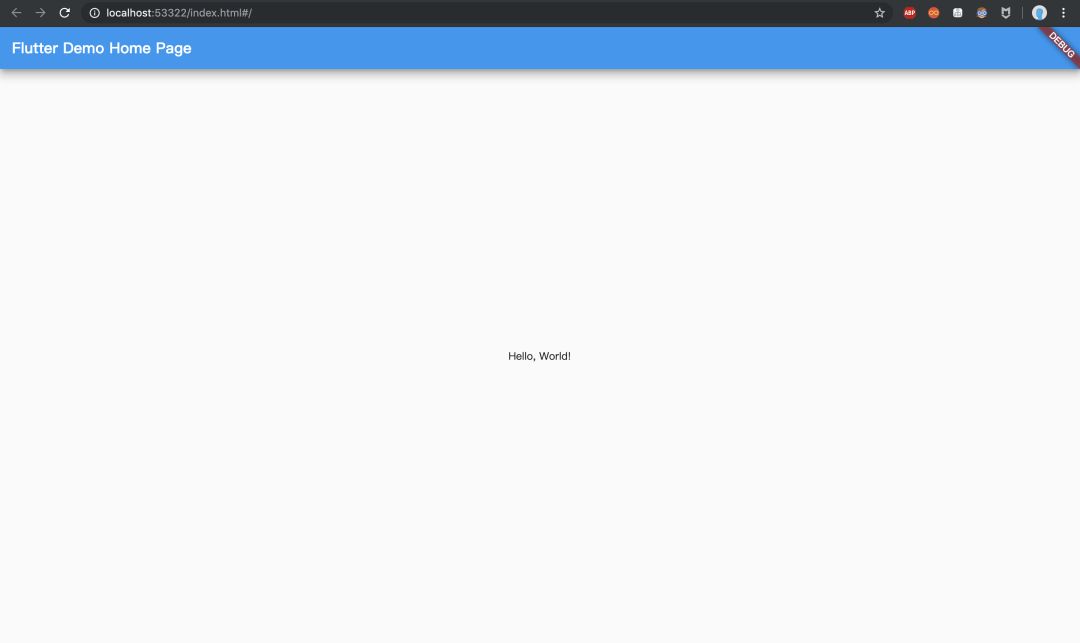
image-20190621202310684
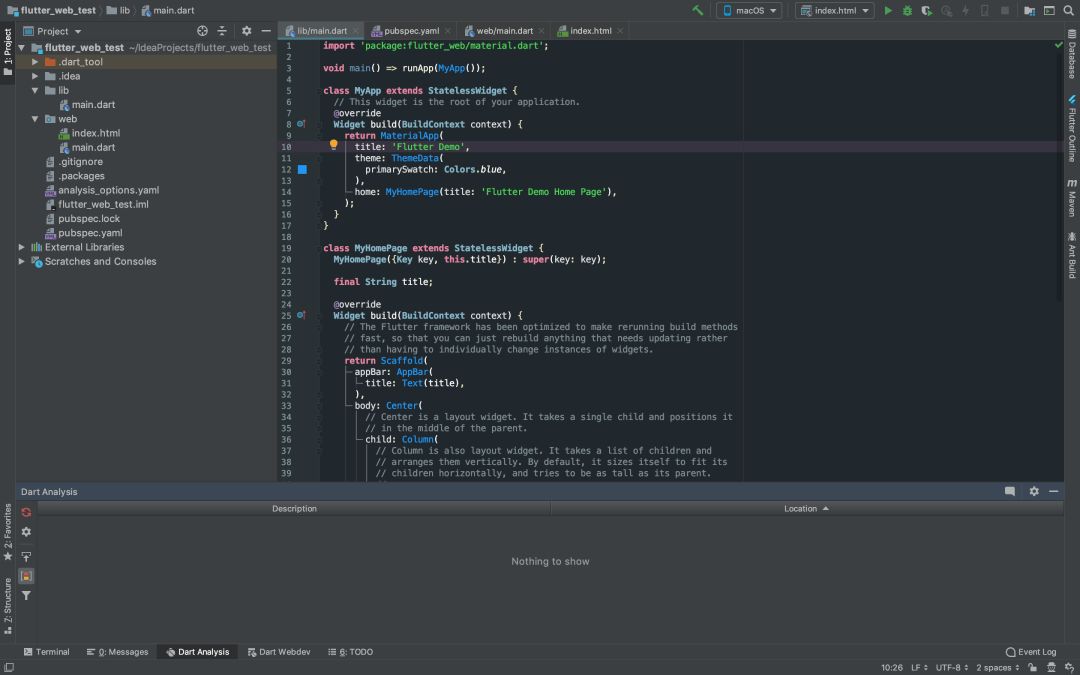
image-20190621202725911
可以看到,大体的项目结构和普通的
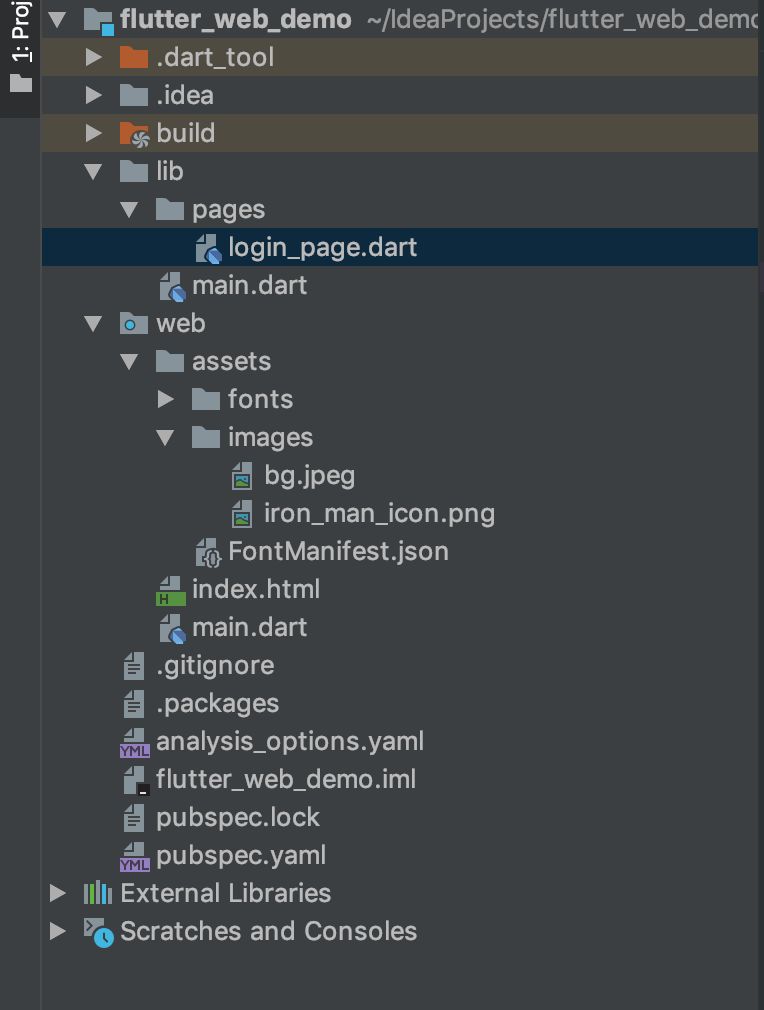
image-20190621203620933
然后就可以正常使用了,这也是迄今为止我发现的
Google对于Flutter的期望是全平台统一UI开发,号称要做一套 "一份代码、全平台部署" 的UI框架,这一点在移动端已经很成熟了,国内有很多成功的案例,典型的像阿里的闲鱼客户端,但是Flutter所声称的桌面端和Web端的相关案例还很少,之前我写过一篇文章介绍如何将Flutter代码部署成为桌面端程序,那么本文就该介绍如何将Flutter部署为Web应用了。本文将会以一个实例来带大家一步一步探寻如何将Flutter应用程序部署到Web端,我们先来看一下最终的效果:
Flutter部署到Web端的流程,至于实际的应用场景大家可以根据自己的需要自行开发。
开发环境配置
Flutter 1.5及更高的版本才支持Web端部署,这主要指的是将Dart编译为JavaScript,所以,必须要确保我们本地的Flutter SDK的版本在v1.5.4以上,建议直接使用命令flutter upgrade更新到最新版即可。
安装 flutter_web 编译工具
要想将Flutter代码编译为Web端可部署的应用程序,必须安装flutter_web,这是一个Flutter官方为我们开发并维护的编译工具,直接使用以下命令安装即可:
flutter pub global activate webdev
$HOME/.pub-cache/bin加入到你的环境变量中即可,由于电脑不同的操作系统配置环境变量的方式不同,这里就不一一展开赘述了,以Mac操作系统为例:
cd
vim .bash_profile
然后添加一行:
export PATH="$PATH":"$HOME/Flutter/flutter/.pub-cache/bin"
退出并保存,使用如下命令使其生效:
source .bash_profile
Flutter环境配置的没有问题,配置Flutter for web只是多装了一个flutter_web编译工具而已,非常简单。
创建项目
区别于普通的Flutter项目,由于Flutter对Web的支持目前还没有完全完成,相当于是一个供大家尝鲜的作品,所以创建Flutter for web项目和普通Flutter项目不一样,这里建议大家使用Idea,我这里也以Idea为例进行说明:
创建 Dart 项目,而不是 Flutter 项目
直接在Idea中新建项目,如下图所示:
注意三点:
-
选择
Dart项目,而不是新建Flutter项目 -
正确设置自己
dart sdk的位置 -
选择
Generate sample content中的Flutter Web app选项
Web了,在Idea中应该可以直接点击运行按钮进行运行,或者可以在Idea的终端中输入:
wevdev serve
Chrome浏览器,其他浏览器笔者没有测试过,按照官方的说法,目前支持最好的应该是Chrome浏览器) 如下图:
我们来看看项目结构:
Flutter项目差不多,只是多了一个web文件夹,下面是一些和web相关的文件和资源,后面我会具体讲其用处。
编写代码
创建好项目之后,我们就可以着手代码的编写了,这里不再详细叙述代码怎么写,和普通Flutter编写代码的规则是一模一样的,这里我在lib文件夹下新建了一个pages文件夹,然后新建了login_page.dart文件,编写登录界面的代码,完成后代码如下:
import 'package:flutter_web/material.dart';

class LoginPage extends StatefulWidget {
  @override
  State createState() => new _LoginState();
}class _LoginState extends State<LoginPage> {static final GlobalKey _scaffoldKey =new GlobalKey();final TextEditingController _phoneController = new TextEditingController();final TextEditingController _passwordController = new TextEditingController();bool _correctPhone = true;bool _correctPassword = true;bool showProgress = false;void _checkInput() {if (_phoneController.text.isNotEmpty) {
      _correctPhone = true;
    } else {
      _correctPhone = false;
    }if (_passwordController.text.isNotEmpty) {
      _correctPassword = true;
    } else {
      _correctPassword = false;
    }
    setState(() {});
  }
  _handleSubmitted(int flag) async {/**
     * flag=0:管理员登录
     * flag=1:用户登录
     */
    _checkInput();if (!_correctPassword || !_correctPhone) {return;
    }
  }@override
  Widget build(BuildContext context) {return new Scaffold(
        key: _scaffoldKey,
        resizeToAvoidBottomPadding: false,
        body: new Stack(children: [new Container(
            decoration: new BoxDecoration(
                image: new DecorationImage(
                    image: new AssetImage('images/bg.jpeg'),
                    fit: BoxFit.cover)),
          ),new GestureDetector(
            onTap: () {
              FocusScope.of(context).requestFocus(new FocusNode());
            },
          ),
          _buildLogInWidgets(),
        ]));
  }
  _buildLogInWidgets() {
    Color mainColor = Colors.black;return new Column(
      mainAxisAlignment: MainAxisAlignment.spaceEvenly, //垂直方向对其方式
      crossAxisAlignment: CrossAxisAlignment.start, //水平方向对其方式
      children: [
        Center(
          child: new Container(
            child: Center(
              child: new CircleAvatar(
                  backgroundImage: AssetImage("images/iron_man_icon.png")),
            ),
          ),
        ),new Center(
          child: new Container(
            width: MediaQuery.of(context).size.width * 0.5,
            child: new Column(
                mainAxisAlignment: MainAxisAlignment.center,
                crossAxisAlignment: CrossAxisAlignment.center,
                children: [new Container(
                    padding: const EdgeInsets.only(top: 32.0),
                    child: new TextField(
                      style: TextStyle(color: Colors.black),
                      cursorColor: mainColor,
                      controller: _phoneController,
                      keyboardType: TextInputType.text,
                      decoration: new InputDecoration(
                        hintText: '用户名',
                        hintStyle: TextStyle(color: mainColor),
                        errorText: _correctPhone ? null : '用户名不可为空!',
                        errorStyle: TextStyle(color: Colors.teal),
                        icon: new Icon(Icons.people, color: mainColor),
                        focusedBorder: UnderlineInputBorder(
                            borderSide: BorderSide(color: mainColor)),
                        enabledBorder: UnderlineInputBorder(
                            borderSide: BorderSide(color: mainColor)),
                        errorBorder: UnderlineInputBorder(
                            borderSide: BorderSide(color: mainColor)),
                      ),
                      onSubmitted: (value) {
                        _checkInput();
                      },
                    ),
                  ),new Container(
                    padding: const EdgeInsets.only(top: 32.0),
                    child: new TextField(
                      style: TextStyle(color: Colors.black),
                      cursorColor: mainColor,
                      controller: _passwordController,
                      obscureText: true,
                      keyboardType: TextInputType.text,
                      decoration: new InputDecoration(
                        hintText: '密码',
                        hintStyle: TextStyle(color: mainColor),
                        errorText: _correctPassword ? null : '密码不可为空!',
                        errorStyle: TextStyle(color: Colors.teal),
                        icon: new Icon(Icons.lock_outline, color: mainColor),
                        focusedBorder: UnderlineInputBorder(
                            borderSide: BorderSide(color: mainColor)),
                        enabledBorder: UnderlineInputBorder(
                            borderSide: BorderSide(color: mainColor)),
                        errorBorder: UnderlineInputBorder(
                            borderSide: BorderSide(color: mainColor)),
                      ),
                      onSubmitted: (value) {
                        _checkInput();
                      },
                    ),
                  )
                ]),
          ),
        ),new Center(
            child: new Column(
          children: [new Container(
              width: MediaQuery.of(context).size.width * 0.2,
              child: new Material(
                child: new FlatButton(
                  child: new Container(
                    child: new Center(
                        child: new Text("登录",
                      textScaleFactor: 1.5,
                      style: new TextStyle(
                          color: Colors.white, fontFamily: "Roboto"),
                    )),
                  ),
                  onPressed: () {
                    _handleSubmitted(0);
                  },
                ),
                color: Colors.teal,
                borderRadius: BorderRadius.circular(10.0),
                elevation: 5.0,
              ),
            ),new Center(
                child: Container(
              margin: EdgeInsets.only(top: 20),
              child: new FlatButton(
                child: new Text("没有帐户? 注册",
                    style: new TextStyle(color: Colors.teal)),
              ),
            )),
          ],
        )),
      ],
    );
  }
}Flutter代码是一样的,只是需要注意以下几点:
包的使用
细心的同学可能会发现,我们这里导入的包是:
import 'package:flutter_web/material.dart';
而普通Flutter项目导入的是:
import 'package:flutter/material.dart';
package:flutter 改为 package:flutter_web ,原来的 dart:ui 改为 package:flutter_web_ui/ui.dart,当然,这些你只需要知道就好了,实际生产的时候直接快捷键按下,编辑器会自动帮我们导入正确的包。
资源的使用
我们之前使用资源文件 (比如图片) 的方式是在根目录下新建一个资源文件夹,然后将资源文件放在资源文件夹下,然后在pubspec.yaml文件中进行文件路径的声明,然后就可以使用了,在Flutter for web中,我们需要将原来的资源文件夹从之前的项目根目录迁移到web文件夹下,就像这样:
Flutter for web和普通Flutter项目的不同之处了。编写完布局文件后我们将main.dart稍作修改,引入我们的LoginPage:
import 'package:flutter_web/material.dart';
import 'package:flutter_web_demo/pages/login_page.dart';

void main() => runApp(MyApp());

class MyApp extends StatelessWidget {
  // This widget is the root of your application.
  @override
  Widget build(BuildContext context) {
    return MaterialApp(
      title: 'Flutter Demo',
      theme: ThemeData(
        primarySwatch: Colors.blue,
      ),
      home: MyHomePage(title: 'Flutter Demo Home Page22'),
    );
  }
}

class MyHomePage extends StatelessWidget {
  MyHomePage({Key key, this.title}) : super(key: key);

  final String title;

  @override
  Widget build(BuildContext context) {
    return Scaffold(
        body: LoginPage());
  }
}
然后我们就可以运行起来看效果了:
和开篇的效果图一样,不再赘述。
总结
本文我们通过一个简单的实例带大家走了一遍Flutter在Web端部署的流程,可以看到,目前Flutter在Web上的部署已经没有任何压力了,只是由于生态还不完整,很多库和包还不能用,所以目前还无法投入商用软件中,希望 Flutter 可以发展的越来越完善。同时,结合笔者个人的开发经验,建议大家开发Flutter项目时一定不要怕麻烦,多用像mvp这类的项目结构,这样可以大大提高开发效率。关于Flutter for web的更多资料,可以参考Flutter官方的仓库: https://github.com/flutter/flutter_web。
"开发者说·DTalk" 面向中国开发者们征集 Google  移动应用 (apps & games) 相关的产品/技术内容。欢迎大家前来分享您对移动应用的行业洞察或见解、移动开发过程中的心得或新发现、以及应用出海的实战经验总结和相关产品的使用反馈等。我们由衷地希望可以给这些出众的中国开发者们提供更好展现自己、充分发挥自己特长的平台。我们将通过大家的技术内容着重选出优秀案例进行谷歌开发技术专家 (GDE) 的推荐。
 点击屏末 | 阅读原文 | 了解更多 "开发者说·DTalk" 活动详情与参与方式


开源鸿蒙跨平台开发社区汇聚开发者与厂商,共建“一次开发,多端部署”的开源生态,致力于降低跨端开发门槛,推动万物智联创新。
更多推荐

 0
0 0
0- 0


 已为社区贡献1条内容

所有评论(0)