flutter与android混合开发一:Android原生项目创建flutter模块、Android打开Flutter界面并传递数据
本篇主要讲解:如何在Android原有项目中创建flutter模块;Android原生代码打开flutter界面并传递数据,flutter显示接收到的数据(以简单的demo讲解)效果图如下:步骤:一. Android原有项目创建flutter模块1.在项目下(eg: 项目路径是E:\project...
本篇主要讲解:
- 如何在Android原有项目中创建flutter模块;
- Android 原生代码打开flutter界面并传递数据,flutter显示接收到的数据(以简单的demo讲解)
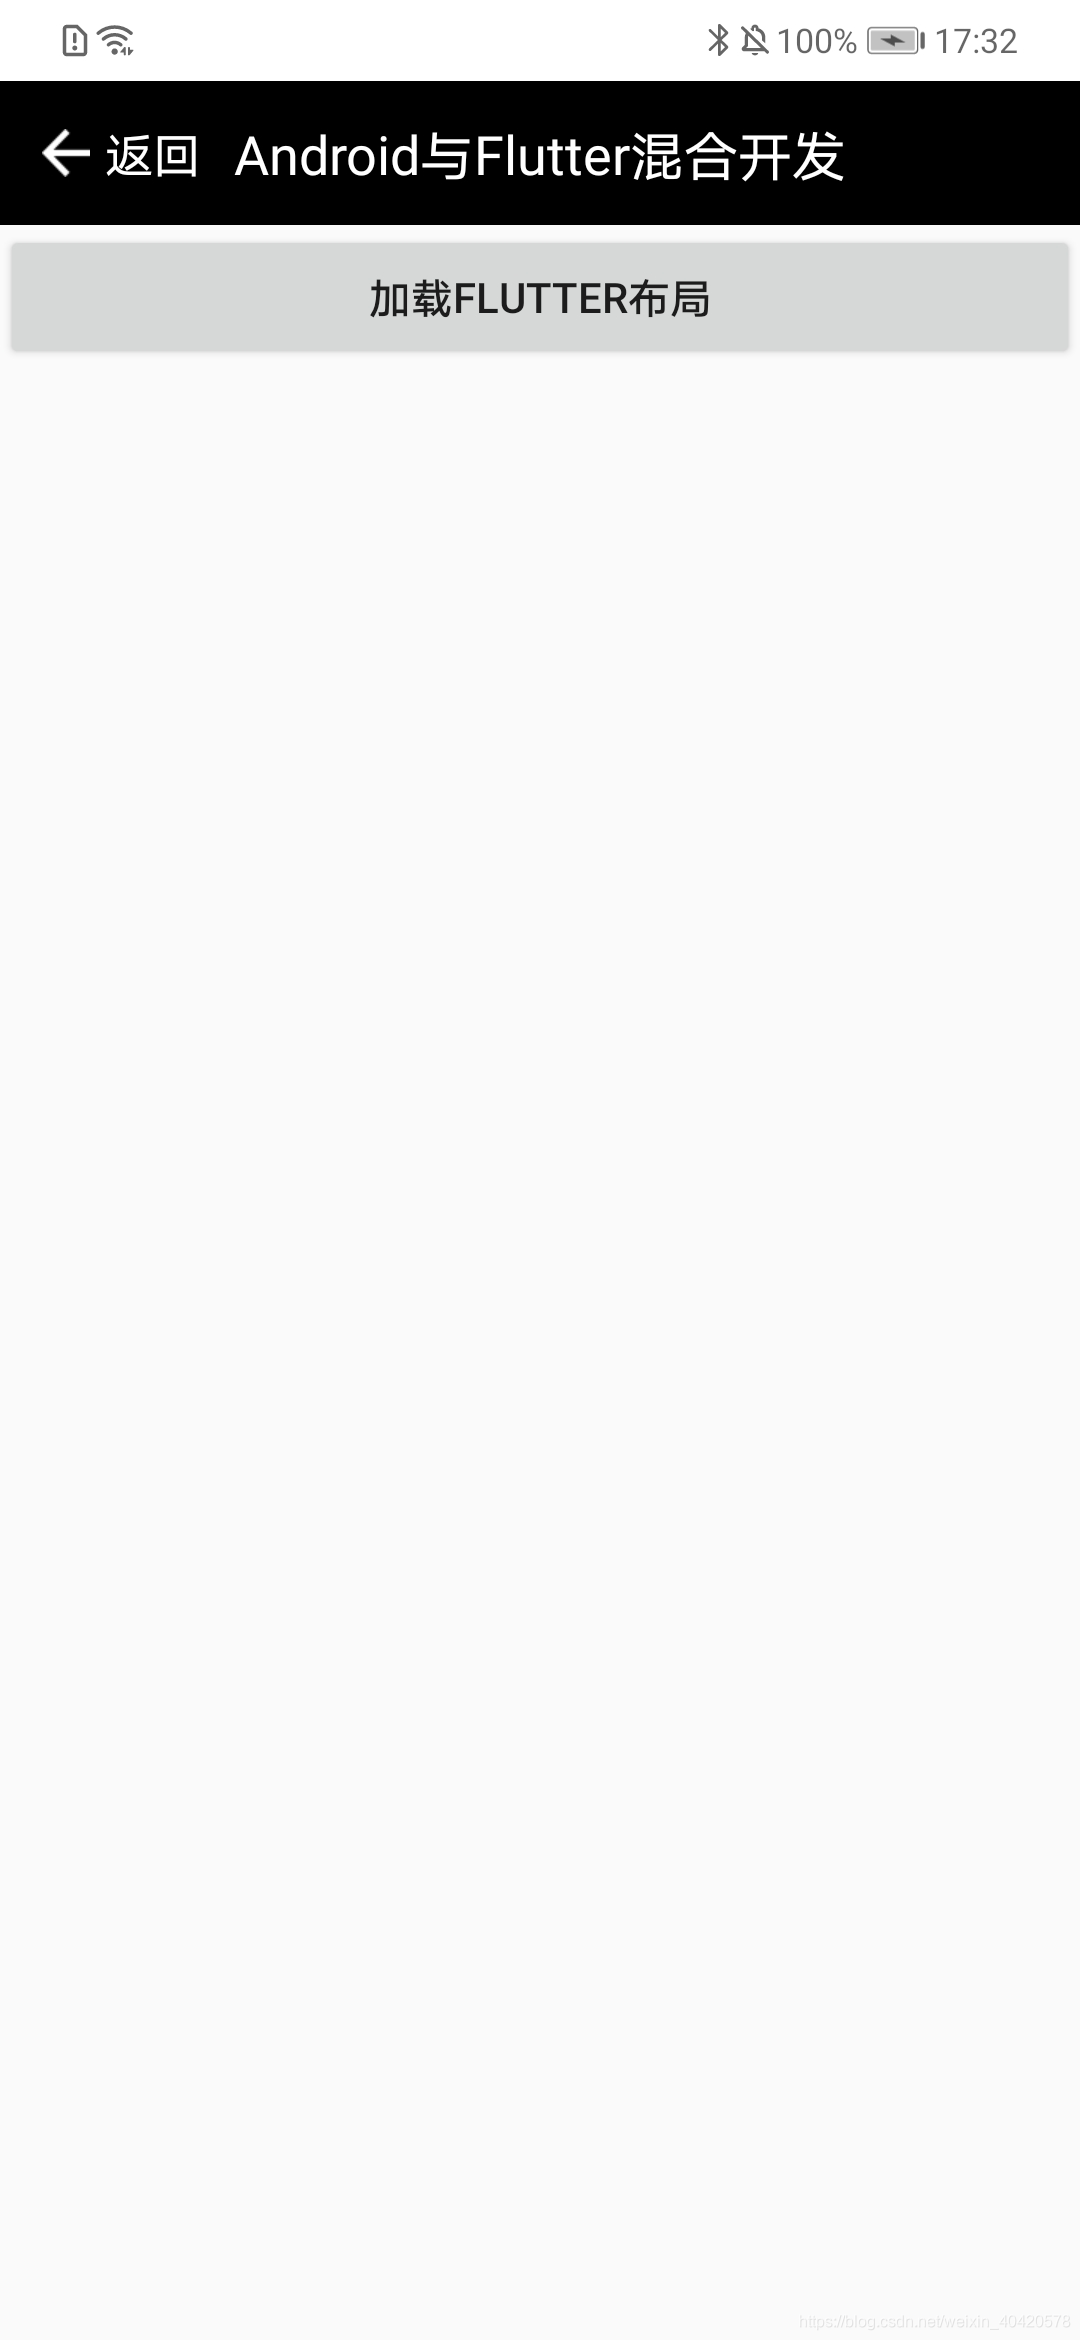
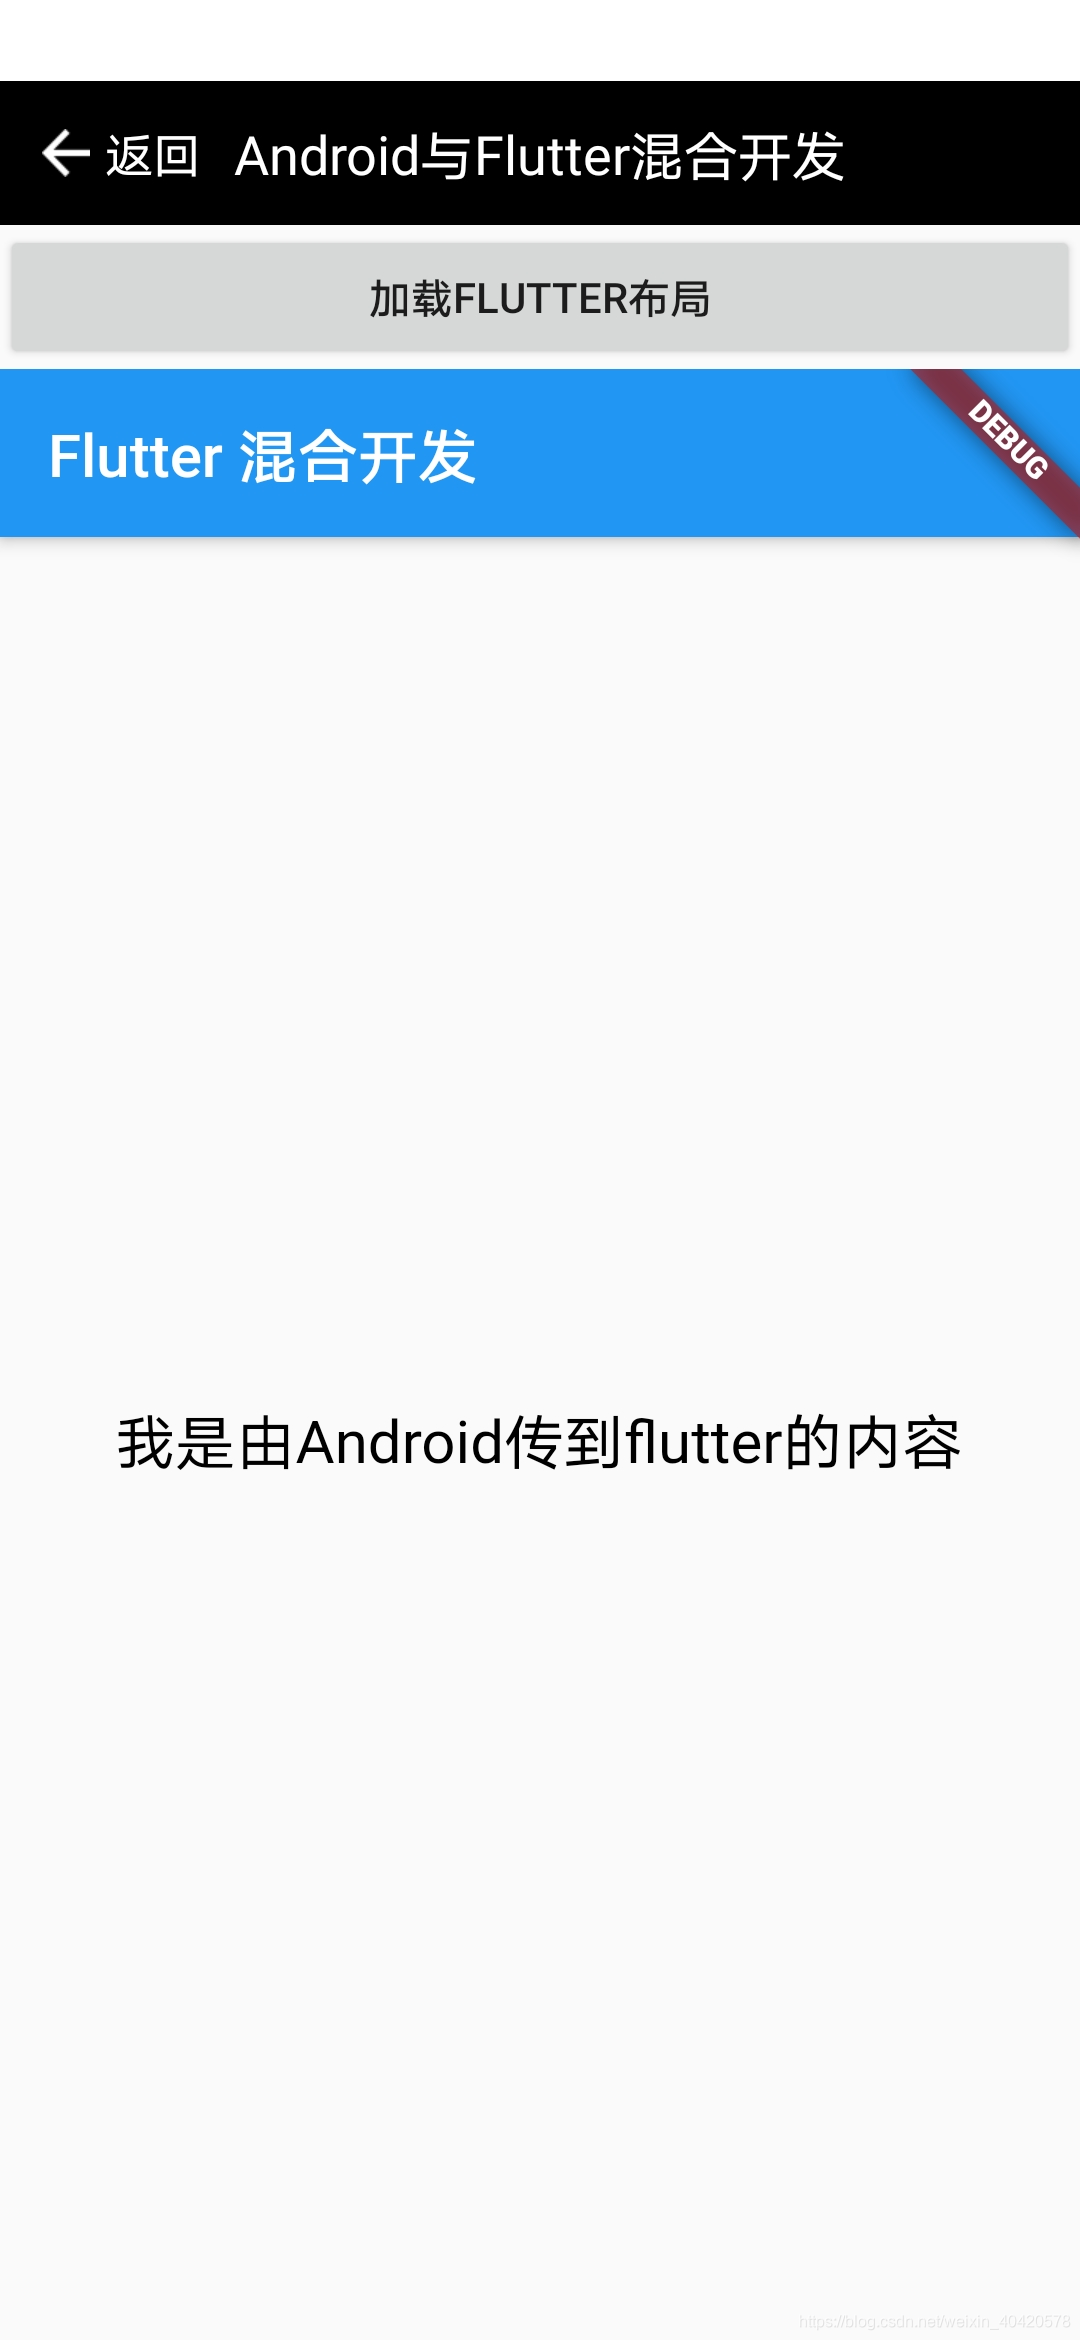
效果图如下:
步骤:
一. Android原有项目创建flutter模块
1.在项目下(eg: 项目路径是E:\project_code),打开Terminal,并输入创建flutter模块代码:
注:因为project_code项目中原先已经创建了flutter模块,是同样的操作,为了详细讲解并截图,所以新建项目操作一遍,后续的相关代码、截图会在project_code项目中。
flutter create -t module flutter_module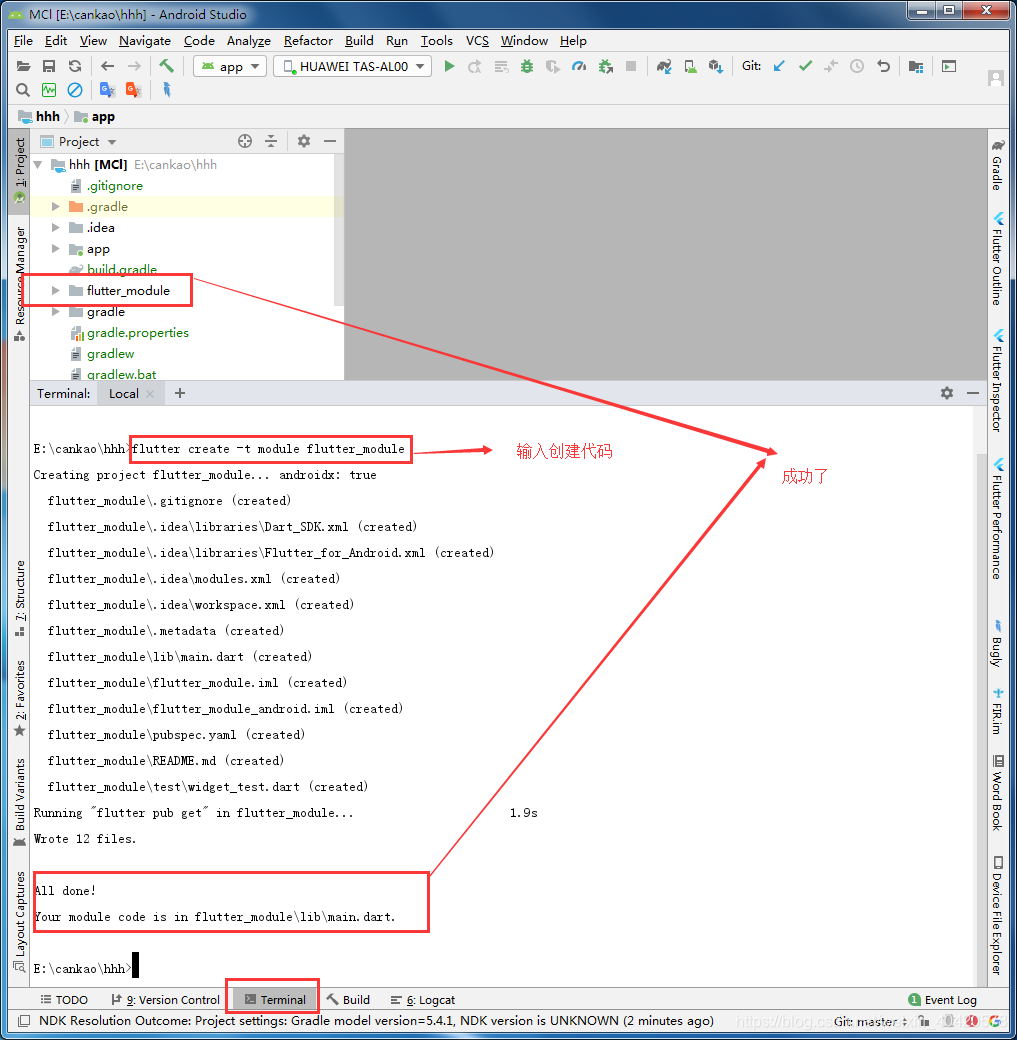
2. 配置
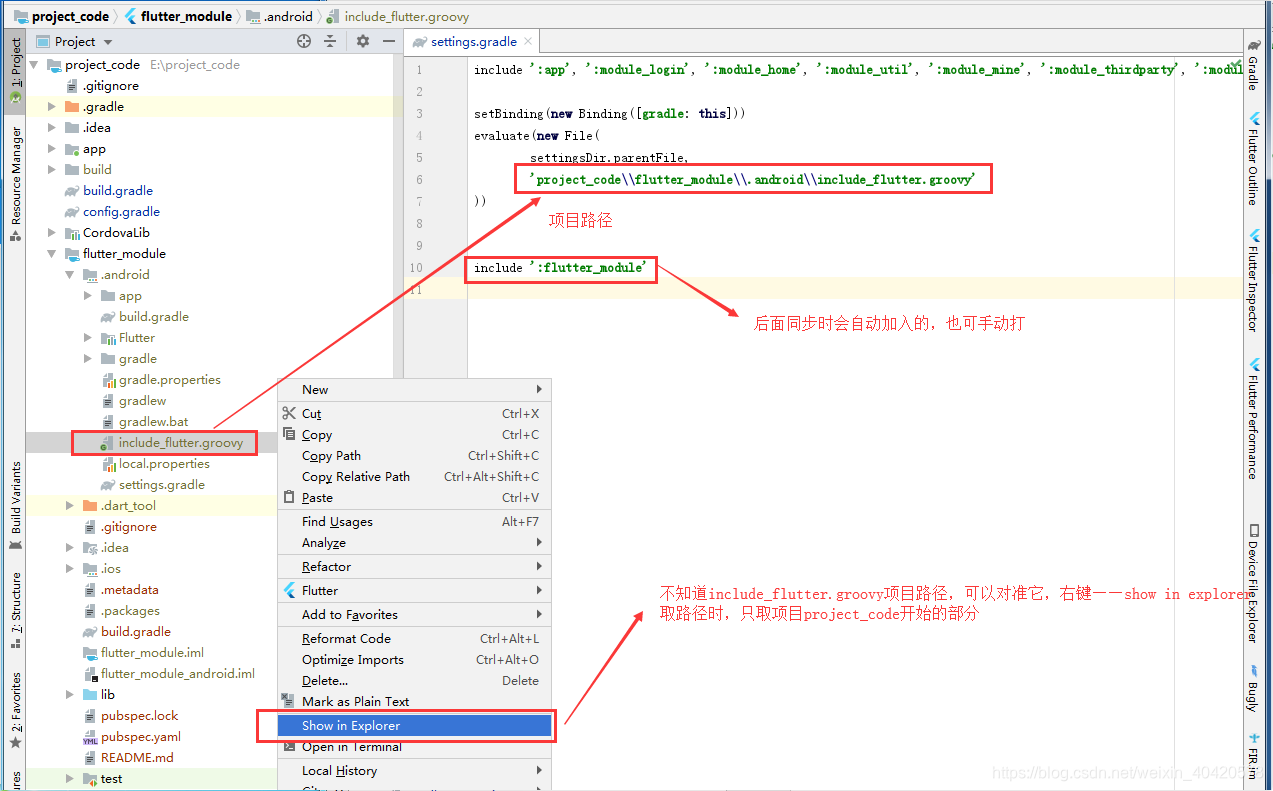
2.1 settings.gradle下,输入如图代码:
2.2 build.gradle(Module: app),加入如下代码:
android {

       defaultConfig{
            ****************
            minSdkVersion 不能低于16
            ***************
        }

        compileOptions {
        sourceCompatibility JavaVersion.VERSION_1_8
        targetCompatibility JavaVersion.VERSION_1_8
    }

}

dependencies {
    ***********
    implementation project(':flutter')
}
2.3 同步项目(右上角的Sync Now)
二. Android 打开Flutter界面并传递显示数据
1. Android代码(写在app里面,其它模块怎么调用flutter,正在研究):
1.1 activity_flutter_demo.xml布局(布局用了DataBinding,重点只需要一个button,一个FrameLayout)
<?xml version="1.0" encoding="utf-8"?>
<!--布局涉及到DataBinding,不要复制代码,自己布局一个button、一个FrameLayout即可-->
<layout xmlns:android="http://schemas.android.com/apk/res/android"
    xmlns:app="http://schemas.android.com/apk/res-auto"
    xmlns:tools="http://schemas.android.com/tools">

    <data>

        <variable
            name="toolBar"
            type="com.example.module_common.common.toolbar.TitleBuilder" />

        <variable
            name="activity"
            type="com.example.dell.myapplication.flutter.ui.activity.FlutterDemoActivity" />

    </data>

    <android.support.constraint.ConstraintLayout
        android:layout_width="match_parent"
        android:layout_height="match_parent"
        tools:context=".flutter.ui.activity.FlutterDemoActivity">

<!-- include是引入公共标题栏,直接忽略代码       -->
        <include
            android:id="@+id/Bar"
            layout="@layout/public_title"
            app:toolbar="@{toolBar}" />

        <Button
            android:id="@+id/bt_flutter_load"
            android:layout_width="match_parent"
            android:layout_height="wrap_content"
            android:onClick="@{activity.clickLoad}"
            android:text="加载flutter布局"
            app:layout_constraintTop_toBottomOf="@id/Bar" />

        <FrameLayout
            android:id="@+id/fl_flutter"
            android:layout_width="match_parent"
            android:layout_height="0dp"
            app:layout_constraintBottom_toBottomOf="parent"
            app:layout_constraintTop_toBottomOf="@id/bt_flutter_load" />

    </android.support.constraint.ConstraintLayout>
</layout>
1.2 FlutterDemoActivity点击按钮时,加载flutter布局并传递数据
    /**
     * 这个方法是button的点击事件,是DataBinding的写法,重点看里面的如何加载flutter及传递数据,
     * 点击事件,按照自己的来写
     * 加载flutter界面
     * @param view
     */
    public void clickLoad(View view){
        FlutterFragment fragment= FlutterFragment.withNewEngine().initialRoute("我是由Android传到flutter的内容").build();
        getSupportFragmentManager().beginTransaction().add(R.id.fl_flutter, fragment).commit();
    }
2. Flutter接收传递参数并显示(main.dar代码)
import 'dart:ui';

import 'package:flutter/material.dart';

void main() => runApp(MyApp(initParams: window.defaultRouteName));

class MyApp extends StatelessWidget {
  final String initParams;//接收的参数

  const MyApp({Key key, this.initParams}) : super(key: key);

  @override
  Widget build(BuildContext context) {
    return MaterialApp(
      home: MyHomePage(title: 'Flutter 混合开发', initParams: initParams),
    );
  }
}

class MyHomePage extends StatefulWidget {
  MyHomePage({Key key, this.title, this.initParams}) : super(key: key);

  final String title;
  final String initParams;

  @override
  _MyHomePageState createState() => _MyHomePageState();
}

class _MyHomePageState extends State<MyHomePage> {
  @override
  Widget build(BuildContext context) {
    return Scaffold(
      appBar: AppBar(
        title: Text(widget.title),
      ),
      body: Center(
        child: Column(
          mainAxisAlignment: MainAxisAlignment.center,
          children: <Widget>[
            Text(
              //显示传递过来的参数
              widget.initParams,
              style: TextStyle(color: Colors.black, fontSize: 20),
            ),
          ],
        ),
      ),
    );
  }
}
初步实现Android调用flutter,未来继续努力!

开源鸿蒙跨平台开发社区汇聚开发者与厂商,共建“一次开发,多端部署”的开源生态,致力于降低跨端开发门槛,推动万物智联创新。
更多推荐

 1
1 0
0- 0


 已为社区贡献9条内容

所有评论(0)