【跨端开发】React Native 基础
·
React Native 基础
一、基础组件
1.1 基本用法
文字类型都应该包裹在 Text 标签中。
View 标签:视窗容器。
import { Text, ScrollView } from "react-native";
import { SafeAreaView } from "react-native-safe-area-context";
import { useRouter } from "expo-router";

export default function TabTwoScreen() {
  const router = useRouter();

  return (
    <SafeAreaView>
      <ScrollView>
        <Text onPress={() => {
          console.log('onPress')
        }}>Hello</Text>
      </ScrollView>
    </SafeAreaView>
  );
}
1.2 样式相关
在上一块代码中加上样式:
import { StyleSheet, Text, ScrollView } from "react-native";
import { SafeAreaView } from "react-native-safe-area-context";
import { useRouter } from "expo-router";

export default function TabTwoScreen() {
  const router = useRouter();

  return (
    <SafeAreaView style={styles.safeArea}>
      <ScrollView contentContainerStyle={styles.container}>
        <Text style={styles.text} onPress={() => {
          router.push({
            pathname: "./list",
            params: {
              name: "John",
              title: 'ttt'
            },
          });
        }}>Hello</Text>
      </ScrollView>
    </SafeAreaView>
  );
}

const styles = StyleSheet.create({
  safeArea: {
    flex: 1,
  },
  text: {
    color: "red",
    fontSize: 20,
    fontWeight: "bold",
  },
  container: {
    padding: 16,
  },
});
样式注意点
- 创建样式:使用
StyleSheet.create()创建样式对象 - 字体大小不带单位:直接使用数字,如
fontSize: 20 - 行内样式:可以直接使用对象形式
// 行内样式示例
<Text style={{ color: "red" }} onPress={() => {
  router.push({
    pathname: "./list",
    params: {
      name: "John",
      title: 'ttt'
    },
  });
}}>Hello</Text>
1.3 默认样式说明
- 默认为
display: flex,且direction为column - 一般来说,在最外层包裹一个
SafeAreaView用于处理 iOS 刘海屏挡住文字的情况 - 使用
ScrollView处理 view 滚动的情况 - 使用
RefreshControl组件处理下拉刷新的问题
1.4 RefreshControl 下拉刷新
import { StyleSheet, Text, ScrollView, RefreshControl, View } from "react-native";
import { SafeAreaView } from "react-native-safe-area-context";
import { useState, useCallback } from "react";

/**
 * RefreshControl 示例页面
 * 展示如何使用下拉刷新功能
 */
export default function RefreshScreen() {
  // 刷新状态
  const [refreshing, setRefreshing] = useState(false);
  // 数据列表
  const [data, setData] = useState([
    { id: 1, title: "数据项 1", time: new Date().toLocaleTimeString() },
    { id: 2, title: "数据项 2", time: new Date().toLocaleTimeString() },
    { id: 3, title: "数据项 3", time: new Date().toLocaleTimeString() },
  ]);
  // 刷新次数统计
  const [refreshCount, setRefreshCount] = useState(0);

  /**
   * 下拉刷新处理函数
   * 模拟网络请求,更新数据列表
   */
  const onRefresh = useCallback(() => {
    setRefreshing(true);

    // 模拟网络请求延迟
    setTimeout(() => {
      // 更新数据,添加新的时间戳
      const newData = [
        { id: 1, title: "数据项 1", time: new Date().toLocaleTimeString() },
        { id: 2, title: "数据项 2", time: new Date().toLocaleTimeString() },
        { id: 3, title: "数据项 3", time: new Date().toLocaleTimeString() },
        { id: data.length + 1, title: `新数据项 ${data.length + 1}`, time: new Date().toLocaleTimeString() },
      ];

      setData(newData);
      setRefreshCount(prev => prev + 1);
      setRefreshing(false);
    }, 2000); // 2秒延迟模拟网络请求
  }, [data.length]);

  return (
    <SafeAreaView style={styles.safeArea}>
      <ScrollView
        contentContainerStyle={styles.container}
        refreshControl={
          <RefreshControl
            refreshing={refreshing}
            onRefresh={onRefresh}
            // 可选:自定义刷新指示器颜色(iOS)
            tintColor="#007AFF"
            // 可选:自定义刷新指示器颜色(Android)
            colors={["#007AFF"]}
            // 可选:刷新时的标题(Android)
            title="正在刷新..."
            titleColor="#666"
          />
        }
      >
        {/* 页面标题 */}
        <View style={styles.header}>
          <Text style={styles.title}>下拉刷新示例</Text>
          <Text style={styles.subtitle}>
            向下拉动页面即可触发刷新
          </Text>
        </View>

        {/* 刷新状态信息 */}
        <View style={styles.infoCard}>
          <Text style={styles.infoLabel}>刷新状态:</Text>
          <Text style={[styles.infoValue, refreshing && styles.refreshing]}>
            {refreshing ? "正在刷新..." : "未刷新"}
          </Text>
        </View>

        <View style={styles.infoCard}>
          <Text style={styles.infoLabel}>刷新次数:</Text>
          <Text style={styles.infoValue}>{refreshCount}</Text>
        </View>

        {/* 数据列表 */}
        <View style={styles.dataSection}>
          <Text style={styles.sectionTitle}>数据列表</Text>
          {data.map((item) => (
            <View key={item.id} style={styles.dataItem}>
              <Text style={styles.dataTitle}>{item.title}</Text>
              <Text style={styles.dataTime}>更新时间: {item.time}</Text>
            </View>
          ))}
        </View>

        {/* 使用说明 */}
        <View style={styles.tipCard}>
          <Text style={styles.tipTitle}>💡 使用提示</Text>
          <Text style={styles.tipText}>
            • 在 iOS 上,向下拉动页面即可触发刷新
          </Text>
          <Text style={styles.tipText}>
            • 在 Android 上,向下拉动页面即可触发刷新
          </Text>
          <Text style={styles.tipText}>
            • RefreshControl 可以用于 ScrollView、FlatList 等可滚动组件
          </Text>
          <Text style={styles.tipText}>
            • 刷新时会显示加载指示器,直到刷新完成
          </Text>
        </View>
      </ScrollView>
    </SafeAreaView>
  );
}

const styles = StyleSheet.create({
  safeArea: {
    flex: 1,
    backgroundColor: "#f5f5f5",
  },
  container: {
    padding: 16,
  },
  header: {
    marginBottom: 24,
    alignItems: "center",
  },
  title: {
    fontSize: 24,
    fontWeight: "bold",
    color: "#333",
    marginBottom: 8,
  },
  subtitle: {
    fontSize: 14,
    color: "#666",
    textAlign: "center",
  },
  infoCard: {
    backgroundColor: "#fff",
    padding: 16,
    borderRadius: 8,
    marginBottom: 12,
    flexDirection: "row",
    justifyContent: "space-between",
    alignItems: "center",
    shadowColor: "#000",
    shadowOffset: {
      width: 0,
      height: 1,
    },
    shadowOpacity: 0.1,
    shadowRadius: 2,
    elevation: 2,
  },
  infoLabel: {
    fontSize: 16,
    color: "#666",
  },
  infoValue: {
    fontSize: 16,
    fontWeight: "600",
    color: "#333",
  },
  refreshing: {
    color: "#007AFF",
  },
  dataSection: {
    marginTop: 8,
    marginBottom: 24,
  },
  sectionTitle: {
    fontSize: 18,
    fontWeight: "600",
    color: "#333",
    marginBottom: 12,
  },
  dataItem: {
    backgroundColor: "#fff",
    padding: 16,
    borderRadius: 8,
    marginBottom: 8,
    shadowColor: "#000",
    shadowOffset: {
      width: 0,
      height: 1,
    },
    shadowOpacity: 0.1,
    shadowRadius: 2,
    elevation: 2,
  },
  dataTitle: {
    fontSize: 16,
    fontWeight: "600",
    color: "#333",
    marginBottom: 4,
  },
  dataTime: {
    fontSize: 12,
    color: "#999",
  },
  tipCard: {
    backgroundColor: "#e3f2fd",
    padding: 16,
    borderRadius: 8,
    borderLeftWidth: 4,
    borderLeftColor: "#2196F3",
  },
  tipTitle: {
    fontSize: 16,
    fontWeight: "600",
    color: "#1976D2",
    marginBottom: 8,
  },
  tipText: {
    fontSize: 14,
    color: "#424242",
    lineHeight: 20,
    marginBottom: 4,
  },
});
1.5 FlatList 列表组件
FlatList 是滚动列表组件,只渲染在视窗中的元素,性能更优。
import { StyleSheet, FlatList, Text, RefreshControl } from "react-native";
import { SafeAreaView } from "react-native-safe-area-context";
import { useState } from "react";
import { useLocalSearchParams, Stack } from "expo-router";
import { useNavigation } from "@react-navigation/native";

export default function TabTwoScreen() {
  const { title } = useLocalSearchParams();
  const [refreshing, setRefreshing] = useState(false);
  const navigation = useNavigation();
  // 处理 title 和 url 可能是数组或字符串的情况
  const displayTitle = Array.isArray(title) ? title[0] : title;

  // 没有 title 时不展示 header
  const headerShown = !!displayTitle;

  const onRefresh = () => {
    setRefreshing(true);
    setTimeout(() => {
      setRefreshing(false);
    }, 2000);
  };

  return (
    <SafeAreaView style={styles.safeArea}>
      <Stack.Screen options={{ title: displayTitle, headerShown }} />
      <FlatList
        data={[
          { id: 1, title: "Item 1" },
          { id: 2, title: "Item 2" },
          { id: 4, title: "Item 4" },
          { id: 5, title: "Item 5" },
          { id: 6, title: "Item 6" },
          { id: 7, title: "Item 7" },
          { id: 8, title: "Item 8" },
          { id: 9, title: "Item 9" },
          { id: 10, title: "Item 10" },
          { id: 11, title: "Item 11" },
        ]}
        renderItem={({ item }) => <Text style={styles.text}>{item.title}</Text>}
        ListHeaderComponent={() => <Text>Header</Text>}
        ListFooterComponent={() => <Text>Footer</Text>}
        refreshControl={
          <RefreshControl refreshing={refreshing} onRefresh={onRefresh} />
        }
        onEndReached={() => {
          console.log("onEndReached");
        }}
        onEndReachedThreshold={0.5}
      />
      <Text onPress={() => {
        navigation.setOptions({
          title: "New Title",
          headerShown: false,
        });
      }}>Click me</Text>
    </SafeAreaView>
  );
}

const styles = StyleSheet.create({
  safeArea: {
    flex: 1,
    // height: "100%",
    backgroundColor: "white",
  },
  text: {
    color: "black",
    fontSize: 20,
    fontWeight: "bold",
  },
  container: {
    padding: 16,
  },
});
二、Expo Router
2.1 安装
npx create-expo-app@latest
2.2 配置 Scheme
在 app.json 中配置 scheme,配置完后可以从别的应用或地址跳转到自己的 app。
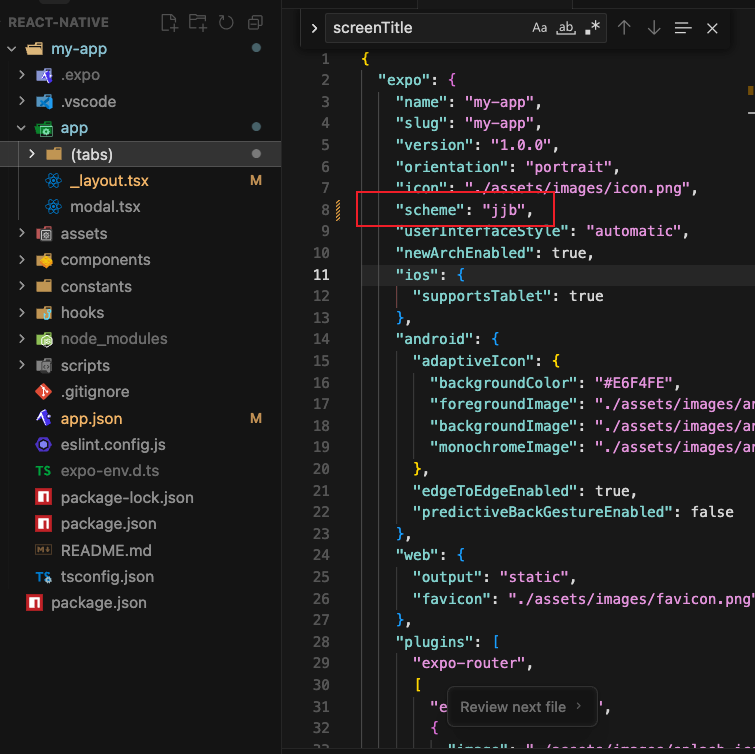
{
  "scheme": "jjb"
}
使用示例:jjb://index
2.3 布局(Layout)
Layout 组件会在所有组件的最外层包裹一层,此时会出现导航栏并且跳转到子页面后会有返回按钮。
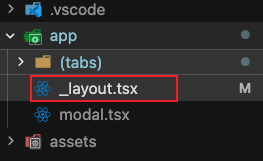
import { DarkTheme, DefaultTheme, ThemeProvider } from '@react-navigation/native';
import { Stack } from 'expo-router';
import { StatusBar } from 'expo-status-bar';
import 'react-native-reanimated';

import { useColorScheme } from '@/hooks/use-color-scheme';

export const unstable_settings = {
  anchor: '(tabs)',
};

export default function RootLayout() {
  const colorScheme = useColorScheme();

  return (
    <ThemeProvider value={colorScheme === 'dark' ? DarkTheme : DefaultTheme}>
      <Stack screenOptions={{
        headerTitleAlign: 'center',
        animation: 'slide_from_right',
      }}>
        <Stack.Screen name="(tabs)" options={{ headerShown: false }} />
        <Stack.Screen name="modal" options={{ presentation: 'modal', title: 'Modal' }} />
      </Stack>
      <StatusBar style="auto" />
    </ThemeProvider>
  );
}
注意:
Stack布局文件只对它同级或下级的目录生效。
2.4 路由方法
1. router.navigate(最常用)
- 作用:跳转到指定页面
- 说明:如果目标页面已在 Stack 中,直接跳转到现有实例;否则新增页面到 Stack
2. router.replace
- 作用:替换掉 Stack 中所有页面
- 说明:替换后无法返回上一页(因为之前的页面都被替换了)
3. router.push
- 作用:强制新增页面到 Stack
- 说明:无论目标页面是否存在,始终在 Stack 里新增一个页面
4. router.back
- 作用:返回上一个页面
5. router.dismiss
- 作用:用于关闭模态页
2.5 路由传参
方法一:通过文件名定义参数
使用动态路由文件名,如 [id].tsx。
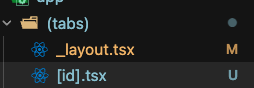
import { StyleSheet, Text, View } from "react-native";
import { SafeAreaView } from "react-native-safe-area-context";
import { useLocalSearchParams, Stack, useRouter } from "expo-router";

export default function DetailScreen() {
  const { id } = useLocalSearchParams<{ id: string }>();
  const router = useRouter();
  const displayId = Array.isArray(id) ? id[0] : id || "未知";

  return (
    <SafeAreaView style={styles.container}>
      <Stack.Screen options={{ title: `详情 - ${displayId}` }} />
      <View style={styles.content}>
        <Text style={styles.idText}>ID: {displayId}</Text>
        <Text style={styles.button} onPress={() => router.back()}>
          返回
        </Text>
      </View>
    </SafeAreaView>
  );
}

const styles = StyleSheet.create({
  container: {
    flex: 1,
    backgroundColor: "white",
  },
  content: {
    flex: 1,
    padding: 16,
    justifyContent: "center",
    alignItems: "center",
    gap: 24,
  },
  idText: {
    fontSize: 24,
    fontWeight: "bold",
    color: "#0a7ea4",
  },
  button: {
    fontSize: 16,
    color: "#0a7ea4",
    padding: 12,
  },
});
方法二:通过 params 传参(更常见)
<Text style={{ color: "red" }} onPress={() => {
  router.push({
    pathname: "/list",
    params: {
      name: "John",
      title: 'ttt'
    },
  });
}}>Hello</Text>
接收路由参数:
import { useLocalSearchParams } from "expo-router";

export default function Screen() {
  const { title } = useLocalSearchParams();
  // ...
}
2.6 导航栏
重要提示
⚠️ 注意:
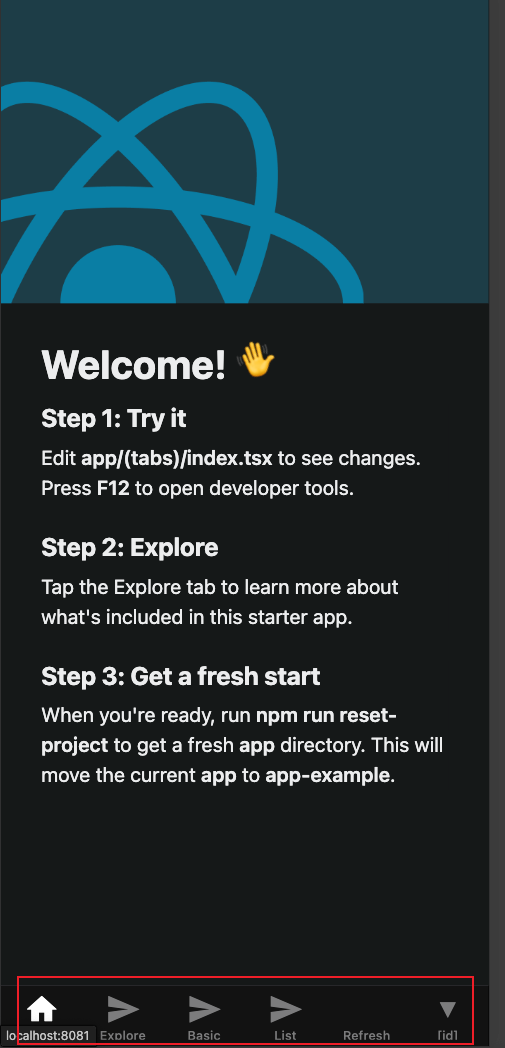
(tabs)下的页面跳转路径不需要加上(tabs)!(tabs)下的页面都会放到 TabBar 的下方
设置导航栏标题
方法一:使用 Stack.Screen,并通过路由传参
import { useLocalSearchParams } from "expo-router";

export default function Screen() {
  const { title } = useLocalSearchParams();

  return (
    <>
      <Stack.Screen options={{ title }} />
      {/* ... */}
    </>
  );
}
方法二:使用 navigation.setOptions
import { useNavigation } from "expo-router";

export default function Screen() {
  const navigation = useNavigation();

  return (
    <Text onPress={() => {
      navigation.setOptions({
        title: "New Title",
      });
    }}>Click me</Text>
  );
}
导航栏样式配置
import { Stack } from 'expo-router';

export default function Layout() {
  return (
    <Stack
      screenOptions={{
        headerTitleAlign: 'center', // 安卓标题栏居中
        animation: 'slide_from_right', // 安卓使用左右切屏
        headerStyle: { backgroundColor: '#e29447' }, // 导航栏整体样式
        headerTintColor: '#fff', // 导航栏中文字、按钮、图标的颜色
        headerTitleStyle: { fontWeight: 'bold' }, // 导航栏标题样式
      }}
    >
      <Stack.Screen name="index" options={{ title: '首页' }} />
      <Stack.Screen
        name="courses/[id]"
        options={({ route }) => ({
          title: route.params?.title || '课程页', // 使用 params 中的 title, 如果没有则显示默认值
        })}
      />
    </Stack>
  );
}
标题和返回按钮配置
只展示箭头,不显示标题:
export default function Layout() {
  return (
    <Stack
      screenOptions={{
        title: '', // 标题为空
        headerBackButtonDisplayMode: 'minimal' // 只有返回箭头没有标题
      }}
    >
    </Stack>
  );
}
导航栏自定义渲染
自定义左中右三个区域:
<Stack.Screen
  name="index"
  options={{
    headerTitle: (props: { children: string; tintColor?: string }) => (
      <LogoTitle {...props} />
    ),
    headerLeft: () => (
      <HeaderButton name="bell" href="/articles" style={style.headerLeft} />
    ),
    headerRight: () => (
      <>
        <HeaderButton name="magnifier" href="/search" style={style.headerRight} />
        <HeaderButton name="options" href="/settings" style={style.headerRight} />
      </>
    ),
  }}
/>
隐藏导航栏
<Stack.Screen name="(tabs)" options={{ headerShown: false }} />
2.7 TabBar
基本说明
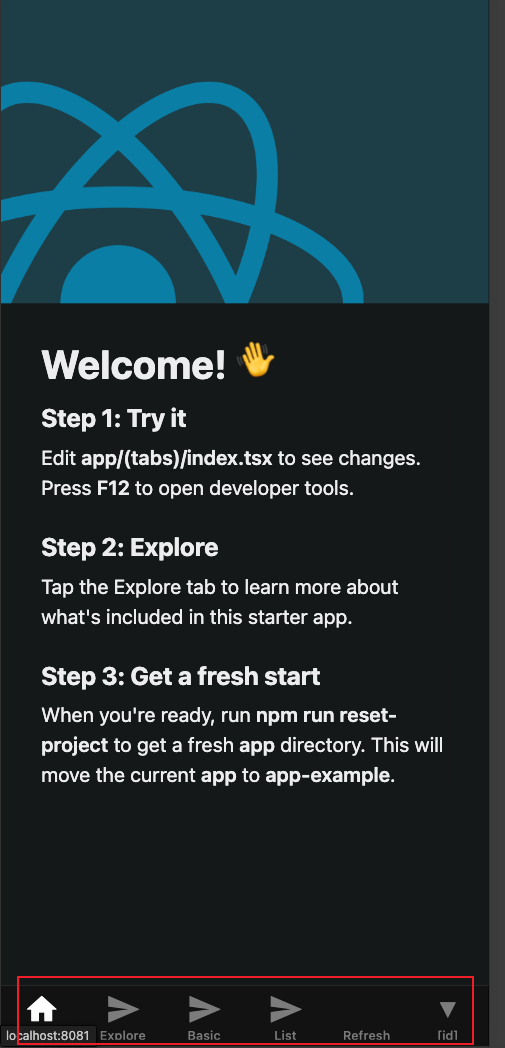
- 默认图标为倒三角形
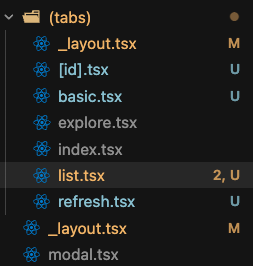
- 路由分组:带
()的目录不算路径,例如basic只需要写成/basic,而不是/(tabs)/basic
TabBar 配置
export default function TabLayout() {
  return (
    <Tabs
      screenOptions={{
        headerTitleAlign: 'center', // 安卓标题栏居中
        headerTitle: (props: HeaderTitleProps) => <LogoTitle {...props} />,
        headerLeft: () => (
          <HeaderButton name="bell" href="/articles" style={style.headerLeft} />
        ),
        headerRight: () => (
          <>
            <HeaderButton name="magnifier" href="/search" style={style.headerRight} />
            <HeaderButton name="options" href="/settings" style={style.headerRight} />
          </>
        ),
      }}
    >
      <Tabs.Screen name="index" options={{ title: '发现' }} />
      <Tabs.Screen name="explore" options={{ title: '视频课程' }} />
      <Tabs.Screen name="basic" options={{ title: '基础' }} />
      <Tabs.Screen name="list" options={{ title: '列表' }} />
      <Tabs.Screen name="refresh" options={{ title: '刷新' }} />
    </Tabs>
  );
}
配置 TabBar 底部图标,取消 Android 水波纹
import { Tabs } from "expo-router";
import React from "react";
import { TouchableOpacity, StyleSheet } from "react-native";

export default function TabLayout() {
  return (
    <Tabs
      screenOptions={{
        tabBarActiveTintColor: '#1f99b0', // 设置 TabBar 选中项的颜色
        // Android 取消水波纹效果
        tabBarButton: (props: BottomTabBarButtonProps) => (
          <TouchableOpacity
            {...props}
            activeOpacity={1}
            style={[props.style, { backgroundColor: 'transparent' }]}
          />
        ),
      }}
    >
      {/* ... */}
    </Tabs>
  );
}
2.8 Modal 模态页
配置 Modal 页面
<Stack.Screen
  name="list"
  options={{
    presentation: "modal",
    animation: "slide_from_bottom", // 从底部滑入
  }}
/>
自定义关闭按钮
关闭模态页一般使用 router.dismiss:
// 模态页关闭按钮组件
function CloseButton() {
  const router: Router = useRouter();

  return (
    <View style={{ width: 30 }}>
      <TouchableOpacity onPress={() => router.dismiss()}>
        <MaterialCommunityIcons name="close" size={30} color="#1f99b0" />
      </TouchableOpacity>
    </View>
  );
}
三、Expo 相关命令
3.1 更新 Expo
npm i expo@latest
3.2 更新 Expo 依赖
npx expo install --fix
3.3 检查 Expo 是否能正常运行
npx expo-doctor

开源鸿蒙跨平台开发社区汇聚开发者与厂商,共建“一次开发,多端部署”的开源生态,致力于降低跨端开发门槛,推动万物智联创新。
更多推荐



 14
14 0
0- 0


 已为社区贡献1条内容

所有评论(0)