通知系统 OpenHarmony Flutter实现方案
摘要 本文探讨了Flutter框架下通知系统的实现方案,重点介绍了本地通知和定时通知的技术架构。通过flutter_local_notifications插件,开发者可以构建包含标题、内容、图标等元素的跨平台通知系统。文章详细解析了状态管理、通知显示、定时调度等核心功能,并提供了代码示例说明如何在Android/iOS平台上实现通知渠道配置。同时,针对OpenHarmony PC端特性,阐述了通过
欢迎加入开源鸿蒙跨平台社区:https://openharmonycrossplatform.csdn.net
引言
在现代应用开发中,通知系统是连接应用和用户的重要桥梁。无论是消息提醒、系统通知、推送通知还是定时提醒,通知系统都能够及时地将重要信息传达给用户,即使应用不在前台运行。Flutter 提供了丰富的通知 API 和插件生态系统,开发者可以轻松地实现本地通知、推送通知、通知管理等功能。
通知系统不仅仅是在状态栏显示一个图标和文字,更涉及通知分类、通知渠道、通知优先级、通知样式、通知操作等多个方面。一个优秀的通知系统应该具备清晰的通知分类、合适的通知优先级、丰富的通知样式、便捷的通知操作等特性。在 OpenHarmony PC 端,通知系统的设计需要考虑到 PC 端的使用场景,例如通知中心、桌面角标、系统通知栏等,为 PC 用户提供符合桌面应用习惯的通知体验。
本文将深入探讨通知系统的技术实现,从基础的本地通知到高级的推送通知,结合 OpenHarmony PC 端的特性,展示如何构建完善的通知系统。我们将通过完整的代码示例和详细的解释,帮助开发者理解通知系统的每一个细节,掌握跨平台通知服务的最佳实践。
一、通知系统基础架构
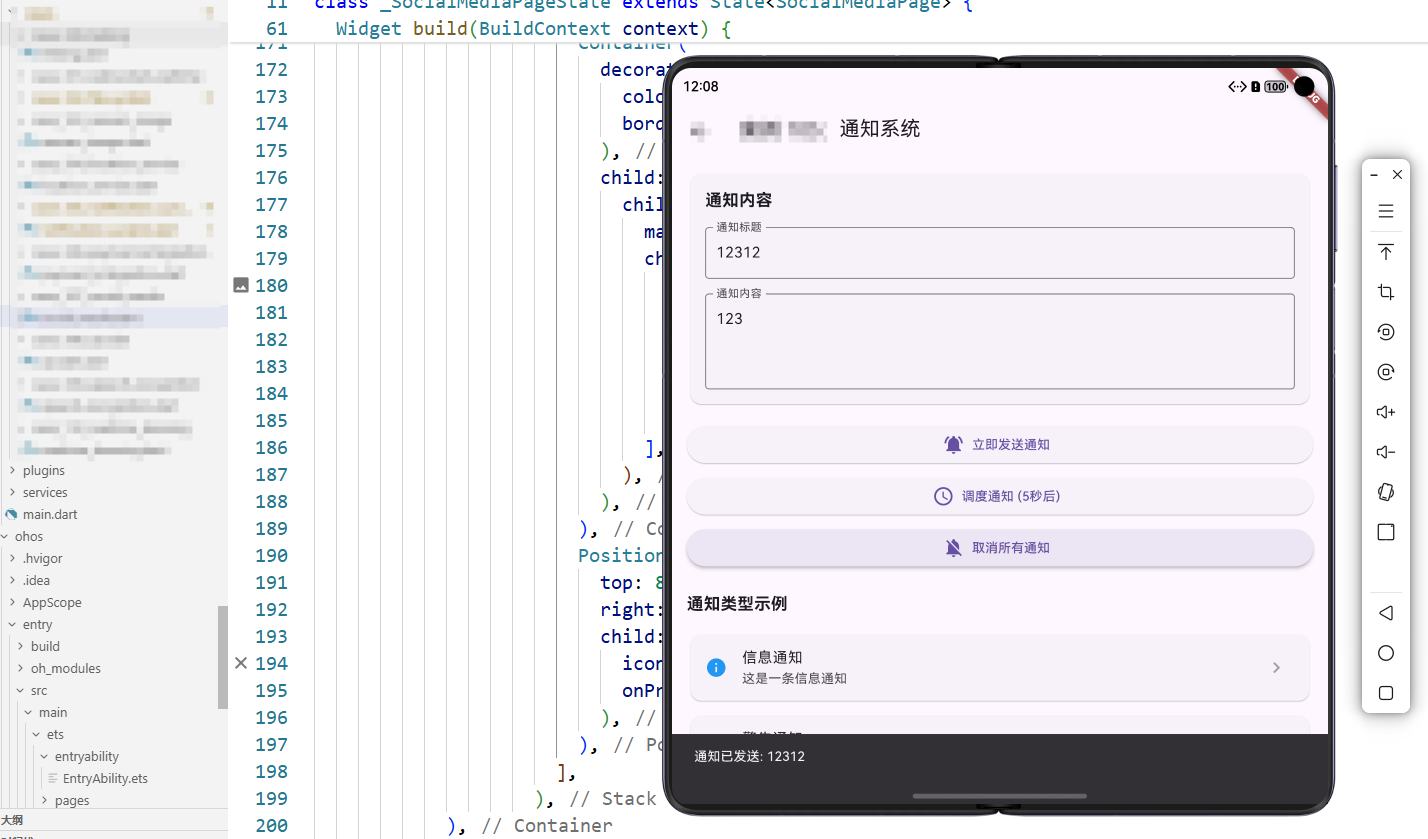
通知系统的核心是创建和显示通知,以及管理通知的生命周期。Flutter 提供了 flutter_local_notifications 插件来实现本地通知功能,支持 Android、iOS 和桌面平台。通知可以包含标题、内容、图标、声音、振动、操作按钮等元素。
状态管理
class _NotificationSystemPageState extends State<NotificationSystemPage> {
  final TextEditingController _titleController = TextEditingController();
  final TextEditingController _bodyController = TextEditingController();
  int _notificationId = 0;
}
代码解释: 这里定义了通知系统的状态管理。_titleController 和 _bodyController 是文本输入控制器,用于获取用户输入的通知标题和内容。_notificationId 是通知 ID,每个通知都需要唯一的 ID,用于管理通知(更新、取消等)。通知 ID 通常是递增的整数,确保每个通知都有唯一标识。这种状态管理方式简单直观,便于用户输入通知内容和管理通知。
二、本地通知实现
显示本地通知
Future<void> _showLocalNotification() async {
  if (_titleController.text.isEmpty || _bodyController.text.isEmpty) {
    ScaffoldMessenger.of(context).showSnackBar(
      const SnackBar(content: Text('请输入标题和内容')),
    );
    return;
  }

  // 在实际应用中,这里应该使用通知插件:
  // final FlutterLocalNotificationsPlugin flutterLocalNotificationsPlugin =
  //     FlutterLocalNotificationsPlugin();
  // const AndroidNotificationDetails androidPlatformChannelSpecifics =
  //     AndroidNotificationDetails(
  //   'your channel id',
  //   'your channel name',
  //   importance: Importance.max,
  //   priority: Priority.high,
  // );
  // const NotificationDetails platformChannelSpecifics =
  //     NotificationDetails(android: androidPlatformChannelSpecifics);
  // await flutterLocalNotificationsPlugin.show(
  //   _notificationId++,
  //   _titleController.text,
  //   _bodyController.text,
  //   platformChannelSpecifics,
  // );

  ScaffoldMessenger.of(context).showSnackBar(
    SnackBar(
      content: Text('通知已发送: ${_titleController.text}'),
      duration: const Duration(seconds: 2),
    ),
  );
}
代码解释: _showLocalNotification 方法用于显示本地通知。首先验证通知标题和内容是否为空,如果为空则显示提示信息并返回。在实际应用中,应该初始化 FlutterLocalNotificationsPlugin 插件,配置通知渠道(Android)或通知设置(iOS),然后调用 show 方法显示通知。show 方法需要通知 ID、标题、内容和平台特定的通知详情。通知渠道用于对通知进行分类管理,不同的渠道可以设置不同的重要性、声音、振动等。这种设计使得用户可以按照渠道管理通知,提升用户体验。
三、定时通知实现
调度通知
Future<void> _scheduleNotification() async {
  if (_titleController.text.isEmpty || _bodyController.text.isEmpty) {
    ScaffoldMessenger.of(context).showSnackBar(
      const SnackBar(content: Text('请输入标题和内容')),
    );
    return;
  }

  // 在实际应用中,这里应该调度通知:
  // await flutterLocalNotificationsPlugin.zonedSchedule(
  //   _notificationId++,
  //   _titleController.text,
  //   _bodyController.text,
  //   tz.TZDateTime.now(tz.local).add(const Duration(seconds: 5)),
  //   platformChannelSpecifics,
  //   uiLocalNotificationDateInterpretation:
  //       UILocalNotificationDateInterpretation.absoluteTime,
  // );

  ScaffoldMessenger.of(context).showSnackBar(
    const SnackBar(content: Text('通知已调度,将在5秒后显示')),
  );
}
代码解释: _scheduleNotification 方法用于调度定时通知。与即时通知类似,先验证输入内容,然后调用 zonedSchedule 方法调度通知。zonedSchedule 方法需要指定通知的触发时间,这里使用 TZDateTime.now(tz.local).add(Duration(seconds: 5)) 表示 5 秒后触发。时区处理很重要,应该使用 tz 包处理时区,确保定时通知在正确的时区触发。这种功能适用于提醒、闹钟、定时任务等场景。
四、Flutter 桥接 OpenHarmony 原理与 EntryAbility.ets 实现
通知系统在 OpenHarmony 平台上需要与系统的通知服务、权限管理、通知渠道管理等功能进行桥接。虽然基本的通知功能可以在 Flutter 插件中实现,但通知权限、通知渠道配置、系统通知样式等功能需要通过 Platform Channel 与 OpenHarmony 系统交互。
Flutter 桥接 OpenHarmony 的架构原理
Flutter 与 OpenHarmony 的桥接基于 Platform Channel 机制。对于通知系统,虽然可以使用 Flutter 插件显示通知,但某些系统级功能(如通知权限、通知渠道配置、系统通知样式等)需要通过 Platform Channel 调用 OpenHarmony 的原生能力。
通知权限桥接: OpenHarmony 使用基于权限的安全模型,应用需要声明和请求通知权限。通过 Platform Channel,可以检查权限状态、请求权限、处理权限回调。这种桥接机制确保了应用能够显示通知,同时遵循系统的安全策略。
EntryAbility.ets 中的通知权限桥接配置
import { FlutterAbility, FlutterEngine } from '@ohos/flutter_ohos';
import { GeneratedPluginRegistrant } from '../plugins/GeneratedPluginRegistrant';
import { MethodChannel } from '@ohos/flutter_ohos';
import { notificationManager } from '@kit.NotificationKit';
import { abilityAccessCtrl } from '@kit.AbilityKit';

export default class EntryAbility extends FlutterAbility {
  private _notificationChannel: MethodChannel | null = null;

  configureFlutterEngine(flutterEngine: FlutterEngine) {
    super.configureFlutterEngine(flutterEngine)
    GeneratedPluginRegistrant.registerWith(flutterEngine)
    this._setupNotificationBridge(flutterEngine)
  }

  private _setupNotificationBridge(flutterEngine: FlutterEngine) {
    this._notificationChannel = new MethodChannel(
      flutterEngine.dartExecutor,
      'com.example.app/notification'
    );

    this._notificationChannel.setMethodCallHandler(async (call, result) => {
      if (call.method === 'requestNotificationPermission') {
        try {
          const context = this.context;
          const atManager = abilityAccessCtrl.createAtManager();
          const permission: abilityAccessCtrl.Permissions = 'ohos.permission.NOTIFICATION_CONTROLLER';

          const grantStatus = await atManager.requestPermissionsFromUser(
            context,
            [permission]
          );

          result.success(grantStatus.authResults[0] === 0);
        } catch (e) {
          result.error('PERMISSION_ERROR', e.message, null);
        }
      } else if (call.method === 'showNotification') {
        try {
          const title = call.arguments['title'] as string;
          const content = call.arguments['content'] as string;

          const wantAgentInfo: notificationManager.WantAgentInfo = {
            wants: [],
            operationType: notificationManager.OperationType.START_ABILITY,
            requestCode: 0,
            wantAgentFlags: [notificationManager.WantAgentFlags.UPDATE_PRESENT_FLAG]
          };

          const notificationRequest: notificationManager.NotificationRequest = {
            content: {
              contentType: notificationManager.ContentType.NOTIFICATION_CONTENT_BASIC_TEXT,
              normal: {
                title: title,
                text: content
              }
            },
            id: 0,
            slotType: notificationManager.SlotType.NOTIFICATION_CONTENT_BASIC_TEXT
          };

          await notificationManager.publishNotification(notificationRequest);
          result.success(true);
        } catch (e) {
          result.error('NOTIFICATION_ERROR', e.message, null);
        }
      } else {
        result.notImplemented();
      }
    });
  }
}
代码解释: _setupNotificationBridge 方法设置通知系统桥接。requestNotificationPermission 方法请求通知权限,使用 OpenHarmony 的权限管理 API。showNotification 方法显示通知,使用 OpenHarmony 的通知服务 API notificationManager.publishNotification。通知请求包含内容、ID、类型等信息,可以配置通知样式、操作按钮、点击行为等。这种桥接机制使得 Flutter 应用可以充分利用 OpenHarmony 平台的通知能力,提供丰富的通知体验。
Flutter 端通知服务封装
在 Flutter 端,可以通过 Platform Channel 封装通知服务:
class NotificationService {
  static const _notificationChannel = MethodChannel('com.example.app/notification');

  static Future<bool> requestPermission() async {
    try {
      final granted = await _notificationChannel.invokeMethod('requestNotificationPermission');
      return granted as bool;
    } catch (e) {
      return false;
    }
  }

  static Future<bool> showNotification(String title, String content) async {
    try {
      final result = await _notificationChannel.invokeMethod('showNotification', {
        'title': title,
        'content': content
      });
      return result as bool;
    } catch (e) {
      return false;
    }
  }
}
代码解释: Flutter 端通过 MethodChannel 封装通知服务。requestPermission 方法请求通知权限,showNotification 方法显示通知。这种封装提供了简洁的 API,隐藏了 Platform Channel 的实现细节,便于在应用中调用。错误处理确保通知失败时能够向用户显示友好的错误信息。
通知渠道管理桥接
OpenHarmony 支持通知渠道管理,可以通过桥接配置:
channel.setMethodCallHandler(async (call, result) => {
  if (call.method === 'createNotificationChannel') {
    try {
      const channelId = call.arguments['channelId'] as string;
      const channelName = call.arguments['channelName'] as string;

      const notificationSlot: notificationManager.NotificationSlot = {
        type: notificationManager.SlotType.NOTIFICATION_CONTENT_BASIC_TEXT,
        level: notificationManager.SlotLevel.DEFAULT,
        name: channelName,
        enableBadge: true,
        enableVibration: true,
        enableLight: true
      };

      await notificationManager.addNotificationSlot(notificationSlot);
      result.success(true);
    } catch (e) {
      result.error('CHANNEL_ERROR', e.message, null);
    }
  } else {
    result.notImplemented();
  }
});
代码解释: OpenHarmony 端提供通知渠道管理功能,可以为不同类型的通知创建不同的渠道。每个渠道可以设置声音、振动、指示灯、角标等属性,用户可以在系统设置中按渠道管理通知。这种机制使得应用可以更好地管理通知,提升用户体验。
五、通知系统最佳实践
通知分类
应该按照通知的重要性对通知进行分类,使用不同的通知渠道。重要通知使用高优先级渠道,普通通知使用默认优先级渠道。这样用户可以按照需要管理不同类型的通知。
通知内容
通知标题应该简洁明了,能够快速传达核心信息。通知内容应该包含足够的信息,但不要过长,避免在通知栏中显示不完整。可以使用展开样式显示更多内容。
通知操作
可以为通知添加操作按钮,让用户在不打开应用的情况下执行操作。例如,消息通知可以添加"回复"按钮,任务通知可以添加"完成"按钮。操作按钮应该简洁明了,符合用户的操作习惯。
通知权限
通知权限是敏感权限,应该在需要时才请求,并且要向用户说明为什么需要通知权限。应该检查权限状态,如果已授予则直接使用,如果未授予则请求权限。
总结
通知系统是现代应用的重要功能,它能够及时地将重要信息传达给用户。通过掌握本地通知、定时通知、通知管理等技术,我们可以构建完善的通知系统应用。在 OpenHarmony PC 端,充分利用权限管理、通知渠道配置等平台特性,可以实现丰富的通知体验。同时,要注意通知分类、通知内容、通知操作等问题,确保通知系统在不同场景下都能提供良好的用户体验。
通知系统不仅仅是技术实现,更是用户体验设计的重要组成部分。一个设计良好的通知系统可以让用户感受到应用的专业性和对细节的关注。通过不断学习和实践,我们可以掌握更多通知系统技术,创建出更加优秀的应用体验。

开源鸿蒙跨平台开发社区汇聚开发者与厂商,共建“一次开发,多端部署”的开源生态,致力于降低跨端开发门槛,推动万物智联创新。
更多推荐
 9
9 0
0- 0


 已为社区贡献14条内容

所有评论(0)