android 修改applicationid 不能运行问题_超过百万的StackOverflow Flutter 问题第二期
老孟导读:一个月前分享的《超过百万的StackOverflow Flutter 问题-第一期》受到很多朋友的喜欢,非常感谢大家的支持,在文章末尾有第一期的链接,希望此文能对你有所帮助。No connected devices这个问题估计大部分都遇到过,解决方法如下:执行flutter doctorDoctor summary (to see all details, run flutte...

老孟导读:一个月前分享的《超过百万的StackOverflow Flutter 问题-第一期》受到很多朋友的喜欢,非常感谢大家的支持,在文章末尾有第一期的链接,希望此文能对你有所帮助。
No connected devices
这个问题估计大部分都遇到过,解决方法如下:
执行flutter doctor
Doctor summary (to see all details, run flutter doctor -v):[✓] Flutter (Channel stable, v1.12.13+hotfix.9, on Mac OS X 10.14.6 18G1012, locale zh-Hans-CN) [!] Android toolchain - develop for Android devices (Android SDK version 29.0.2) ! Some Android licenses not accepted. To resolve this, run: flutter doctor --android-licenses[✓] Xcode - develop for iOS and macOS (Xcode 11.3.1)[✓] Android Studio (version 3.5)[✓] Connected device (1 available)! Doctor found issues in 1 category.保证没有红色的叉。
启动手机或者模拟器(Android系统大于16),开启USB 调试模式,不同手机开启方法略有不同,以华为手机为例:进入设置->系统->关于手机,快速连续点击版本号5次,提示打开开发者模式,返回设置,此时会出现开发人员选项菜单,进入,打开开发人员选项和USB 调试,弹出授权菜单,同意即可。
打开Android Studio,查看连接的手机:
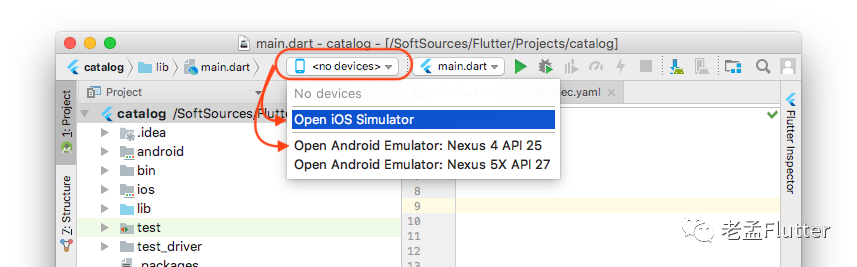
如果依然无法连接手机,打开Android Studio设置界面:
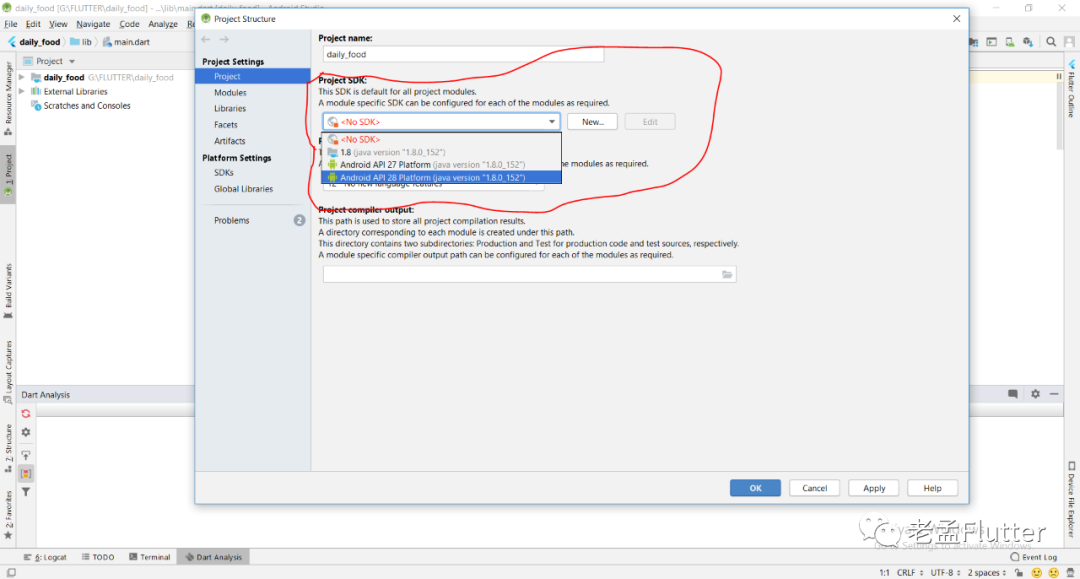
选择最近的API。
到此基本就可以解决了,如果还无法连接,那基本就是adb的问题,很可能是adb端口被占用,关于adb的解决方案可百度,引起adb问题有很多种情况。
创建Toast提示
在Material Design设计规范中Snackbars就是Toast提示,Snackbar用法如下:
Scaffold.of(context).showSnackBar(SnackBar( content: Text("Sending Message"), ));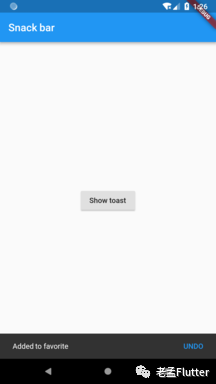
这个效果在国内来不是很接受,所以一般使用第三方插件fluttertoast
Fluttertoast.showToast( msg: "This is Toast messaget", toastLength: Toast.LENGTH_SHORT, gravity: ToastGravity.CENTER, timeInSecForIos: 1 );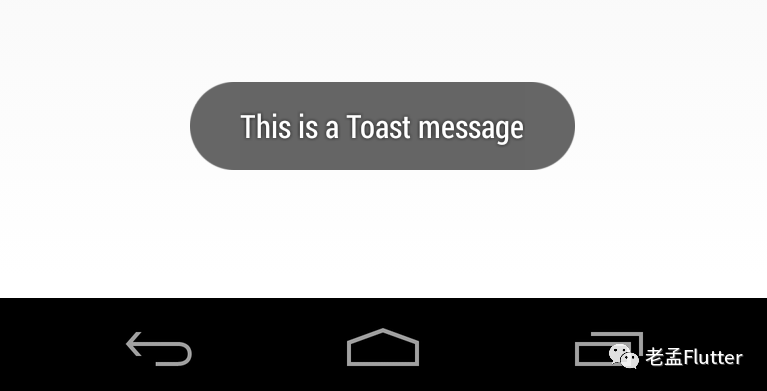
创建一个圆角Button
创建圆角Button的方式有很多种,下面介绍几种简单的:
使用 FlatButton 和 RaisedButton
shape: RoundedRectangleBorder( borderRadius: BorderRadius.circular(18.0), side: BorderSide(color: Colors.red)),
使用ClipRRect
ClipRRect( borderRadius: BorderRadius.circular(40), child: RaisedButton( onPressed: () {}, child: Text("Button"), ),)使用ButtonTheme
ButtonTheme( shape: RoundedRectangleBorder(borderRadius: BorderRadius.circular(20)), child: RaisedButton( onPressed: () {}, child: Text("Button"), ),)添加启动页
Flutter应用程序启动时会出现一段时间的白屏,因为程序要启动引擎,所以App第一次启动比较慢,在原生端会显示一段时间的白色启动页,我们把这个白色启动页做为应用程序的启动页,替换为自己的图片,此方案的启动页只能是一张图片,无法交互,如果需要启动页有交互效果建议使用Flutter做。
Android端替换启动页图片,打开android/app/src/main/res/drawable/launch_background.xml文件,效果如下:
<?xml version="1.0" encoding="utf-8"?><layer-list xmlns:android="http://schemas.android.com/apk/res/android"> <item android:drawable="@android:color/white" /> layer-list>修改为:
<?xml version="1.0" encoding="utf-8"?><layer-list xmlns:android="http://schemas.android.com/apk/res/android"> <item> <bitmap android:gravity="center" android:src="@drawable/splash" /> item>layer-list>将splash.png图片拷贝到drawable文件夹下。
修改应用程序的包名/BundleIdentifier
Android平台上打开android/app/build.gradle:
defaultConfig { applicationId "com.example.fluttersample" minSdkVersion 16 targetSdkVersion 28 versionCode flutterVersionCode.toInteger() versionName flutterVersionName testInstrumentationRunner "android.support.test.runner.AndroidJUnitRunner"}修改applicationId属性即可。
iOS平台打开ios/Runner/Info.plist,修改CFBundleIdentifier的值:
<key>CFBundleIdentifierkey> <string>$(PRODUCT_BUNDLE_IDENTIFIER)string>如何给一个控件添加边框
new Container( margin: const EdgeInsets.all(15.0), padding: const EdgeInsets.all(3.0), decoration: BoxDecoration( border: Border.all(color: Colors.blueAccent) ), child: Text("My Awesome Border"),)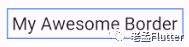
让Button充满父组件
SizedBox.expand( child: RaisedButton(...),)或者
SizedBox( width: double.infinity, // height: double.infinity, child: RaisedButton(...),)或者
ConstrainedBox( constraints: const BoxConstraints(minWidth: double.infinity), child: RaisedButton(...),)或者
ButtonTheme( minWidth: double.infinity, child: MaterialButton( onPressed: () {}, child: Text('Raised Button'), ),),如何在Column中添加ListView
给ListView指定高度:
Column( children: [ Container( height: 50, child: ListView(), ) ],)或者铺满Column:
Column( children: [ Expanded( child: horizontalList, ) ],);如何给图片添加圆角
ClipRRect( borderRadius: BorderRadius.circular(8.0), child: Image.network( '', ),)或者
CircleAvatar( radius: 20, backgroundImage: NetworkImage('https://via.placeholder.com/140x100'))或者
ClipOval( child: Image.network( "image_url", height: 100, width: 100, fit: BoxFit.cover, ),),或者
Container( width: 100.0, height: 150.0, decoration: BoxDecoration( image: DecorationImage( fit: BoxFit.cover, image: NetworkImage('Path to your image') ), borderRadius: BorderRadius.all(Radius.circular(8.0)), color: Colors.redAccent, ),如何去掉TextField的下划线
InputDecoration( border: InputBorder.none, hintText: 'Username', ),),如果防止UI随着手机的旋转而在横竖屏间切换
设置支持的方向:
class MyApp extends StatelessWidget { @override Widget build(BuildContext context) { SystemChrome.setPreferredOrientations([ DeviceOrientation.portraitUp, DeviceOrientation.portraitDown, ]); return new MaterialApp(...); } }打开ios/Runner/Info.plist,设置支持的方向:
<array> <string>UIInterfaceOrientationPortraitstring>array>显示/隐藏控件
使用Opacity
Opacity( opacity: .0, child: ,)或者
Visibility( visible: false, child: ,)或者
Offstage( offstage: true, child: ,)如何截取Android的返回按键并处理
使用WillPopScope
@overrideWidget build(BuildContext context) { return new WillPopScope( onWillPop: () async => false, child: new Scaffold( appBar: new AppBar( title: new Text("data"), leading: new IconButton( icon: new Icon(Icons.ac_unit), onPressed: () => Navigator.of(context).pop(), ), ), ), );}如何设置RaisedButton控件的width
ButtonTheme( minWidth: 200.0, height: 100.0, child: RaisedButton( onPressed: () {}, child: Text("test"), ),);或者
SizedBox( width: 100, // specific value child: RaisedButton(...))设置AppBar的height
使用PreferredSize:
class MyApp extends StatelessWidget { @override Widget build(BuildContext context) { return MaterialApp( title: 'Example', home: Scaffold( appBar: PreferredSize( preferredSize: Size.fromHeight(50.0), // here the desired height child: AppBar( // ... ) ), body: // ... ) ); }}如何格式化时间
Dart API本身没有格式化时间的接口,使用intl:
import 'package:intl/intl.dart';DateTime now = DateTime.now();String formattedDate = DateFormat('yyyy-MM-dd – kk:mm').format(now);通过List绘制一组控件
Widget getTextWidgets(List strings) { Listlist = new List(); for(var i = 0; i < strings.length; i++){ list.add(new Text(strings[i])); } return new Row(children: list); }或者
Row(children: strings.map((item) => new Text(item)).toList())或者
var list = ["one", "two", "three", "four"]; child: Column( mainAxisAlignment: MainAxisAlignment.center, children: [ for(var item in list ) Text(item) ], ), 如何设置GridView中组件的height
使用childAspectRatio,设置如下:
class MyHomePage extends StatefulWidget { MyHomePage({Key key, this.title}) : super(key: key); final String title; @override _MyHomePageState createState() => new _MyHomePageState();}class _MyHomePageState extends State<MyHomePage> { List widgetList = ['A', 'B', 'C']; @override Widget build(BuildContext context) { var size = MediaQuery.of(context).size; /*24 is for notification bar on Android*/ final double itemHeight = (size.height - kToolbarHeight - 24) / 2; final double itemWidth = size.width / 2; return new Scaffold( appBar: new AppBar( title: new Text(widget.title), ), body: new Container( child: new GridView.count( crossAxisCount: 2, childAspectRatio: (itemWidth / itemHeight), controller: new ScrollController(keepScrollOffset: false), shrinkWrap: true, scrollDirection: Axis.vertical, children: widgetList.map((String value) { return new Container( color: Colors.green, margin: new EdgeInsets.all(1.0), child: new Center( child: new Text( value, style: new TextStyle( fontSize: 50.0, color: Colors.white, ), ), ), ); }).toList(), ), ), ); }}如何修改状态条颜色
使用flutter_statusbarcolor
import 'package:flutter_statusbarcolor/flutter_statusbarcolor.dart';void main() => runApp(new MyApp());class MyApp extends StatelessWidget { @override Widget build(BuildContext context) { FlutterStatusbarcolor.setStatusBarColor(Colors.white); return MaterialApp( title: app_title, theme: ThemeData( primarySwatch: Colors.blue, ), home: HomePage(title: home_title), ); }}或者
SystemChrome.setSystemUIOverlayStyle(SystemUiOverlayStyle( statusBarColor: Colors.white));Column的子控件底部居中,左对齐
return Column( crossAxisAlignment: CrossAxisAlignment.center, mainAxisSize: MainAxisSize.max, mainAxisAlignment: MainAxisAlignment.end, children: [ //your elements here ],); 你可能还喜欢
-
超过百万的StackOverflow Flutter 问题
-
Flutter 首页必用组件NestedScrollView
-
Flutter 吐血整理组件继承关系图
 关注「老孟Flutter」让你每天进步一点点
 戳我,赠送250+Flutter控件详细说明。

开源鸿蒙跨平台开发社区汇聚开发者与厂商,共建“一次开发,多端部署”的开源生态,致力于降低跨端开发门槛,推动万物智联创新。
更多推荐
 0
0 0
0- 0


 已为社区贡献1条内容

所有评论(0)