ReactNative遇到的深坑和搭建项目建构
·
ReactNative遇到的深坑和搭建项目建构
1.导读
- 在搭建
React Native的途中真的是遇到太多问题了 - 。。。这里记录一下
- 使用的操作系统是
Macos Monterey - 可以直接克隆我的仓库 修改成自己的架构
- 仓库地址
- 已经集成了
- antd/react-native
- dva
- axios
- react-native-config (区分开发环境)
- eslint
- typescript
- reactnavigation (路由导航)
2.bug汇总
- 先进行下一步,遇到问题再回来看看
# 搭建环境下载依赖一直失败
https://www.react-native.cn/docs/environment-setup
# yarn ios 运行模拟器时候没有 app
// 需要给权限
sudo chown -R eternallycyf ~/react_native_project
chmod 777 RN
# 运行报错
// 端口在运行了 杀下端口

# react native debugger 显示一片空白
// react-devtools 版本冲突 请卸载全局 react-devtools
// 并按照react native debugger 页面提示的版本 安装
// npm i -g react-devtools@^4.13.0
// github 有 issue
# react native debugger 网络请求不显示
// 他这个需要先手动 在 element页面 右键点击 enable network 开启

# npm加入其他包的时候请重新 pod install 或者直接重新运行打包

# react-native-config ios配置成功 安卓config是一个空对象或者一个杂乱的对象
// 请确定
// 1. android/app/build.gradle 设置了 resValue "string", "build_config_package", "com.rn"
//                                   (他的值不是固定的 是另一个文件里的字段)
// 2. android/app/src/main/AndroidManifest.xml <manifest package="com.rn">
// 其实这个就在npm首页有写 当时我也没有看到 找了很久 。。。
3.准备阶段
基本环境的安装
npx react-native init AwesomeProject
npx react-native init RN --template react-native-template-typescript
yarn android
yarn ios
# 具体流程: 参考官网
// 按着官网的先一部一部来 把基础必备的东西先装了
// 例如: Xcode Watchman Node CocoaPods
https://www.react-native.cn/docs/environment-setup
# 安装过程中遇到的问题: 指定镜像(必须 或者自己代理)
// 参考这篇文章 基本解决的搭建环境的所有问题
https://www.jianshu.com/p/412d760bcacd
Android模拟器
- 这里就不提这个了
- 按照官网一步一步操作 && 有一个梯子 不然下载应用网站打不开 或者找第三方的地方下载
- 其次 配置环境变量时
open ~/.bash_profile或open ~/.zshrc打不开- 可能是自己电脑之前配置有问题
- 用这个命令打开
open -e ~/.bash_profile
调试
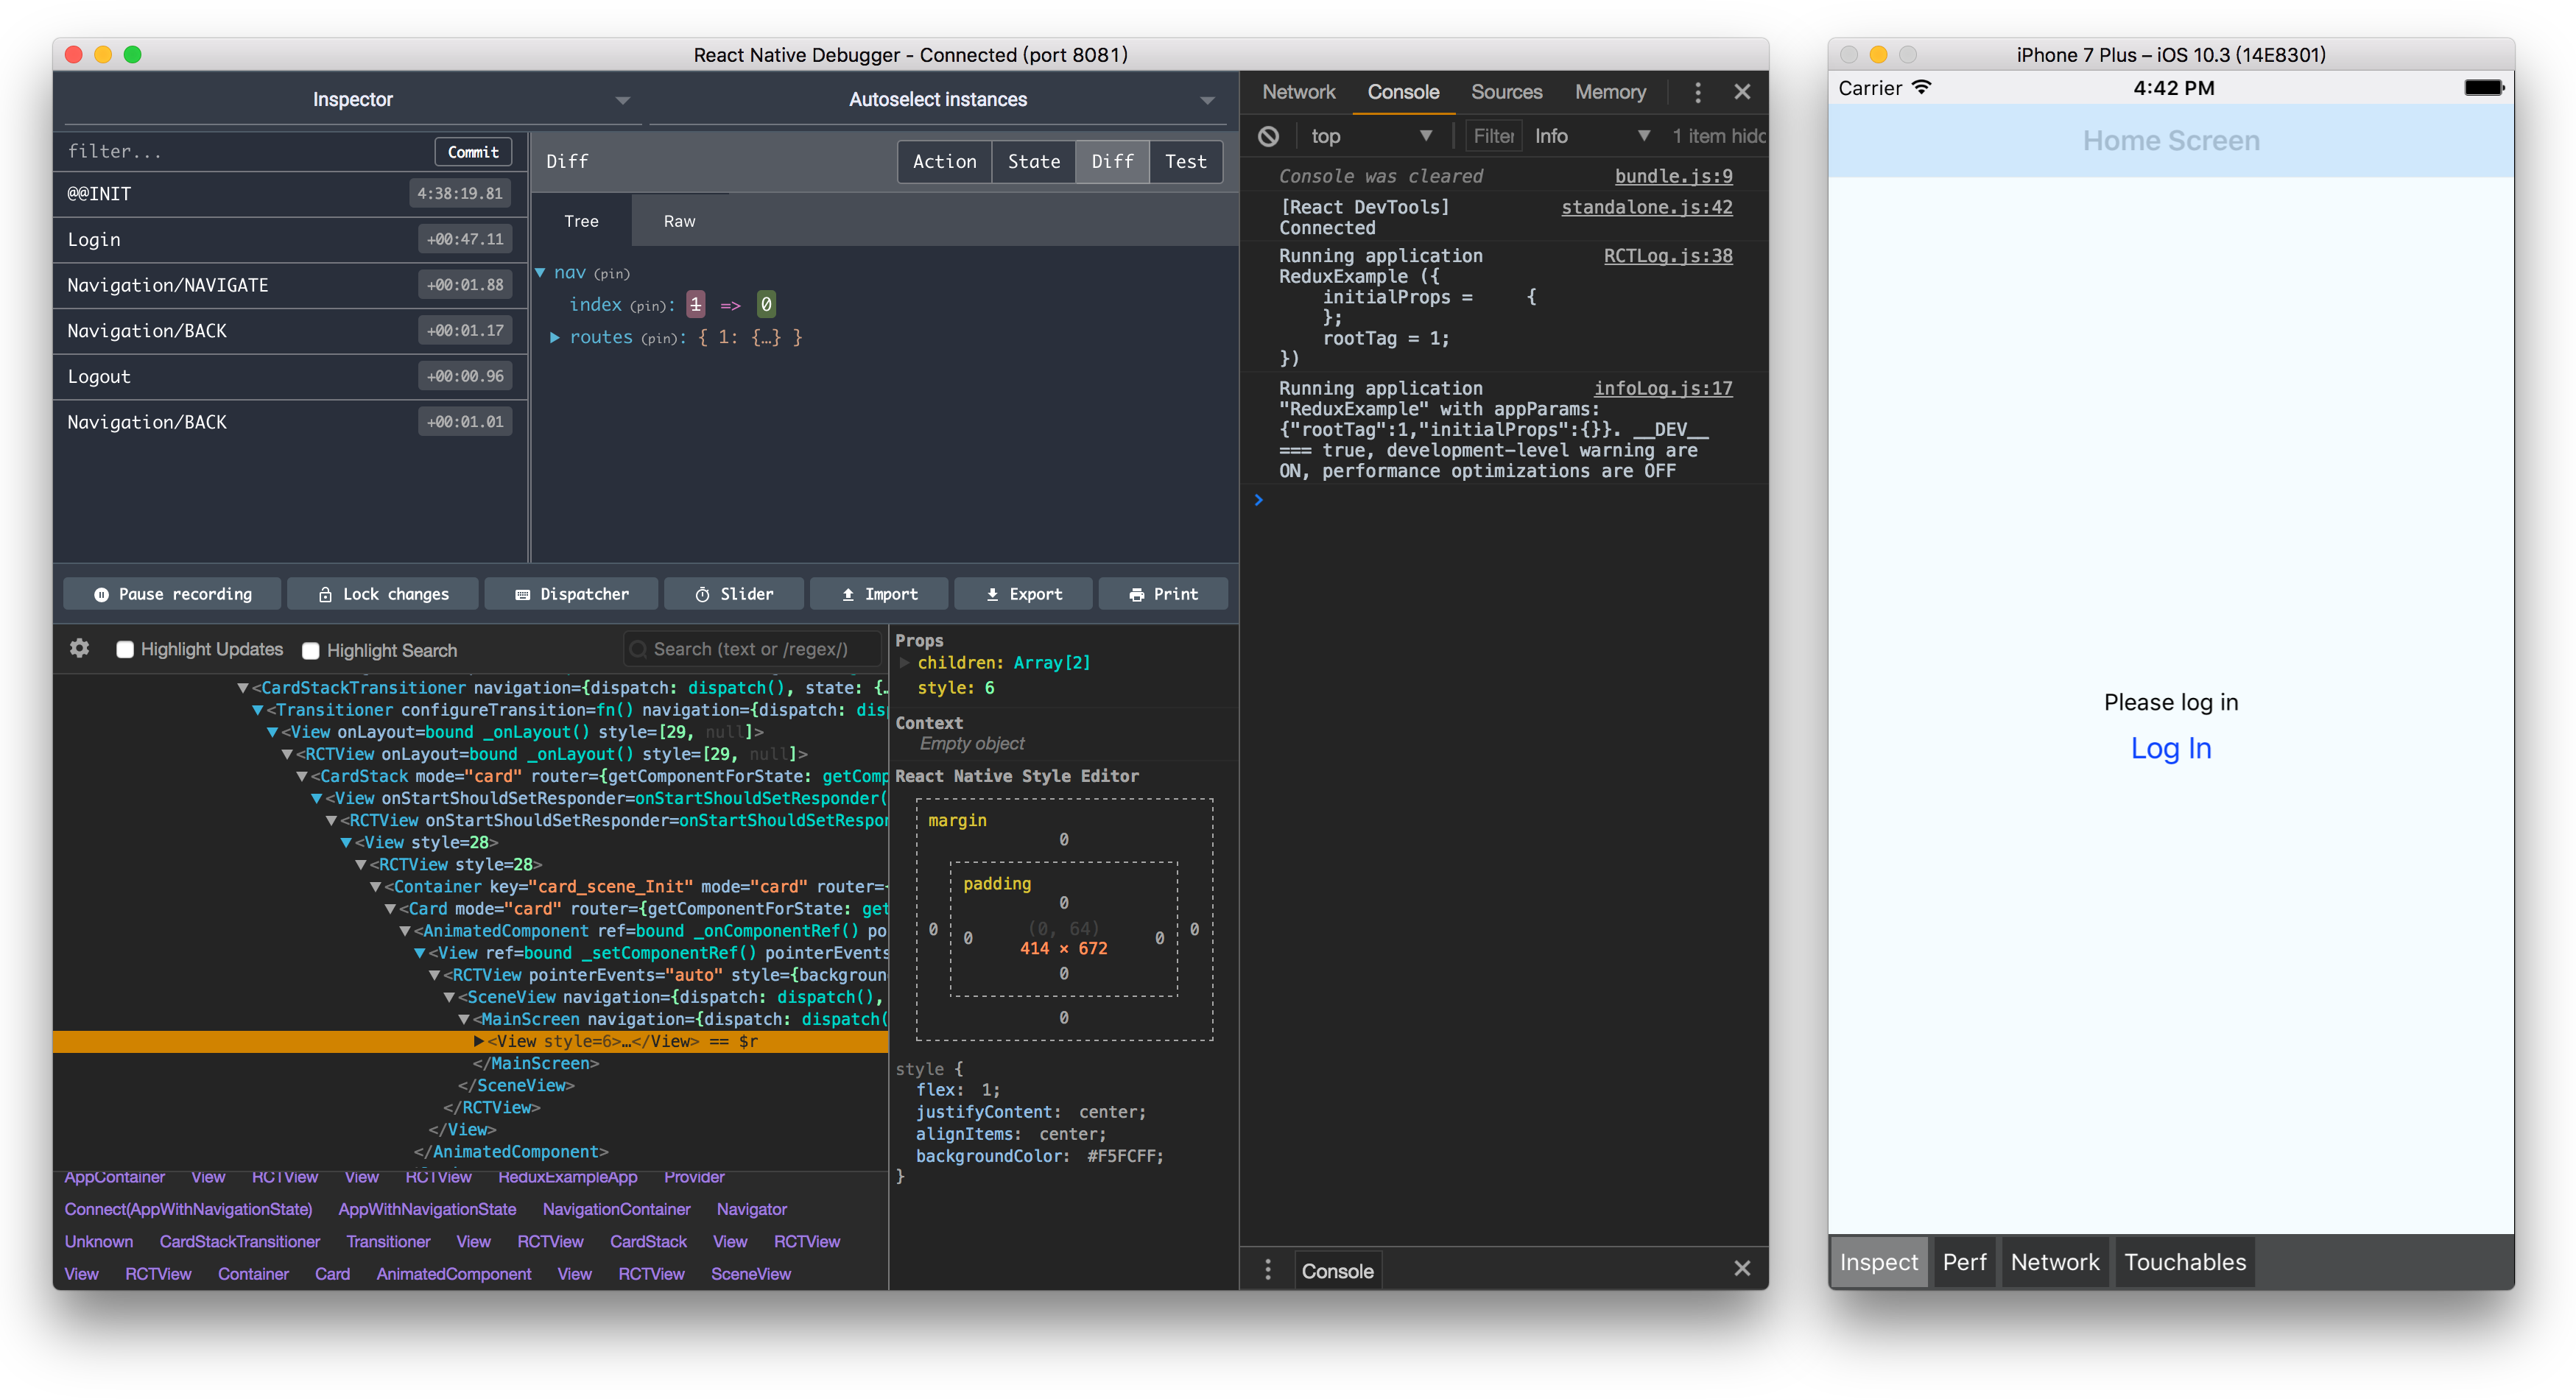
我的方案
- 我这里最终搭建的体系是采用
react-native-debugger和ios模拟器结合react-native-debugger 集成了 console.log network redux调试工具等功能ios模拟器 支持提示错误 元素审查 等功能- 基本满足调试的所有需要了
# brew install --cask react-native-debugger
然后直接打开应用就行 // 注意他直接是一个应用 不是直接运行在浏览器的
调试如何使用
在调试中遇到的bug我统一放在第二章说明了,有问题话往前翻
- 刷新模拟器:两种方法
- 1.按两下
R || r快速刷新 - 2.手动在模拟器操作
ios: command+R || command+D => reloadandroid: command + m reload(模拟器在 应用=> avd => manager里面)
- 1.按两下
- 审查元素
commend+dshow Inspector- 点击元素
console.log- 1.直接使用
react-native-debugger调试工具console.log界面就能看到了 - 2.运行模拟器的终端
- 3.
command+DDebug with Chrome- 切换到
console界面 - 将
top切换为debug...
- 1.直接使用
- 网络请求
react native debugger- 在
Element页面 右键开启enable network - 然后在
network页面刷新就能看到网络请求了
redux|dva- 在
react native debugger页面就能看到了
- 在
其他调试方案单独步骤
如果按照react-native-debugger方案,不需要看这里的内容,直接跳过
ts语法提示
npm install --save @types/react-native
// 根目录构建tsconfig.json文件
{
  "compilerOptions": {
    "allowJs": true,
    "allowSyntheticDefaultImports": true,
    "esModuleInterop": true,
    "isolatedModules": true,
    "jsx": "react",
    "lib": [
      "es6"
    ],
    "moduleResolution": "node",
    "noEmit": true,
    "strict": true,
    "target": "esnext"
  },
  "exclude": [
    "node_modules",
    "babel.config.js",
    "metro.config.js",
    "jest.config.js"
  ]
}
网络请求
// vscode 安装 react native tools 插件
// 打开vscode开发者工具 就可以看到网络请求了
react调试工具
// npm i -g react-devtools@^4.13.0
// 终端输入命令 react-devtools
// 在模拟器刷新后 react-devtools 就有内容了
目录结构
__tests__
.bundle
android
ios
node_modules
.buckconfig
.flowconfig
.ruby-version
.watchmanconfig
App.js
app.json
babel.config.js
Gemfile
Gemfile.lock
index.js
metro.config.js
package.json
4. 插件集成
dva
yarn add dva-core-ts react-redux @types/react-redux
// 随后引入dva就可以了
import {create, Model} from 'dva-core-ts';
import createLoading from 'dva-loading-ts';
import models from '@/models/index';
import '@/config/http';
import home, {HomeModelType} from '@/models/home';
import {Animated} from 'react-native';

const modelExtend = require('dva-model-extend').default;

// 1.创建实例
const app = create({
  onError: function(e) {
    console.log('e', e);
  },
});
// 2.加载model对象
models.forEach(model => {
  app.model(model);
});

app.use(createLoading());

// 3.启动dva
app.start();
// 4.导出dva的数据
export default app._store;

interface Cached {
  [key: string]: number;
}

const cached: Cached = {
  home: 1,
};
function registerModel(model: Model) {
  if (!cached[model.namespace]) {
    app.model(model);
    cached[model.namespace] = 1;
  }
}

export function createModel(namespace: string) {
  const model: HomeModelType = modelExtend(home, {
    namespace,
    state: {
      scrollValue: new Animated.Value(0),
    },
  });
  registerModel(model);
}
react-native-config
// 区分多环境 需要重新打包
yarn add react-native-config
# 配置 参考Npm官网就可以了
// 如果 ios 可以显示 , android 打印结果为空对象或者一个对象里有一堆无关的数据
// 请确定自己正确配置了 resValue  这个值是另一个文件中的变量
// 这里的 bug 解决方式放在最前面了
...
npx react-native link react-native-config
# 根目录新建 .env
API_URL=https://myapi.com
# App.tsx
import Config from 'react-native-config'
babel-plugin-module-resolve
yarn add babel-plugin-module-resolver
# babel.config.js
module.exports = {
  presets: ['module:metro-react-native-babel-preset'],
  plugins: [
    [
      'module-resolver',
      {
        root: ['./src'],
        alias: {
          '@/utils': './src/utils',
          '@/pages': './src/pages',
          '@/navigator': './src/navigator',
          '@/models': './src/models',
          '@/config': './src/config',
          '@/components': './src/components',
          '@/assets': './src/assets',
        },
      },
    ],
  ],
};
# tsconfig.json
 "baseUrl": "./src",
 "paths": {
      "@/assets/*": ["assets/*"],
      "@/components/*": ["components/*"],
      "@/config/*": ["config/*"],
      "@/models/*": ["models/*"],
      "@/navigator/*": ["navigator/*"],
      "@/pages/*": ["pages/*"],
      "@/utils/*": ["utils/*"]
 },
antd/reactNative
import { View, Text, Button } from "react-native"
import { Icon } from '@ant-design/react-native';
React Navigation
这个直接参考官方文档就可以了 我没有遇到什么问题
只是有些API有版本问题
5. 参考链接

开源鸿蒙跨平台开发社区汇聚开发者与厂商,共建“一次开发,多端部署”的开源生态,致力于降低跨端开发门槛,推动万物智联创新。
更多推荐
 0
0 0
0- 0


 已为社区贡献1条内容

所有评论(0)