ReactNative进阶(十):WebView 应用详解_react native webview
2.2 加载 html 代码2.3 RN -> HTML5 通信当加载时,可实现和之间的通信。向发送数据可以通过函数实现。如下:RNhtml在中定义一个按钮,并添加事件向发送数据:当中调用了函数后,的函数将会被回调,用来处理向发送的数据,可以通过获取发送过来的数据。2.4 HTML5(Vue) -> RN 通信HTML5RN还是通过提供的 属性完成回调。回调函数实现逻辑如下:正式学习前端大概 3
onLoadStart:当网页开始加载的时候调用。onError:当网页加载失败的时候调用。onLoad:当网页加载结束的时候调用。onLoadEnd:当网页加载结束调用,不管是成功还是失败。renderLoading:WebView组件正在渲染页面时触发的函数,只有startInLoadingState为true时该函数才起作用。renderError:监听渲染页面出错回调函数。onShouldStartLoadWithRequest(仅iOS):该方法允许拦截WebView加载的 URL 地址,进行自定义处理。该方法通过返回true或者false来决定是否继续加载该拦截到请求。onMessage:在webView内部网页中,调用window.postMessage可以触发此属性对应的函数,通过event.nativeEvent.data获取接收到的数据,实现网页和RN之间的数据传递。injectJavaScript:函数接受一个字符串,该字符串将传递给WebView,并立即执行为JavaScript。
二、WebView 使用样例
2.1 通过 url 地址加载网页
import React, {Component} from 'react';
import {
    AppRegistry,
    StyleSheet,
    Dimensions,
    Text,
    View,
    WebView
} from 'react-native';

//获取设备的宽度和高度
var {
    height: deviceHeight,
    width: deviceWidth
} = Dimensions.get('window');

//默认应用的容器组件
class App extends Component {
    //渲染
    render() {
        return (
            <View style={styles.container}>
              <WebView bounces={false}
                scalesPageToFit={true}
                source={{uri:"https://shq5785.blog.csdn.net/",method: 'GET'}}
                style={{width:deviceWidth, height:deviceHeight}}>
              </WebView>
            </View>
        );
    }
}

//样式定义
const styles = StyleSheet.create({
    container: {
        flex: 1,
        paddingTop:20
    }
});

AppRegistry.registerComponent('HelloWorld', () => App);
2.2 加载 html 代码
import React, {Component} from 'react';
import {
    AppRegistry,
    StyleSheet,
    Dimensions,
    Text,
    View,
    WebView
} from 'react-native';

//获取设备的宽度和高度
var {
    height: deviceHeight,
    width: deviceWidth
} = Dimensions.get('window');

//默认应用的容器组件
class App extends Component {
  //渲染
  render() {
   return (
       <View style={styles.container}>
         <WebView bounces={false}
           scalesPageToFit={true}
           source={{html:"<h1 style='color:#ff0000'>欢迎访问 https://shq5785.blog.csdn.net/</h1>"}}
           style={{width:deviceWidth, height:deviceHeight}}>
         </WebView>
       </View>
   );
  }
}

//样式定义
const styles = StyleSheet.create({
  container: {
      flex: 1,
      paddingTop:20
  }
});

AppRegistry.registerComponent('HelloWorld', () => App);
2.3 RN -> HTML5 通信
当WebView加载html时,可实现html和rn之间的通信。rn向html发送数据可以通过postMessage函数实现。如下:
RN
 <WebView
    ref={(view) => (this.webView = view)}
    useWebKit={false}
    onLoad={() => {
      let data = {
        name: userInfo.usrName
      };
      this.webView.postMessage(JSON.stringify(data));
    }}
    onError={(event) => {
      console.log(`==webViewError:${JSON.stringify(event.nativeEvent)}`);
    }}
    onMessage={(event) => {
      this.\_onH5Message(event);
    }}
    automaticallyAdjustContentInsets={false}
    contentInset={{ top: 0, left: 0, bottom: -1, right: 0 }}
    onScroll={(event) => this.\_onScroll(event)}
    style={styles.webview}
    source={this.html ? { html: this.html } : { uri: this.url }}
    bounces={false}
    showsHorizontalScrollIndicator={false}
    showsVerticalScrollIndicator={false}
  />
html
// 在html中注册事件接收rn发过来的数据并显示在html中
document.addEventListener('message', function listener(RnData) {
  messagesReceivedFromReactNative += 1;
  document.getElementsByTagName('p')[0].innerHTML =
    '从React Native接收的消息: ' + messagesReceivedFromReactNative;
  document.getElementsByTagName('p')[1].innerHTML = RnData.data;
  // 获取接收后的数据后,及时清除监听器
  document.removeEventListener('message', listener)
});
在html中定义一个按钮,并添加事件向rn发送数据:
//window.postMessage向rn发送数据
document.getElementsByTagName('button')[0].addEventListener('click', function() {
  window.postMessage('这是html发送到RN的消息');
});
当html中调用了window.postMessage函数后,WebView的onMessage函数将会被回调,用来处理html向rn发送的数据,可以通过e.nativeEvent.data获取发送过来的数据。
// 接收HTML发出的数据
_onH5Message = (e) => {
  this.setState({
      messagesReceivedFromWebView: this.state.messagesReceivedFromWebView + 1,
      message: e.nativeEvent.data,
  })
  Alert.alert(e.nativeEvent.data)
}
2.4 HTML5(Vue) -> RN 通信
HTML5
const message = {
 flag: 'previewIamge'
 filePath: filePath
}
window.ReactNativeWebView.postMessage(Json.stringify(message))
RN
还是通过WebView提供的onMessage 属性完成回调。
 <WebView
    ref={(view) => (this.webView = view)}
    useWebKit={false}
    onLoad={() => {
      let data = {
        name: userInfo.usrName
      };
      this.webView.postMessage(JSON.stringify(data));
    }}
    onError={(event) => {
      console.log(`==webViewError:${JSON.stringify(event.nativeEvent)}`);
    }}
    onMessage={(event) => {
      this.\_onH5Message(event);
    }}
    automaticallyAdjustContentInsets={false}
    contentInset={{ top: 0, left: 0, bottom: -1, right: 0 }}
    onScroll={(event) => this.\_onScroll(event)}
    style={styles.webview}
    source={this.html ? { html: this.html } : { uri: this.url }}
    bounces={false}
    showsHorizontalScrollIndicator={false}
    showsVerticalScrollIndicator={false}
  />
回调函数_onH5Message()实现逻辑如下:
结尾
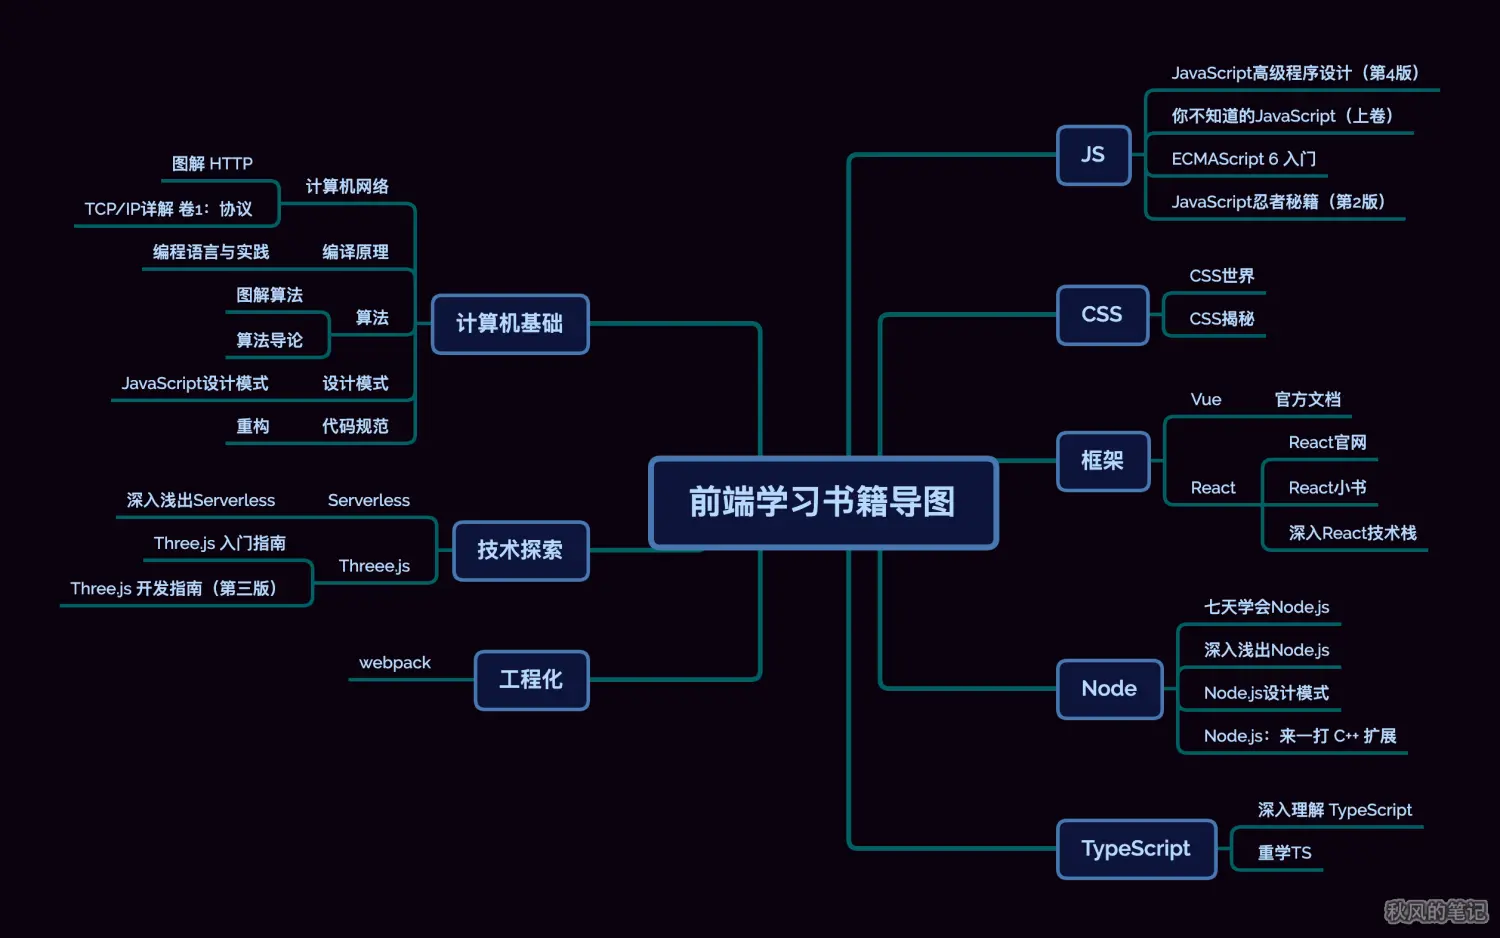
正式学习前端大概 3 年多了,很早就想整理这个书单了,因为常常会有朋友问,前端该如何学习,学习前端该看哪些书,我就讲讲我学习的道路中看的一些书,虽然整理的书不多,但是每一本都是那种看一本就秒不绝口的感觉。
以下大部分是我看过的,或者说身边的人推荐的书籍,每一本我都有些相关的推荐语,如果你有看到更好的书欢迎推荐呀。
开源分享:【大厂前端面试题解析+核心总结学习笔记+真实项目实战+最新讲解视频】
结尾
正式学习前端大概 3 年多了,很早就想整理这个书单了,因为常常会有朋友问,前端该如何学习,学习前端该看哪些书,我就讲讲我学习的道路中看的一些书,虽然整理的书不多,但是每一本都是那种看一本就秒不绝口的感觉。
以下大部分是我看过的,或者说身边的人推荐的书籍,每一本我都有些相关的推荐语,如果你有看到更好的书欢迎推荐呀。
开源分享:【大厂前端面试题解析+核心总结学习笔记+真实项目实战+最新讲解视频】

开源鸿蒙跨平台开发社区汇聚开发者与厂商,共建“一次开发,多端部署”的开源生态,致力于降低跨端开发门槛,推动万物智联创新。
更多推荐
 5
5 0
0- 0


 已为社区贡献1条内容

所有评论(0)